Welcome! At Blogspot Blogger Guide we show you the easy way to customize your Blogger Blog and offer tips, tricks and fixes to take the technical headache out of blogging.

Showing posts with label Blogger Widgets. Show all posts

Sunday, March 27, 2022

Add a Widget or Gadget Above a Blog Post in Blogger

If you want to add a gadget or widget to Blogspot that displays above the blog posts then read on as in today's Blogger tutorial I explain how to open up the main posts section of a Blogger blog so that more gadgets can be added. Despite involving a small change to the Blogger theme it is not difficult and will only involve less than 5 minutes to unlock the main section so you can begin adding gadgets and widgets to Blogger in the Main Section.
Add a Widget or Gadget Above a Blog Post in Blogger - Blogspot Tutorial that teaches you how to open main section to add more gadgets if it is locked

By default Blogger themes on installation do not have the main section open to allow additional gadgets or widgets like a message or a banner to be added. Older default blogger templates have the main section locked in most cases. Therefore, in order to add gadgets the main section needs to be opened manually by tweaking the template. Whether you have a default Blogger theme or a third-party template unlocking the main section will not affect any other function.
Older blogger templates often have the main section locked so that no gadgets can be added but it can be unlocked to add gadgets and widgets

Follow this step-by-step tutorial if you want to start adding gadgets in the Blogger posts area like a banner or a welcome message or some other widget. I suggest you also take a look at my other in-related step-by-step Blogger tutorials that show you how to do the following:


How to Add a Gadget to the Main Posts Section in Blogger


In order to add a gadget or widget like a banner above blog posts in Blogger so that it displays on the homepage and all other blog pages it must first be possible to add a gadget to the main post area.

Check if the Add a Gadget Option in the Main Blogger Posts Section is Displayed


Check whether the Add a Gadget option is available by:

  1. From the Dashboard select the Layout menu from the left-hand side menu

  2. Scroll down to the Main Section where you will see the Blog Posts gadget in place

  3. Check whether the Add a Gadget option is available in the main section.


  4. If the Add a Gadget option is available you can skip
    to Step 12

    or

    If the Add a Gadget option is not available it needs to be unlocked by following the steps below that will first show you how to open the main section and then add the a gadget for affiliate banners, messages and more.


    Steps to Open the Main Posts Section in Blogger to Add Extra Gadgets


  5. From the Dashboard select Theme from the menu on the left-hand side

  6. Click on the down arrow on the orange Customize button

  7. Click Backup to back up your template before proceeding then return to the drop down menu under the customize arrow


  8. Choose Edit HTML from the drop down list of options

  9. Click anywhere in the Blogger template

  10. Enter CTRL + F to bring up the search box

  11. Enter the search term class='main'

    You are looking for these lines:

    <div id='main-wrapper'>
    <b:section class='main' id='main' showaddelement='no'>

  12. Replace the no with yes to show add element and save.

    The code should now look like this:
    <div id='main-wrapper'>
    <b:section class='main' id='main' showaddelement='yes'>

  13. Click Save to save the change to your template.

  14. Navigate back to the Layout menu from the Dashboard

  15. You will now be see the Add a Gadget link in the main blog post section. If for some reason this still isn't showing up then go back to the template and check if there is a maxwidgets attribute in the same line of code. Make sure that the maxwidgets="1" is set a number greater than one eg maxwidgets="2" and then save and go back to Layout again.


  16. Steps to Add a Gadget Above a Blog Post in Blogger


  17. To display your message or banner or other widget click on Add a Gadget above Blog Posts

  18. Choose the HTML/Javascript gadget or you could choose Text Gadget if no code is being added

  19. Paste the code in the content box in the pop up window that appears for the HTML / Javascript gadget.

  20. Add a Widget or Gadget Above a Blog Post in Blogger by going to the Main Section and creating a new HTML Javascript widget or Text Gadget and placing it first above blog posts gadget

  21. Click on Save

  22. Arrange your new gadget in the Main Section by dragging and dropping so that it occurs above the blog posts gadget in the Main Section

  23. Click on Preview (eye icon) in the bottom right corner to see your new banner.

  24. Click the Save button to apply your changes to the layout

Depending on the gadget you want to add above the blog posts you may find the following Blogger tutorials helpful:

Today I have shown you how to open up the main posts area in Blogger to accommodate extra gadgets. You have learned how to add an affiliate marketing banner to your Blogger blog (Blogspot blog) that displays just above the posts on every page.


Related Articles

How to Add a Welcome Message to Blogger
How to Add a Sticky Welcome Message to Blogger
Easy Way to Add Banners to Blogger

Friday, May 29, 2020

How to Delete Locked Blogger Widgets and Fix Blogger Widgets Not Showing

If you are having difficulty with a locked widget in Blogger or you can't add a gadget in a section of Blogger then read on because I will show you how to open up a section so you can add a Blogger gadget, make the widget editable again or delete the Blogger widget depending on your needs.

Sometimes widgets in Blogger become locked.  This means the Blogger widget appears on your live blog but does not show up in the Layout menu and there is no way to edit or delete the widget.  Older blogs typically encounter locked widget problems.  Also Blogger can lock widgets with a change of template.

Want to Know How to Remove Locked Widgets in a Blogger Blog
Want to Know How to
Remove Locked Widgets in a Blogger Blog

How to Fix a Locked Widget So That it Can Be Edited in the Layout Menu

The following steps will unlock a widget that has become locked in a Blogger blog.

Step 1
Log in to your Blogger blog

Step 2
Click View Blog and locate the general area of the widget you want to change. Is it in the sidebar, footer, the header or just under the header?

Step 3.
Select Layout from the  left-hand menu

Step 4.
Look for the widget.  All editable widgets are denoted by four dots on the left-hand side. Check it isn't hiding in another area on the layout menu  eg in the Cross-Column rather than the Header.

If you find it go ahead and click on edit to make changes as usual.

If you don't find it and you are sure it is not displayed then continue with the following steps to manually unlock the missing Blogger widget.

Step 5.

Click on Theme from the left-hand menu

How to Remove Locked Widgets in a Blogger Blog use EDIT HTML


Click on Backup / Restore (right-hand top corner) and then download to back up your blog

Step 6.
From the Theme main page choose EDIT HTML button found below the view of Live on Blog

Step 7.
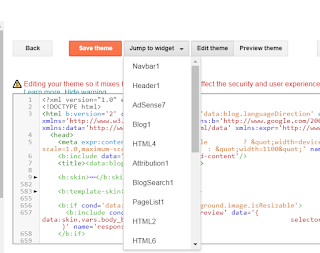
In the drop down menu labelled Jump to Widget click on the widget you are looking for.

In this example the missing widget is called Adsense1 and is locked in the Cross Column area of the Blogger Theme (not editable from the Layout menu).

To fix the problem jump to the widget Adsense1. In cases where the exact name of the widget isn't known just jump to the nearest area eg Header1 and scroll downwards to find it.

How to Remove Locked Widgets in a Blogger Blog - Go to Jump to Widget in Theme Edit HTML
Use the Jump to Widget to Locate the Locked up Widget
in Blogger Theme Edit HTML


Find the cross column area of the template around line 862 and the following code or very similiar.

<b section class='table' id='crosscol' maxwidgets='1' showaddelement='no'>
<widget id='Adsense1' locked='false' title=' ' type='Adsense'>...</b:widget>


How To Unlock Blogger Widget with Blogger Widget Code so that it can be edited in the Layout Menu

Open up the section so more widgets can be added by changing the maxwidgets to 2 and the showaddelement to yes. Go ahead and save the theme. Now navigate back to the Layout menu and you will find that the add gadget button is now available in the Cross Column section of the Blogger template and the locked Adsense widget is now editable.

How to Remove Locked Widgets in a Blogger Blog Layout Menu with Add a Gadget Fixed
Cross Column Section in Layout Menu Can Now Add a Gadget


How To Disable / Delete / Remove the Blogger Widget HTML Code Completely

While the name of the widget will vary depending on your situation the code between the widget tags will be similiar. You will note that the ...</b:widget> denotes that the widget is expandable and more code is hidden. In this case the quick pencil and all the color scheme for the Adsense unit is hidden.

<widget id='Adsense1' locked='false' title=' ' type='Adsense'>...</b:widget>

If you choose to delete the widget from the template take care to delete only the widget code for the widget. I like to expand the widget by clicking on the dots first before trying to delete it.

Once deleted and the changes to the theme saved go to view blog and you will see that the Blogger widget has been removed from your blog for good.


If you found this article helpful in some way feel free to leave a comment. If you would like to get more tips and tricks to customize Blogger consider following me.


Related Articles

Basic Blogger Tutorials to Customize a Blogger Blog for Beginners
How to Delete a Blogger Blog
How to Change Color of the Navbar or Delete it Altogether
How to Delete or Hide the Date Header in Blog Posts on Blogger
How to Remove or Hide the Labels Counter in Blogger