Welcome! At Blogspot Blogger Guide we show you the easy way to customize your Blogger Blog and offer tips, tricks and fixes to take the technical headache out of blogging.

Showing posts with label Widgets. Show all posts

Sunday, March 27, 2022

Add a Widget or Gadget Above a Blog Post in Blogger

If you want to add a gadget or widget to Blogspot that displays above the blog posts then read on as in today's Blogger tutorial I explain how to open up the main posts section of a Blogger blog so that more gadgets can be added. Despite involving a small change to the Blogger theme it is not difficult and will only involve less than 5 minutes to unlock the main section so you can begin adding gadgets and widgets to Blogger in the Main Section.
Add a Widget or Gadget Above a Blog Post in Blogger - Blogspot Tutorial that teaches you how to open main section to add more gadgets if it is locked

By default Blogger themes on installation do not have the main section open to allow additional gadgets or widgets like a message or a banner to be added. Older default blogger templates have the main section locked in most cases. Therefore, in order to add gadgets the main section needs to be opened manually by tweaking the template. Whether you have a default Blogger theme or a third-party template unlocking the main section will not affect any other function.
Older blogger templates often have the main section locked so that no gadgets can be added but it can be unlocked to add gadgets and widgets

Follow this step-by-step tutorial if you want to start adding gadgets in the Blogger posts area like a banner or a welcome message or some other widget. I suggest you also take a look at my other in-related step-by-step Blogger tutorials that show you how to do the following:


How to Add a Gadget to the Main Posts Section in Blogger


In order to add a gadget or widget like a banner above blog posts in Blogger so that it displays on the homepage and all other blog pages it must first be possible to add a gadget to the main post area.

Check if the Add a Gadget Option in the Main Blogger Posts Section is Displayed


Check whether the Add a Gadget option is available by:

  1. From the Dashboard select the Layout menu from the left-hand side menu

  2. Scroll down to the Main Section where you will see the Blog Posts gadget in place

  3. Check whether the Add a Gadget option is available in the main section.


  4. If the Add a Gadget option is available you can skip
    to Step 12

    or

    If the Add a Gadget option is not available it needs to be unlocked by following the steps below that will first show you how to open the main section and then add the a gadget for affiliate banners, messages and more.


    Steps to Open the Main Posts Section in Blogger to Add Extra Gadgets


  5. From the Dashboard select Theme from the menu on the left-hand side

  6. Click on the down arrow on the orange Customize button

  7. Click Backup to back up your template before proceeding then return to the drop down menu under the customize arrow


  8. Choose Edit HTML from the drop down list of options

  9. Click anywhere in the Blogger template

  10. Enter CTRL + F to bring up the search box

  11. Enter the search term class='main'

    You are looking for these lines:

    <div id='main-wrapper'>
    <b:section class='main' id='main' showaddelement='no'>

  12. Replace the no with yes to show add element and save.

    The code should now look like this:
    <div id='main-wrapper'>
    <b:section class='main' id='main' showaddelement='yes'>

  13. Click Save to save the change to your template.

  14. Navigate back to the Layout menu from the Dashboard

  15. You will now be see the Add a Gadget link in the main blog post section. If for some reason this still isn't showing up then go back to the template and check if there is a maxwidgets attribute in the same line of code. Make sure that the maxwidgets="1" is set a number greater than one eg maxwidgets="2" and then save and go back to Layout again.


  16. Steps to Add a Gadget Above a Blog Post in Blogger


  17. To display your message or banner or other widget click on Add a Gadget above Blog Posts

  18. Choose the HTML/Javascript gadget or you could choose Text Gadget if no code is being added

  19. Paste the code in the content box in the pop up window that appears for the HTML / Javascript gadget.

  20. Add a Widget or Gadget Above a Blog Post in Blogger by going to the Main Section and creating a new HTML Javascript widget or Text Gadget and placing it first above blog posts gadget

  21. Click on Save

  22. Arrange your new gadget in the Main Section by dragging and dropping so that it occurs above the blog posts gadget in the Main Section

  23. Click on Preview (eye icon) in the bottom right corner to see your new banner.

  24. Click the Save button to apply your changes to the layout

Depending on the gadget you want to add above the blog posts you may find the following Blogger tutorials helpful:

Today I have shown you how to open up the main posts area in Blogger to accommodate extra gadgets. You have learned how to add an affiliate marketing banner to your Blogger blog (Blogspot blog) that displays just above the posts on every page.


Related Articles

How to Add a Welcome Message to Blogger
How to Add a Sticky Welcome Message to Blogger
Easy Way to Add Banners to Blogger

Monday, March 7, 2022

How to Change the Color of the Blogger Navbar Menu

This Blogspot tutorial shows you how to change the color of the Blogger Navbar which appears above the header in older Blogger themes when enabled. Changing the color of the Blogger Navbar so that it matches the color scheme of your Blogger blog takes less than a minute and is an easy trick that requires no change to the Blogger code as all changes are done in the Navbar Gadget. Updated April 2022

To go straight to the step-by-step tutorial on how to change the color of the Navbar or read on for details about the Navbar and its purpose.
How to Change the Color of the Blogger Navbar or Delete It 2022

What is the Blogger Navbar?

The Blogger Navbar is the colored or sometimes transparent search bar menu that appears by default at the top of older Blogger themes above the header. The Navbar provides quick navigation links that make it easy to jump to the Blogger Dashboard, start a new post, access Theme Designer or share a page directly from your live blog.

Example of an Active Blogger Navbar Read On to Learn how to Change the Color
Blogger Navbar Example

Currently Blogger offers the choice of 6 different Blogger Navbar colors: blue, tan, black, silver, transparent light and transparent dark. Transparent light and transparent dark are the most recent additions. It is uncertain how likely it is that Blogger will continue to offer more color options for the Navbar in the future as Google has announced that it will not be developing the Blogger platform anymore.

How to Change the Color of Blogger Navbar - The Blogger Navbar offers a choice of 6 Colors that can be selected in the Navbar Gadget
The Blogger Navbar Gadget Can be Customized to 6 Different Colors
along with the option to turn it off


Which Blogger Themes Have a Navbar Enabled?

Historically Blogger had the Navbar enabled by default on all blogs however these days the Navbar only displays at the top of a blog on some of the older themes like Simple, Picture Window and Awesome Inc. If you are using a newer theme or have a third party theme it will not show up automatically and would need to be enabled. If you want to know more about how to turn on the Navbar keep reading as this Blogger tutorial covers this too.

If you would like to learn how to remove the Blogger Navbar to stop it showing up I touch on this in this tutorial but for more in-depth coverage of the topic I discuss several methods in my Blogger Tutorial on How to Remove or Disable the Blogger Navbar


How To Change the Color of the Navbar / Search Bar / Menu Bar on Blogger

Below is a step-by-step walkthrough of how to change the color of the menu bar above the header in Blogger.
  1. Sign in to Blogger and select the blog you wish to change

  2. From the Blogger Dashboard go to Layout Menu

  3. Find the Navbar section in Layout typically found at the top in the Blogger Layout Designer.

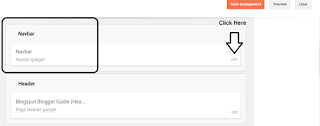
  4. Click the Edit link which appears on the right side of the Navbar Gadget.


  5. Click on the Edit Link to Open the Navbar Gadget in the Layout Page of Blogger to Change the Color of the Navbar
    Click on the Edit Link to Open the Navbar Gadget
    in the Layout Page of Blogger


    Edit Blogger Navbar - Former Blogger Navbar Layout Circa 2009  Showing Position of the Edit Button
    Former Blogger Navbar Layout Circa 2009
    Showing Position of the Edit Button


  6. Select the color of your choice by clicking on the radio button on the left side of each color in the pop up Navbar Configuration window that appears.

    If you want to turn off the Navbar altogether click on the off radio button found at the bottom of the menu of choices in the Navbar configuration window.

    Turn Blogger Navbar Off By Clicking on the Radio Button at the Bottom of the Navbar Configuration Pop-up Window
    Turn Blogger Navbar Off By Clicking on the Radio Button
    at the Bottom of the Navbar Configuration Pop-up Window


  7. Once you have made your selection click on the Save Button to save your changes

  8. Click View Blog to see the effect of changing the color of the Blogger Navbar to more closely match the design and style of your blog.

    Or if you have turned the Blogger Navbar off you will see that the Navbar has disappeared from the top of your blog.

Summary

In today's Blogger Tutorial I have discussed what the Blogger Navbar is, its uses and what Blogger themes have it by default. I have shown you how to change the color of the Blogger Navbar on your blog via the Navbar Gadget to one of six custom choices so that it matches the color and design of your blog.


Related Links

How to Remove or Hide the Blogger Navbar with HTML
How to Change Image Sizes in a Blogger Blogspot Blog
How to Change Image Sizes in Own custom Dimensions in a Blogger Post
How to Add a Print Friendly Button to Blogger
How to Change the Date of Blog Posts in Blogger
How to Remove Blogger Labels Counter
Add a Follow Me Twitter Icon Button to Blogger
Easy Ways to Put Banners on Blogger
How to Add a Welcome Message to Blogger Homepage
How to Unlock or Delete Locked Widgets in Blogger


Monday, June 1, 2020

How to Add a Sticky Welcome Message Post to Blogger Blog

How to add a sticky welcome message post to the Blogger homepage is a question that is often asked by beginner bloggers keen to make their blog more welcoming and attractive to visitors. By adding a welcome message above your blog posts readers landing on your blog will immediately be greeted by the welcome message. Adding a sticky welcome message is a simple addition to Blogger and it only takes a few minutes to create a nice friendly welcome message that sends clear welcome wishes to your blog visitors.
How to Add a Sticky Welcome Message to a Blogger Blog that offers welcome wishes to visitors

In this Blogger tutorial you will learn how to add a sticky welcome message to the main section in Blogger above the blog posts as seen in the image below. We have chosen to put the message above the post area because it is a placement that is very central for your readers to see your greeting when they land on your homepage. If you are interested in other placements like the sidebar or below the header then check out my detailed instructions on the other placement options for welcome messages on your Blogger blog in my companion article how to add a welcome message to a Blogger homepage.
How to Add a Sticky Welcome Message to Blogger Blog placed above the blog posts in the main section of Blogger - Example of a Welcome Message on blogger with customized colors and borders

Why Add a Sticky Welcome Message to Blogger

A sticky welcome message placed above your posts on the Blogger homepage will immediately grab your readers attention. You will engage your readers and if it hits the right note can promote trustworthiness in your blog and your content.

Blogger makes it easy to insert a text box above the posts and customize it to the look and color scheme of your blog using the Rich Text Editor. You can even add further advanced styling to your sticky welcome message using HTML code.  If you want to add third party scripts or videos just swap the text gadget for a HTML/Javascript gadget.

You can choose to place your welcome message only on the homepage or have your message display on every blog page. I have included instructions on how to show the welcome message on the homepage only.

How to Add a Sticky Welcome Post to Blogger Blog - Craft a Good Message to Engage the Visitor
Craft a Good Sticky Welcome Message Post to a Blogger Blog
to Engage the Visitor


Points to Consider When Adding a Sticky Welcome Message to Blogger 

Before you go ahead and create your sticky welcome message think about what you are going to say to attract a readership.  What value will your blog provide to a potential follower?  Are you informing or entertaining your readership?  Remember you are more likely to impress a visitor if they can easily identify how you can help them and what value to their lives your blog is going to provide them with.

It may be tempting to add your welcome message in the header instead of a blog description but I would advise against this. The blog description has an SEO benefit and needs to contain at least one of your keywords. It is far better to create that personal touch by generating your blog's welcome message using a Blogger text gadget and leave the blog description as a tagline that describes the purpose of your blog. For more on how to add a blog description to Blogger and why it is important to do so please visit my companion post.

Steps to Add a Sticky Welcome Message Above the Posts in a Blogger Blog

The following steps will help you put a sticky welcome message above the posts on all pages of your blog. If you only want it to appear on the homepage and not every post page then see below for instructions on how to display the message only on the homepage.

  1. Login to your Blogger account at Blogger.com

  2. From the Blogger Dashboard click on Layout from the menu on the left-hand side

  3. Click on the Add a Gadget link in the Main Posts section or Post Body section (called different names depending on what theme you are using)

    Note if there is no Add a Gadget link in the Main Posts section you may need to open up the section depending on your Blogger theme. I suggest you try adding the gadget to the sidebar first and then dragging it into the Main Posts area afterwards. If this doesn't work then please refer to my detailed step-by-step guide to Adding a Widget or Gadget Above a Blog Post in Blogger in which I show you how to open main section to add more gadgets.

  4. Select the Text gadget from the pop-up menu. You could also choose to use a html/javascript widget instead if you want to add third party scripts to your message.


  5. Use the Text Gadget to Add a Welcome Message Sticky to the Top   of the Main Post Section on the Blogger Homepage
    Use the Text Gadget to Add a Welcome Message Sticky to the Top
    of the Main Post Section on the Blogger Homepage


  6. Click on the plus+ icon at the right of the Text gadget to create your sticky welcome message.

  7. Give the gadget a name like welcome message to make it easy to identify later.

  8. Use the Rich Text Editor icons to add some simple styling to your sticky welcome message. Use Edit HTML if you need to add advanced styling. Check out my other posts for more on how to add advanced styling to Blogger.

  9. Use the Text Box Gadget to Craft Your   Sticky Welcome Post Message in Blogger
    Use the Text Box Gadget to Craft Your
    Sticky Welcome Post Message in Blogger


  10. Click Save to save your welcome message gadget.

  11. Click on Preview icon at the bottom right-hand corner to view your sticky welcome message.

  12. Once you are satisfied with your sticky welcome message drag it above the blog posts if it is not already there. Or if you created it first in the sidebar then drag the gadget over to the main section and position it above the blog posts gadget.

  13. Drag and Drop the Text Widget Sticky Welcome Message into the  Main Section Above Blog Posts in Blogger Layout
    Drag and Drop the Text Widget into the
    Main Section Above Blog Posts in Blogger Layout


  14. Click Save Arrangement once you are satisfied with the positioning of your Blogger welcome message by clickingon the save icon in the bottom right-hand corner.


  15. Click View Blog in the Dashboard and admire your new welcome message that is greeting your blog visitors.


How to Display a Welcome Message Only on the Homepage of Blogger

If you like the idea of a welcome message but would prefer to have it show only on the homepage rather than all pages it will require a manual edit of your Blogger template. Follow these steps to set the text gadget to only show up on the main page:

  1. Login to your Blogger if not already logged in

  2. Check the name of the welcome message gadget

  3. Return to the Dashboard and Choose Theme

  4. Click the down arrow denoted by the triangle next to the orange Customize button

  5. Choose Back up your theme to download your template in case

  6. Choose Edit HTML

  7. Click on the Jump to Widget icon in the top left corner of the editor

  8. From the drop down menu of widgets click on the gadget you created for your welcome message eg Text1

  9. The code that you jump to will look similar to this:


    <b:section class='main' id='main' name='Main' showaddelement='yes'>
    <b:widget id='Text1' locked='false' title='' type='Text' version='1'>
    <b:widget-settings>
    <b:widget-setting name='content'><![CDATA[<p style="background: #ffffff; border: double;">Welcome! At <span style="font-weight: bold;">Blogspot Blogger Guide</span> we show you the easy way.</p>]]></b:widget-setting>
    </b:widget-settings>
    <b:includable id='main'>
    <!-- only display title if it's non-empty -->
    <b:if cond='data:title != &quot;&quot;'>
    <h2 class='title'><data:title/></h2>
    </b:if>
    <div class='widget-content'>
    <data:content/>
    </div> <b:include name='quickedit'/>
    </b:if>
    </b:includable>
    </b:widget>


  10. Add the following line of code immediately after <b:includable id='main'> which adds an if statement saying homepage only:

    <b:if cond='data:blog.url == data:blog.homepageUrl'>


  11. Add the following line of code immediately before </b:includable>
    to close the if statement

    </b:if>


  12. The following shows the code with the if statement added and is highlighted in blue:
    <b:section class='main' id='main' name='Main' showaddelement='yes'>
    <b:widget id='Text1' locked='false' title='' type='Text' version='1'>
    <b:widget-settings>
    <b:widget-setting name='content'><![CDATA[<p style="background: #ffffff; border: double;">Welcome! At <span style="font-weight: bold;">Blogspot Blogger Guide</span> we show you the easy way.</p>]]></b:widget-setting>
    </b:widget-settings>
    <b:includable id='main'>
    <b:if cond='data:blog.url == data:blog.homepageUrl'>
    <!-- only display title if it's non-empty -->
    <b:if cond='data:title != &quot;&quot;'>
    <h2 class='title'><data:title/></h2>
    </b:if>
    <div class='widget-content'>
    <data:content/>
    </div> <b:include name='quickedit'/>
    </b:if>
    </b:includable>
    </b:widget>

  13. Click the Save icon from the row of buttons in the top right-hand corner

  14. You will be returned to the Dashboard. Click View Blog from the menu and navigate to several post pages to check that your welcome message is now only showing on the homepage rather than every page.


In today's Blogger tutorial I have shown you how to put a welcome message on your Blogger blog that extends welcome wishes to your blog visitors. The welcome message acts in the same way as a sticky note and always appears above your blog posts in the main section of your blog. A welcome message similar to the example can be added with a text gadget and can be customized and styled to suit any Blogger blog.


Related Articles

Basic Blogger Tutorials to Customize a Blogger Blog
Advanced Blogger Tutorials to Customize a Blogger Blog
How to Add a Welcome Message to a Blogger  Homepage
How to Change the Color of the Blogger Nav Bar
How to Put a Twitter Follow Icon on Blogger Next to Post Title
How to Add a Blog Description to the Blogger Page Header


Sunday, May 31, 2020

How to Add a Blog Welcome Message to a Blogger Homepage

A blog welcome message is a great way to greet your visitors when they arrive on your Blogger blog. By adding a blog welcome message you will immediately engage your readers and they will get more information about what your blog is about. In this Blogger tutorial I not only show you how to add a welcome message to the homepage of a Blogger blog, but I also discuss what to say and where to place your welcome message on your blog.

Fortunately adding a blog welcome message to your Blogger homepage is easy to do with the text gadget and you can customize the look of the text, links, video and more.
How to Add a Blog Welcome Message to a Blogger Homepage - Blogger Tutorial for Beginners

What to Say in a Blogger Blog Welcome Message

A welcome message that greets visitors as they arrive on your blog can be placed on a Blogger blog with the intention of letting readers know more about your blog than they can glean from looking at your blog title and blog description. A welcome message typically says something about the purpose of your blog, may include something about you, what you do, what makes your content different and most importantly how you can help them solve a problem.

Your blog welcome message is an opportunity to engage your visitors so it is important to think about the flavor of the message you want to convey. For instance do you want to promote friendliness or trustworthiness, or both? Perhaps you want to include a message that promotes you as an authority on a subject so for example you might say I have 10 years industry experience in blogging or something like that to evidence your knowledge of the niche topic of your blog.

Take a look at this example of a simple Blog Welcome Message below that sets the tone for the visitor experience. The object is to encourage repeat visits and to let the visitor know you are there to help:
Welcome! Thanks for stopping by. This blog provides information on blogging and resources to customize your blog. I look forward to helping you create a successful blog. Please consider following me so you don't miss out on any new posts.

If you are interested in learning more about crafting a welcome message for your Blogger blog watch out for my upcoming blog post in which I give more examples of welcome messages and what to say to engage visitors.


Where to Position a Welcome Message on the Blogger Homepage Guide

Before we discuss how to add a blog welcome message it is a good idea to consider placement of your welcome message. There are three primary spots to place a welcome message: just below the header, above the post area or at the top of the sidebar.

Below the Header
A well crafted blog welcome message just below the header can be a good way to draw the eye to the hotspot below the header. If you have a banner or an Adsense unit there already you will need to be sure that the welcome message adds visual appeal and does not conflict with existing Adsense units or banners.

In the Sidebar
At the top of sidebar can also be a great place for your Blogger welcome message. If eye catching, the blog welcome message will grab a reader's attention in that spot.  Further a welcome message there is less likely to conflict with other widgets like banners or Adsense units.

Above the Post Area
Another option is to put a blog welcome message often called a sticky message above the posts in the main post section of Blogger. The benefits of this position for a blog welcome message is that it will not detract from any other widgets in place and will always display whenever a visitor lands on your Blogger homepage.

For detailed instructions on how to add a welcome message above blog posts in Blogger check out my companion article: How to Add a Sticky Welcome Message to Blogger

3 Options for Best Position of a Welcome Message on the Blogger Homepage


Steps to Add a Welcome Message to the Sidebar of a Blogger Homepage Guide

Follow the steps outlined below to quickly and easily add a welcome message to the sidebar of a Blogspot blog that greets your visitors no matter what page they land on. If you would prefer to place your message above the header or :

Step 1
Login to your Blogger account at Blogger.com

Step 2
From the Blogger Dashboard click on Layout from the menu on the left-hand side

Step 3
Find the Sidebar section. Click on the Add a Gadget link

Step 4
From the pop-up menu scroll down to select the Text gadget.  If you want a sophisticated welcome message that includes video and third-party scripts then choose the html/javascript widget instead from the same menu.

Steps to Add a blog Welcome Message to a Blogger Homepage using the Text Gadget
Add a Blog Welcome Message to a Blogger Homepage
sing the Text Gadget


Step 5
Click on the plus+ icon at the right of the Text gadget to create your welcome message.

Step 6
Enter a title for your message in the pop up window that appears. Name the gadget something meaningful like welcome message so you will be able to easily identify it later.

Step 7
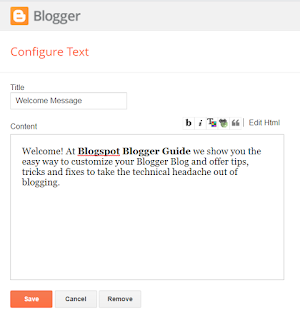
Add the text of your Blogger welcome message into the text box. See an example of a welcome message in the image below for ideas. Using the Rich Text Editor icons you can add some simple styling by changing the text color, adding blockquotes, bold and italics. For more sophisticated styling click on the Edit HTML button which allows you to add specific HTML style code around your text. If you are not sure how to add HTML styling to your welcome message check out my other post on adding styling to a Blogger welcome message.

How to Use the Text Gadget to Create a Blog Welcome Message on the Homepage of a Blogspot Blog - Example Welcome Message
Use the Text Box Gadget to Create a Blog Welcome Message in Blogger


Step 8
Click Save to save your welcome message gadget.

Step 9
Click on Preview (bottom right-hand corner eye icon) to view your welcome message.

Step 10
Once you are happy with the message you can move on to repositioning it the sidebar. Use drag and drop to arrange the welcome message alongside other gadgets in the sidebar.

Step 10
Click Save by clicking on the save button bottom right-hand corner once you are satisfied with the positioning of your Blogger welcome message in the sidebar.


In this Blogger tutorial you have learned how to add a blog welcome message to Blogger. Also discussed were examples of what to say in a welcome message and where to place your message for best effect. Please feel free to comment about adding a blog welcome message if you would like to.


Related Articles

Basic Blogger Tutorials to Customize a Blogger Blog for Beginners
Advanced Blogger Tutorials to Customize a Blogger Blog
How to Add a Sticky Message Above Blogger Posts
How to Schedule Blog Posts in Blogger for a Specific Future Date and Time
How to Add a Copyright Notice to a Blogger Blog
How to Delete a Blogger Blog


Tuesday, October 6, 2009

Remove Blogger Labels Counter or Turn On Counter in a Blogspot Blog

Until recently the only way to turn off, disable or remove the counter of the labels widget in Blogger was to use a Blogger hack. Luckily Blogger has now added a new feature so that Blogspot bloggers have a choice about whether to show or not show a post count next to the corresponding tag when using the Blogger labels widget. (Updated as at 18 February 2022)
How to Turn On or Turn Off Blogger Labels Counter in a Blogspot Blog

How to Turn Off  / Remove / Delete the Blogger Labels Counter?

If you already have a Blogger labels widget installed and you are using an older template then Blogger shows a count of the number of posts with that label or tag next to each label by default. If you want to turn off the label counter you will need to disable it.

Removing the Blogger labels counter is easy and only takes a minute. Switching off the labels counter can be useful sometimes for instance when establishing a new blog where a limited number of posts may deter visitors. Fortunately Blogger has listened to users and now installs a new blog with the Labels Counter turned off.
How to Remove Blogger Labels Counter or Turn On Counter in a Blogspot Blog

Conversely you may find that your Blogger label counter has been disabled and you want to reinstate it. In this case you would navigate to Blogger and follow these steps except that you would reverse Step 4.

Blogger labels gadget showing the number of posts enabled Blogger labels gadget showing the counter of the number of posts disabled

  1. Log in to Blogger
  2. At the Dashboard go to Layout Menu
  3. In the Blogger sidebar click on the pencil or click the edit link to edit your Labels Gadget
  4. Use the toggle button to switch between on (blue-green) and off positions (white) in the Show Number of Posts Per Label heading.
  5. Click on Save
  6. View your Blogger blog without the number of posts shown next to the labels tag

Blogger Configure labels gadget - labels counter can be toggled on and off by using the slider

Turn Labels Counter in Blogger On and Off - older style interface of configure labels gadget

#bloggertutorials #blogspot #bloggergadgets

Summary
Today you have learned how to turn off the Blogger labels counter so that no count of the number of posts is shown next to the label in a Blogspot blog. Disabling this feature only takes a minute and can be a useful feature for new blogs with few posts. If you are new to Blogger and blogging you can learn more useful tricks and tips for customizing your blog at Blogspot Blogger Guide. Watch out for more Blogger tutorials in this series of Blogspot Tutorials for Beginners.


Related Links
How to Put a Copyright Notice on a Blogger Blog
How to Add a Print Friendly Button to Blogger
How to Change the Date of Blog Posts in Blogger
Add a Follow Me Twitter Icon Button to Blogger
Easy Ways to Put Banners on Blogger
How to Add a Welcome Message to Blogger Homepage
How to Unlock or Delete Locked Widgets in Blogger
Making Money From Affiliate Banners and Links with Blogger
How to Get More Adsense Clicks with Blogger
Easy Ways to Put Affiliate Ad Banners on Blogger