Welcome! At Blogspot Blogger Guide we show you the easy way to customize your Blogger Blog and offer tips, tricks and fixes to take the technical headache out of blogging.

Showing posts with label Beginners. Show all posts

Thursday, March 24, 2022

How to Backdate a Blogger Post or Publish Article on a Retrospective Date

In today's Blogger tutorial I show you how to backdate a Blogger post to a date in the past. This handy Blogger feature allows content creators on the Blogger platform to customize blog posts by setting a user defined publication date for a blog post that is retrospective. Backdating a post is possible for any blog post you are about to publish or for an existing post where you want to change the publication date to an earlier date.
How to Backdate a Blogger Post or Publish an Article to a Retrospective Date

If you are looking for a Blogger Tutorial on how to set a future date you could check out my companion article on how to schedule Blogger Posts for a Specific Date in the Future.

Reasons to Backdate a Published Article or a New Post

It is not difficult to change the date of a blog post to a past date but this feature does need to be used with care. There are times when it can be useful to be able to backdate Blogger posts for example to fill a gap or to fit into a particular blog post timeline if your blog is date sensitve. You might change the dates of a blog post if you are intending to publish your blog as a book and want to tidy up the post dates for reasons of continuity.
How to Change the date of a Blogger Post to a retrospective date. Useful to keep blog post content in chronological order or to reorder the timeline of the date blog post are published
Change Date of Blog Posts to Past Date if You Need to Reorder the Timeline

Older Posts Can Be Seen as Less Relevant by Search Engines

Do keep in mind that older posts can potentially get penalized by the Google algorithm as they are viewed as less relevant.This is only an issue up to a point though as search engines are still able to recognize the actual date a post was published despite its timestamping. As a rule of thumb it is best not to overdo the backdating of blog articles unless you have a very specifc reason to do so.


Changing the Date of a Blogger Post Has No Affect on the Permalink

Changing the publication date of an blog article does not affect the permalink which is the URL (blog post address) assigned on publishing a blog post. Do not change the permalink without good reason as any backlinks to that article will be lost and search engines like Google will eventually remove the blog post from the search index. A redirect to handle deleted blog posts or changed permalinks can be set up but this is a subject for a more advanced Blogger tutorial that I will be writing about in the future.


Blogger Posts can be changed to a retrospective date without penalty even if they are already published
Blogger Posts Can Be Backdated to a Date and Time of Your Choice


Steps to Back Date an Existing Blog Post or to Publish an Article on an Earlier Date

  1. (a) Navigate to New Post and Create a Blogger post or
    (b) Open a draft post or
    (c) Open an already published post

  2. In the Blogger Post editor click on Published which is in the menu on the right-hand side of the compose box

  3. From the two radio buttons: Automatic and Set Time and Date click Set Time and Date and use the calendar that opens to set a date before the current date for your Blogger post

  4. (a) Click on Save and Update for an already published article or
    (b) Save from the Preview Drop Down Menu and then Publish to publish a new blog post

  5. Click on Posts to then view your post in a list of articles. It will now be timestamped for the date you selected.

  6. If you now click on the View button (the eye icon) to view the article you will see that the publication date of the blog post has changed to the date you selected. The date in the permalink which appears in the browser search window remains the same.


#blogspottutorial #bloggertutorial #changedate #blogposts

Summary

In this Blogger Tutorial I have shown you how to backdate a Blogger post and discussed reasons why you might choose to set a date for a Blogger post that is retrospective. There are advantages in selecting a user defined date especially if you are needing to reorder the timeline of your blog posts in Blogger for some reason. As a general rule it is best to keep blog articles current otherwise their relevancy in terms of the Google search engine algorithm can be affected.


Related Links

Easy Ways to Put Banners on Blogger
How to Put a Twitter Follow Icon Next to Blog Post Title in Blogger
How to Add a Facebook Share Button to Blogger
How to Unlock or Delete Locked Widgets in Blogger
How to Add a Sticky Welcome Message Above Posts in Blogger
How to Add a Welcome Message to the Blogger Homepage
How to Schedule a Blog Post to a Future Date in Blogger
How to Change the Date of Blog Posts in Blogger


Tuesday, March 22, 2022

How to Add a Blog Description to the Blogger Header For a Blogspot Blog

In this Blogger Tutorial for beginners new to Blogspot blogging I show you how to quickly add a blog description to your Blogger blog. A blog description is the one line tagline that is displayed in the header under the blog name in Blogger. Adding a blog description to Blogger is easy to achieve and will help both search engines and your audience know about your blog topic.
How to Add a Blog Description to a Blogger Blog and Why it is Important for Search Engines and Blog Visitors

Why is a Good Blog Description Important?

A Blogger blog description needs to clearly and succinctly say what the blog is about. It needs to be well-crafted if you are going to use it as a tagline in your header to hook potential readers to your blog. With just a few well chosen words the role of your blog description is to spark a reader's interest enough to decide to visit your blog.

If you would like to know more about how to write a good blog description for showcasing your Blogspot blog / Blogger blog take a look at my companion article where I discuss tips for writing a well-crafted blog description and the SEO benefits for search engines and visitors. I will also show you some examples of well written blog descriptions to help you write the best blog description for your blog.

How to Add a Blog Description to a Blogger Blog - Step-by-step walkthrough to put description onto blog through the settings menu plus discussion why it is important to write a good blog description

Also bear in mind it is possible to hide the blog description if you want to write a longer description for your blog that doesn't display to readers but is visible to search engines. If you are interested in hiding the blog description on your Blogger blog I will be discussing how to do this in an upcoming post.

Steps to Add a Blog Description to Blogger


Step 1
Login to Blogger

Step 2
Go to the Settings Menu on the lefthand side

Step 3
In Basic Settings below Blog Name you will find the space to enter a blog description
to add a blog description to Blogger blog go to settings and then under Basic you will find description box under the blog name

Step 4
Click on the word description to bring up the dialog box
to add a blog description to Blogger blog click on description box under the blog name and enter a descriptive tagline for your blog

Step 5
Enter your chosen description
For example I have used "Tips, Tricks and Strategies to Customize a Blogger Blog"
How to Add a Blog Description to Blogger - once saved the description will appear under the blog name in the header of your blog on blogspot

Step 6
Click Save

Step 7
Click the Preview Button located at the bottom of the Layout Menu on the righthand side

Step 8
View how your description will look on your live blog. Check for any errors.

Step 9
Click the back arrow in your browser to go back to the Settings menu.

Step 10
Go ahead and click the Save button located at the bottom of the Layout Menu on the righthand side to commit your changes. Or if you need to make any further changes click on the Description again and repeat Steps 5 to 9.


#blogspottutorial #bloggertutorial #blogdescription

Summary

In today's Blogger tutorial I have discussed the steps to add a blog description to a Blogger Blog. I also covered the importance of writing a good blog description that is well-crafted and will attract visitors to your blog.


Related Articles

How to Choose a Great Topic for a Blogger Blog in 2020
How to Add a Blog Welcome Message to a Blogger Homepage
How to Change the Color of the Blogger Navbar
How to Change Image Sizes in Blogger Posts
How to Resize Images in Blogger to User Defined Dimensions
How to Schedule Blog Posts in Blogger for a Specific Future Date


Saturday, June 13, 2020

How to Choose a Great Blog Topic for a Blogger Blog - 7 Tips for Beginner Bloggers

Have you chosen a blog topic for your Blogger blog that is right for you? Lots of people start their Blogspot blogs at Blogger.com without giving much thought to their selection of blog topic. Or the angle of the topic they want to explore. If you want your Blogger blog to stand out from the crowd make sure you consider your blog topic carefully.
How to Choose a Great Blog Topic for a Blogger Blog - 7 Tips for Beginner Bloggers to help choose a subject and niche that is right for you

A good blog topic or niche can make or break a blog. Like some partners some blogs and their owners just don't fit no matter which way you look at it. Make sure before you spend 3 to 6 months of initial slog to develop your blog that you haven't placed your ladder against the wrong wall.


How to Choose A Good Blog Topic - 7 tips for Beginner and Newbie bloggers and anyone who wants to build a successful blogger blog
How do I Choose a Good Blog Topic


Tips to Help You Choose a Great Blog Topic

Here are a few tips that will get you thinking about your topic or niche topic for your Blogspot blog at Blogger.com and how important it is to choose the right one for you.

1. Choose a blog topic that you are passionate about
2. Choose a blog topic that interests you not just interests others
3. Choose a blog topic that has potential for readership
4. Know your subject area
5. What's your angle? Identify your angle when choosing a blog topic
6. Choose a blog topic with a medium to long shelf life
7. Clearly define the parameters and scope of your blog topic


1. Choose a blog topic that you are passionate about

You are going to be writing content about this blog topic for 365 days of the year for at least 2-5 years. For that to work successfully you have to have some passion otherwise the tedium will wear you down.

Conversely if you are really passionate about a topic that passion will shine through in your blog and like a big magnet it will attract others.

2. Choose a blog topic that interests you not just interests others

Yes you can make money writing about making money but if you aren't interested in money you have a problem. The topic itself may be viable commercially but readers will soon figure out if you are in it for the money not the fun. Make sure you are genuinely interested in your blog topic and not just choosing it because it seems to be a hot topic. Don't forget readers are going to want new and fresh content and will not stick around if you are not up to providing it.


Who is My Audience and What Interests Them? Know Your Audience - Choose a Blog Topic that will have a global audience and cater for their interests. Make sure you know the interests of your visitors
Who is My Audience and What Interests Them?


3. Choose a blog topic that has potential for readership

If you choose a more unusual blog topic or very narrowly defined niche then you may find you are the only one interested in it. However if you have very little competition you will be able to quickly carve out a niche for your blog.

Research your market. Check out forums. Identify if there actually is a gap waiting to be filled. If there are a lot of others writing about the same topic can the market sustain another blog or will it be a hard slog to get traffic. Know your audience.

Attracting visitors and maintaining readership are important factors in ensuring that your blog will generate a steady income stream. If monetization is important to you check your blog's potential for adding relevant ads and affiliate marketing.

Choose a blog topic that has potential for readership. Carry out research prior to starting your blog to be sure that the market is not too saturated already and if it is find a way to niche down further
Research Your Topic to Ensure a Readership Base Exists

4. Know your subject area

How well do you know the subject matter of your chosen blog topic? Readers will quickly assess your knowledge of your blog topic and will expect you to deliver the goods.

If you are passionate but not very knowledgeable how will you find the information you need to create new material? Creating content is time consuming and it requires good research skills. Have you got access to the kind of information you are going to need?

As a general rule don't choose a topic you know very little about or you may find yourself floundering once you have exhausted your own ideas.


5. What's your angle? Identify your angle when choosing a blog topic

Knowing your subject is one thing but finding a fresh angle is something else. If you want to create a blog in a subject area that is already heavily populated with other blogs you are likely to be more successful if you can find a good angle that has yet to be exploited. Most information isn't new it is just repackaged. How will you pitch your blog? Check out other blogs and identify what aspects might not be so well covered. Make a list of these and ask yourself if any of these areas has enough scope to sustain a blog by itself.

6. Choose a blog topic with a medium to long shelf life

Your blog topic might be great but will readers be interested in it a year or two down the track? This is particularly true for technology based blogs where products come and go and change happens at a rapid rate. Rethink your idea if your topic may not have long term sustainability. Ask yourself if there is a way to reframe it so that it will be more ongoing rather than of short duration.

7. Clearly define the parameters and scope of your blog topic

Do you know what the parameters of your blog topic are? What you will cover and what you won't? If you don't know what the limits of your blog are others won't know either.

Think carefully about your blog topic and define the parameters to narrow the scope.  Niche down. Better to be an authority on a narrow subject than go too wide


It pays to carefully define the scope of your blog or you run the risk of trying to cover everything and losing your audience because they have no idea what your blog is about. Often the most successful blogs are those that focus on a specialist subject and stick within those guidelines. It is better to be an authority on a narrow topic area than go too wide.

Jot down now what your blog actually covers. Include your material and your audience in this. For instance, is your blog for everyone or is it focused on beginners only like this blog? Deciding this early on will make it easy to pitch your articles in a particular way. If you have no clarity you may find you write good material but it is not pitched to the right audience.

Make notes to clarify what your blog covers so that you can pitch articles to the right audience
Jot Down Ideas About What Your Blog Covers
to Make Sure You Pitch it the Right Audience


If you have lots of ideas for a blog topic you will need to crystallize these. Jotting down advantages and disadvantages will help you sort the wheat from the chaff. You may find you have several good ideas but select only one of these to concentrate on. Once things are up and running with your first venture you might decide to get cracking on the second idea but prioritize to start with.

Remember that laying the groundwork now will prevent disappointment further down the track. Your idea has a much greater chance of being successful if you spend some time getting clear about what you want from your blog and what you want to achieve. Even if your idea needs a lot of refining the exercise is a great opportunity to put some planning in place and planning your blog as in most things in life is one of the cornerstones of success.

Doing the Groundwork to Define Your Blog Topic is Key to a Successful Blog
Doing the Groundwork First is Key to a Successful Blog


Summary

This Blogger tutorial has focused on how to choose a great blog topic for a  Blogspot blog. I have discussed 7 tips to help beginner bloggers new to the Google Blogger platform and blogging choose a blog topic that will fit with their knowledge base and interests. Finding a good fit with your blog topic is one of the keys to success and worth taking the time to consider carefully. Any thoughts or ideas about this article please share them.


Related Articles

How to Set Up a Blogspot Blog on Blogger.com
How to Get a Free Blog at Blogger.com
Benefits of Blogging with Blogger.com
Why Blogger.com is a Better Blogging Platform than Wordpress in 2020


Monday, June 1, 2020

How to Add a Sticky Welcome Message Post to Blogger Blog

How to add a sticky welcome message post to the Blogger homepage is a question that is often asked by beginner bloggers keen to make their blog more welcoming and attractive to visitors. By adding a welcome message above your blog posts readers landing on your blog will immediately be greeted by the welcome message. Adding a sticky welcome message is a simple addition to Blogger and it only takes a few minutes to create a nice friendly welcome message that sends clear welcome wishes to your blog visitors.
How to Add a Sticky Welcome Message to a Blogger Blog that offers welcome wishes to visitors

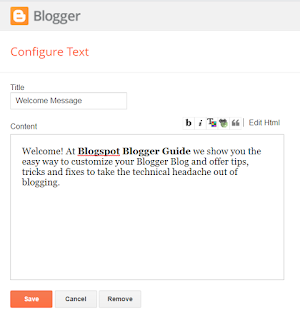
In this Blogger tutorial you will learn how to add a sticky welcome message to the main section in Blogger above the blog posts as seen in the image below. We have chosen to put the message above the post area because it is a placement that is very central for your readers to see your greeting when they land on your homepage. If you are interested in other placements like the sidebar or below the header then check out my detailed instructions on the other placement options for welcome messages on your Blogger blog in my companion article how to add a welcome message to a Blogger homepage.
How to Add a Sticky Welcome Message to Blogger Blog placed above the blog posts in the main section of Blogger - Example of a Welcome Message on blogger with customized colors and borders

Why Add a Sticky Welcome Message to Blogger

A sticky welcome message placed above your posts on the Blogger homepage will immediately grab your readers attention. You will engage your readers and if it hits the right note can promote trustworthiness in your blog and your content.

Blogger makes it easy to insert a text box above the posts and customize it to the look and color scheme of your blog using the Rich Text Editor. You can even add further advanced styling to your sticky welcome message using HTML code.  If you want to add third party scripts or videos just swap the text gadget for a HTML/Javascript gadget.

You can choose to place your welcome message only on the homepage or have your message display on every blog page. I have included instructions on how to show the welcome message on the homepage only.

How to Add a Sticky Welcome Post to Blogger Blog - Craft a Good Message to Engage the Visitor
Craft a Good Sticky Welcome Message Post to a Blogger Blog
to Engage the Visitor


Points to Consider When Adding a Sticky Welcome Message to Blogger 

Before you go ahead and create your sticky welcome message think about what you are going to say to attract a readership.  What value will your blog provide to a potential follower?  Are you informing or entertaining your readership?  Remember you are more likely to impress a visitor if they can easily identify how you can help them and what value to their lives your blog is going to provide them with.

It may be tempting to add your welcome message in the header instead of a blog description but I would advise against this. The blog description has an SEO benefit and needs to contain at least one of your keywords. It is far better to create that personal touch by generating your blog's welcome message using a Blogger text gadget and leave the blog description as a tagline that describes the purpose of your blog. For more on how to add a blog description to Blogger and why it is important to do so please visit my companion post.

Steps to Add a Sticky Welcome Message Above the Posts in a Blogger Blog

The following steps will help you put a sticky welcome message above the posts on all pages of your blog. If you only want it to appear on the homepage and not every post page then see below for instructions on how to display the message only on the homepage.

  1. Login to your Blogger account at Blogger.com

  2. From the Blogger Dashboard click on Layout from the menu on the left-hand side

  3. Click on the Add a Gadget link in the Main Posts section or Post Body section (called different names depending on what theme you are using)

    Note if there is no Add a Gadget link in the Main Posts section you may need to open up the section depending on your Blogger theme. I suggest you try adding the gadget to the sidebar first and then dragging it into the Main Posts area afterwards. If this doesn't work then please refer to my detailed step-by-step guide to Adding a Widget or Gadget Above a Blog Post in Blogger in which I show you how to open main section to add more gadgets.

  4. Select the Text gadget from the pop-up menu. You could also choose to use a html/javascript widget instead if you want to add third party scripts to your message.


  5. Use the Text Gadget to Add a Welcome Message Sticky to the Top   of the Main Post Section on the Blogger Homepage
    Use the Text Gadget to Add a Welcome Message Sticky to the Top
    of the Main Post Section on the Blogger Homepage


  6. Click on the plus+ icon at the right of the Text gadget to create your sticky welcome message.

  7. Give the gadget a name like welcome message to make it easy to identify later.

  8. Use the Rich Text Editor icons to add some simple styling to your sticky welcome message. Use Edit HTML if you need to add advanced styling. Check out my other posts for more on how to add advanced styling to Blogger.

  9. Use the Text Box Gadget to Craft Your   Sticky Welcome Post Message in Blogger
    Use the Text Box Gadget to Craft Your
    Sticky Welcome Post Message in Blogger


  10. Click Save to save your welcome message gadget.

  11. Click on Preview icon at the bottom right-hand corner to view your sticky welcome message.

  12. Once you are satisfied with your sticky welcome message drag it above the blog posts if it is not already there. Or if you created it first in the sidebar then drag the gadget over to the main section and position it above the blog posts gadget.

  13. Drag and Drop the Text Widget Sticky Welcome Message into the  Main Section Above Blog Posts in Blogger Layout
    Drag and Drop the Text Widget into the
    Main Section Above Blog Posts in Blogger Layout


  14. Click Save Arrangement once you are satisfied with the positioning of your Blogger welcome message by clickingon the save icon in the bottom right-hand corner.


  15. Click View Blog in the Dashboard and admire your new welcome message that is greeting your blog visitors.


How to Display a Welcome Message Only on the Homepage of Blogger

If you like the idea of a welcome message but would prefer to have it show only on the homepage rather than all pages it will require a manual edit of your Blogger template. Follow these steps to set the text gadget to only show up on the main page:

  1. Login to your Blogger if not already logged in

  2. Check the name of the welcome message gadget

  3. Return to the Dashboard and Choose Theme

  4. Click the down arrow denoted by the triangle next to the orange Customize button

  5. Choose Back up your theme to download your template in case

  6. Choose Edit HTML

  7. Click on the Jump to Widget icon in the top left corner of the editor

  8. From the drop down menu of widgets click on the gadget you created for your welcome message eg Text1

  9. The code that you jump to will look similar to this:


    <b:section class='main' id='main' name='Main' showaddelement='yes'>
    <b:widget id='Text1' locked='false' title='' type='Text' version='1'>
    <b:widget-settings>
    <b:widget-setting name='content'><![CDATA[<p style="background: #ffffff; border: double;">Welcome! At <span style="font-weight: bold;">Blogspot Blogger Guide</span> we show you the easy way.</p>]]></b:widget-setting>
    </b:widget-settings>
    <b:includable id='main'>
    <!-- only display title if it's non-empty -->
    <b:if cond='data:title != &quot;&quot;'>
    <h2 class='title'><data:title/></h2>
    </b:if>
    <div class='widget-content'>
    <data:content/>
    </div> <b:include name='quickedit'/>
    </b:if>
    </b:includable>
    </b:widget>


  10. Add the following line of code immediately after <b:includable id='main'> which adds an if statement saying homepage only:

    <b:if cond='data:blog.url == data:blog.homepageUrl'>


  11. Add the following line of code immediately before </b:includable>
    to close the if statement

    </b:if>


  12. The following shows the code with the if statement added and is highlighted in blue:
    <b:section class='main' id='main' name='Main' showaddelement='yes'>
    <b:widget id='Text1' locked='false' title='' type='Text' version='1'>
    <b:widget-settings>
    <b:widget-setting name='content'><![CDATA[<p style="background: #ffffff; border: double;">Welcome! At <span style="font-weight: bold;">Blogspot Blogger Guide</span> we show you the easy way.</p>]]></b:widget-setting>
    </b:widget-settings>
    <b:includable id='main'>
    <b:if cond='data:blog.url == data:blog.homepageUrl'>
    <!-- only display title if it's non-empty -->
    <b:if cond='data:title != &quot;&quot;'>
    <h2 class='title'><data:title/></h2>
    </b:if>
    <div class='widget-content'>
    <data:content/>
    </div> <b:include name='quickedit'/>
    </b:if>
    </b:includable>
    </b:widget>

  13. Click the Save icon from the row of buttons in the top right-hand corner

  14. You will be returned to the Dashboard. Click View Blog from the menu and navigate to several post pages to check that your welcome message is now only showing on the homepage rather than every page.


In today's Blogger tutorial I have shown you how to put a welcome message on your Blogger blog that extends welcome wishes to your blog visitors. The welcome message acts in the same way as a sticky note and always appears above your blog posts in the main section of your blog. A welcome message similar to the example can be added with a text gadget and can be customized and styled to suit any Blogger blog.


Related Articles

Basic Blogger Tutorials to Customize a Blogger Blog
Advanced Blogger Tutorials to Customize a Blogger Blog
How to Add a Welcome Message to a Blogger  Homepage
How to Change the Color of the Blogger Nav Bar
How to Put a Twitter Follow Icon on Blogger Next to Post Title
How to Add a Blog Description to the Blogger Page Header


Thursday, February 12, 2009

How to Set up Blogger and Configure All Settings for a New Blogspot Blog in 2022

Before you launch into publishing the first post of your new Blogspot blog at Blogger.com it pays to properly set up and configure your free blog. There are a number of key settings that need correct set up to improve functionality and to avoid problems down the track. This Blogger tutorial shows you how to set up a new blog step-by-step and covers all the main settings you will need to consider to customize the set up of your blog.
How to Set up Blogger and Configure All Settings for a New Free Blogspot Blog in 2022

For bloggers hoping to attract visitors and perhaps make money from advertising and affiliate links it is a good idea to ensure that you have configured your blog correctly particularly the way blog posts are displayed and comments are handled.
How to Set up a New Free Blog at Blogger to make money

If you have not yet got a blog at Blogger.com please see my Blogger tutorial about how to start a Blogspot Blog: Get a Free Blogspot Blog at Blogger.com. If you are still considering your blog topic and niche you will find plenty of tips on how to choose a good topic for your blog.


How to Configure Basic Settings in Blogger

Prior to writing your first post configure Blogger by clicking on Settings in the menu on the left-hand side of the Dashboard.

Set or Change the Blog Language of Your Blogger Blog

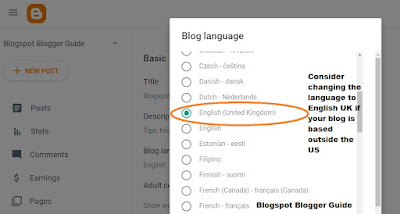
In English speaking countries the language of your blog will automatically be set to US English. For bloggers from other English speaking countries outside the US you may prefer to change the language settings to UK English.
How to Set up Blogger - How to Change or Set the Blog Language. Non US may want to change the language to UK English

If you would like to change the language you can do so under the Settings > Blog Language option. From there it is just a question of checking the radio button according to the language you want to choose and then clicking save.

Add a Blog Description

Enter a short tagline, phrase or short sentence as your Blog Description in the page header of your blog. As you are limited to 500 characters your blog description needs to be concise. Make sure it describes the purpose of your site and gives some indication of what kind of content a visitor might expect. The blog description will appear on your blog just under the blog name in the header section. It can be changed at a later date if needed.

For tips on adding a blog description to a Blogspot Blog check out my earlier Blogger tutorial.

Make Your Blog Visible to Search Engines

If you are wishing to keep your blog completely private of for just friends and family rather than the whole world ensure that the visible to search engines setting slider under Privacy in the Settings menu is set to the off position.

If you want search engines like Google to index your blog for the purposes of attracting visitors the visibility to search engines setting will need to be on otherwise your blog will not get much in the way of traffic. To check the visible to search engines setting ensure the slider is green (the on position) in Settings under the Privacy heading.

You will need some patience initially as it does take search engines like Google time to crawl your site and index your blog posts. To improve your chances of your blog being indexed thorough I suggest you consider adding a sitemap at some point. To learn more take a look at my Blogger tutorial on how to add a simple atom sitemap to the Google Search Console.

Check HTTPS Redirect is Turned On to Secure your Blog.

By default this setting should be turned on but it is worth checking the slider is in the green on position. Older blogs and those using third party templates may find the HTTPS setting is turned off. The advantage of having this setting turned on is that all blog posts and pages are delivered encrypted regardless of whether the blog address is http or https.

Set Permissions for Reader Access of Your Blogger Blog


Under Reader Access in the Permissions Setting set the privacy setting to your preferred setting.
  • Custom Readers if you want to keep your blog private with only selected readers.
  • Private to Authors: If you want to invite other blog authors and have them read posts then set the permission to private with other blog authors.
  • Public: If you want your blog to have the widest readership then set the permission to public which means anyone and everyone can read it.


How to Configure Blog Posts in Blogger


Maximum Number of Blog Posts Setting

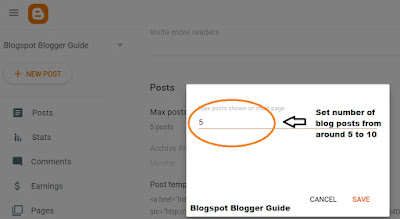
Under the Posts heading set the number of posts to show on the main page. By default the number of blog posts is set to 7 but you can have more or less than this number. To change the maximum number of posts click on the number of posts and then using the up and down arrows select the number of posts to display.
How to Set up Blogger and Configure All Settings - Set Maximum Number of Blog Posts from 5-10 to display on the home page in most cases

I would advise against showing too many posts on the home page as it may lengthen loading times which is a big factor in visitor retention. One way to get around this issue so you can display more posts is by using jump breaks so visitors are only shown a shortened version of the post on the main page and the full post when they click on read more. You may need to experiment with this feature before you find the best balance for your blog.

Archiving


In the past it was possible to set the frequency of the archiving of your blog to other than monthly. This feature is turned off currently.
Configure your Blogger Blog settings from the Settings Menu interface circa 2009

Configuring Commenting on Your Blogger Blog


Who Can Comment

In the Comments section under Settings you can control who is allowed to comment on your blog.You can set three different options to handle comments:
  • Anyone (including anonymous)
  • Users with Google Accounts
  • Only members of this blog
Unless you have a private blog then in most cases who can comment is likely to be set to anyone. You may find spam commenting becomes an issue so I suggest that you set up moderate comments at the same time so that you can filter genuine comments from the spam ones.


Comment Moderation

In the Comments Moderation section it is possible to control comments before they go live. In the past spam has been quite a problem with Blogger blogs and remains so today depending on the niche topic and the popularity of your blog. I would suggest you apply some comment moderation and your best bet is to set it to always to comletely filter out spam.

There are three different levels of Comment Moderation that can be applied to a Blogger blog:
  • Always
  • Sometimes
  • Never

How to Set up Blogger and Configure All Settings for a New Blogspot Blog - Set Comment Moderation to Always if blog is public

Email Notification of Comments It may worth setting up email notification of new comments if you set comment moderation to always otherwise you may forget to check the comments section periodically. You can add your email address under the Settings >> Comments >> Email moderation requests to: section.

Reader Comment Captcha
It is possible to control spam from spam bots to some degree with captcha. I suggest you make sure that the green slider is set to on prevent unwelcome messages especially from spambots.


Comment Moderation

How to Set Up Time Zone Format and Date Header in Blogger


Set Up Time Zone

The Time Zone is set to (GMT-07:00) Pacific Time – Los Angeles by default so you will need to set up the Time Zone depending on your geographical location. To select the Time Zone click on the Time Zone heading and then select the correct Time Zone by clicking on the radio button next to the appropriate Time Zone and then selecting save.

Set Up Date Format

Blogger offers multiple options for displaying the date. To make changes click on the Date Header Format heading and then choosing your desired format by selecting the radio button from the dropdown menu. You will need to save changes for the different date format to take effect. To see the change in effect, preview a blog post or click on View Blog.

Set Up Timestamp Format

There are 11 different Timestamp options provided by Blogger which allow you to customize how the time will appear on a post. You can change the Timestamp to suit your preferences by navigating to Settings >> Timestamp Format. Select the option from the the options that appear in the popup window and click save to apply the changes.

Set Up Comment Timestamp Format

You can also customize the appearance of the timestamp on comments. Set up is the same as for setting up the timestamp.

Configure Other Settings in Blogger


Declare Adult Content

Make sure that adult content is set to no unless your blog does have adult content of course.

Google Analytics ID

If you have a Google Analytics ID already enter it in the space provided to track blog performance.  If you have just started your blog make a point of coming later once you have your Google Analytics ID and entering it here.

Congfigure Site Feed

Post Feed
There are 5 options for the Post Feed: full, until jump break, short, custom and none.

For a new blog not using a feed service your feed in most cases should be set to short or to jump break. If you are not sure you can leave it at full for now and come back to it later.

Often a full feed is used where blogs posts are being desseminated by a RSS service eg Feedburner. These days social media platforms do much of that job so there is a debate about whether RSS feeds are still worth it especially as there is a higher risk of content theft and readers are not visiting your blog to read your content. Conversely blog feeds are needed for some functionality to work eg the recent posts gadget works off the feed.

Post Feed Footer
In the Post Feed Footer enter a copyright notice about your material which will appear in the bottom of your feed after every post. This will act as a deterrent to content lifting and blog scraping.


Configure Your Blogger User Profile

If you want your readers to know a bit about you consider configuring your user profile with information about yourself. Do you want your readers to be able to email you for example? You can enter as much or as little information as you like.

To make changes to your user profile scroll right to the bottom of Settings and click on the user profile link. Check the options if you want to share your profile and email address. You can also select what name gets displayed on your blog posts on your user profile page. You can add a photo, your geographical location and any other information you might wish to.

Congratulations! With these settings in place it's time to go ahead and make your first post.

While any of the settings discussed in this Blogger tutorial are able to be altered at any time it is a good idea to put them in place prior to writing a first post so that you don't forget to set something important once the business of writing blog posts takes over. This Blogger tutorial provides instructions on how to configure and set some of the basic settings and features for Blogspot blogs at Blogger.com.


Related Articles

How to Get a Free Blog on Google Blogger
How to Choose a Great Blog Topic for a Blogger Blog - 7 Tips for Beginner Bloggers