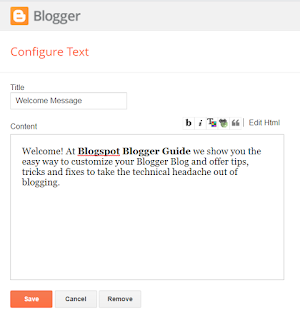
Welcome! At Blogspot Blogger Guide we show you the easy way to customize your Blogger Blog and offer tips, tricks and fixes to take the technical headache out of blogging.

Saturday, June 13, 2020

How to Choose a Great Blog Topic for a Blogger Blog - 7 Tips for Beginner Bloggers

Have you chosen a blog topic for your Blogger blog that is right for you? Lots of people start their Blogspot blogs at Blogger.com without giving much thought to their selection of blog topic. Or the angle of the topic they want to explore. If you want your Blogger blog to stand out from the crowd make sure you consider your blog topic carefully.
How to Choose a Great Blog Topic for a Blogger Blog - 7 Tips for Beginner Bloggers to help choose a subject and niche that is right for you

A good blog topic or niche can make or break a blog. Like some partners some blogs and their owners just don't fit no matter which way you look at it. Make sure before you spend 3 to 6 months of initial slog to develop your blog that you haven't placed your ladder against the wrong wall.


How to Choose A Good Blog Topic - 7 tips for Beginner and Newbie bloggers and anyone who wants to build a successful blogger blog
How do I Choose a Good Blog Topic


Tips to Help You Choose a Great Blog Topic

Here are a few tips that will get you thinking about your topic or niche topic for your Blogspot blog at Blogger.com and how important it is to choose the right one for you.

1. Choose a blog topic that you are passionate about
2. Choose a blog topic that interests you not just interests others
3. Choose a blog topic that has potential for readership
4. Know your subject area
5. What's your angle? Identify your angle when choosing a blog topic
6. Choose a blog topic with a medium to long shelf life
7. Clearly define the parameters and scope of your blog topic


1. Choose a blog topic that you are passionate about

You are going to be writing content about this blog topic for 365 days of the year for at least 2-5 years. For that to work successfully you have to have some passion otherwise the tedium will wear you down.

Conversely if you are really passionate about a topic that passion will shine through in your blog and like a big magnet it will attract others.

2. Choose a blog topic that interests you not just interests others

Yes you can make money writing about making money but if you aren't interested in money you have a problem. The topic itself may be viable commercially but readers will soon figure out if you are in it for the money not the fun. Make sure you are genuinely interested in your blog topic and not just choosing it because it seems to be a hot topic. Don't forget readers are going to want new and fresh content and will not stick around if you are not up to providing it.


Who is My Audience and What Interests Them? Know Your Audience - Choose a Blog Topic that will have a global audience and cater for their interests. Make sure you know the interests of your visitors
Who is My Audience and What Interests Them?


3. Choose a blog topic that has potential for readership

If you choose a more unusual blog topic or very narrowly defined niche then you may find you are the only one interested in it. However if you have very little competition you will be able to quickly carve out a niche for your blog.

Research your market. Check out forums. Identify if there actually is a gap waiting to be filled. If there are a lot of others writing about the same topic can the market sustain another blog or will it be a hard slog to get traffic. Know your audience.

Attracting visitors and maintaining readership are important factors in ensuring that your blog will generate a steady income stream. If monetization is important to you check your blog's potential for adding relevant ads and affiliate marketing.

Choose a blog topic that has potential for readership. Carry out research prior to starting your blog to be sure that the market is not too saturated already and if it is find a way to niche down further
Research Your Topic to Ensure a Readership Base Exists

4. Know your subject area

How well do you know the subject matter of your chosen blog topic? Readers will quickly assess your knowledge of your blog topic and will expect you to deliver the goods.

If you are passionate but not very knowledgeable how will you find the information you need to create new material? Creating content is time consuming and it requires good research skills. Have you got access to the kind of information you are going to need?

As a general rule don't choose a topic you know very little about or you may find yourself floundering once you have exhausted your own ideas.


5. What's your angle? Identify your angle when choosing a blog topic

Knowing your subject is one thing but finding a fresh angle is something else. If you want to create a blog in a subject area that is already heavily populated with other blogs you are likely to be more successful if you can find a good angle that has yet to be exploited. Most information isn't new it is just repackaged. How will you pitch your blog? Check out other blogs and identify what aspects might not be so well covered. Make a list of these and ask yourself if any of these areas has enough scope to sustain a blog by itself.

6. Choose a blog topic with a medium to long shelf life

Your blog topic might be great but will readers be interested in it a year or two down the track? This is particularly true for technology based blogs where products come and go and change happens at a rapid rate. Rethink your idea if your topic may not have long term sustainability. Ask yourself if there is a way to reframe it so that it will be more ongoing rather than of short duration.

7. Clearly define the parameters and scope of your blog topic

Do you know what the parameters of your blog topic are? What you will cover and what you won't? If you don't know what the limits of your blog are others won't know either.

Think carefully about your blog topic and define the parameters to narrow the scope.  Niche down. Better to be an authority on a narrow subject than go too wide


It pays to carefully define the scope of your blog or you run the risk of trying to cover everything and losing your audience because they have no idea what your blog is about. Often the most successful blogs are those that focus on a specialist subject and stick within those guidelines. It is better to be an authority on a narrow topic area than go too wide.

Jot down now what your blog actually covers. Include your material and your audience in this. For instance, is your blog for everyone or is it focused on beginners only like this blog? Deciding this early on will make it easy to pitch your articles in a particular way. If you have no clarity you may find you write good material but it is not pitched to the right audience.

Make notes to clarify what your blog covers so that you can pitch articles to the right audience
Jot Down Ideas About What Your Blog Covers
to Make Sure You Pitch it the Right Audience


If you have lots of ideas for a blog topic you will need to crystallize these. Jotting down advantages and disadvantages will help you sort the wheat from the chaff. You may find you have several good ideas but select only one of these to concentrate on. Once things are up and running with your first venture you might decide to get cracking on the second idea but prioritize to start with.

Remember that laying the groundwork now will prevent disappointment further down the track. Your idea has a much greater chance of being successful if you spend some time getting clear about what you want from your blog and what you want to achieve. Even if your idea needs a lot of refining the exercise is a great opportunity to put some planning in place and planning your blog as in most things in life is one of the cornerstones of success.

Doing the Groundwork to Define Your Blog Topic is Key to a Successful Blog
Doing the Groundwork First is Key to a Successful Blog


Summary

This Blogger tutorial has focused on how to choose a great blog topic for a  Blogspot blog. I have discussed 7 tips to help beginner bloggers new to the Google Blogger platform and blogging choose a blog topic that will fit with their knowledge base and interests. Finding a good fit with your blog topic is one of the keys to success and worth taking the time to consider carefully. Any thoughts or ideas about this article please share them.


Related Articles

How to Set Up a Blogspot Blog on Blogger.com
How to Get a Free Blog at Blogger.com
Benefits of Blogging with Blogger.com
Why Blogger.com is a Better Blogging Platform than Wordpress in 2020



Tuesday, June 2, 2020

Why Blogger is a Better Blogging Platform than Wordpress for Beginner Bloggers

This article covers the main features of Blogger and compares some of the advantages and disadvantages of the Blogger platform versus other blogging platforms such as Wordpress.
Why Blogger is a Better Blogging Platform than Wordpress for Beginner Bloggers

Creating your Blogspot blog at Blogger is a good choice for beginner bloggers as it is a free blogging platform with an easy interface and good features. More advanced webmasters may find the lack of some advanced features irritating but Blogger is definitely worth considering as a place to try out blogging at no expense as it is completely free.
Blogger is a a Good Choice for Beginner Bloggers as it is a completely free blogging platform

Blogger.com offers the ability to add a custom domain name at a cost or to go with the default subdomain name that Blogger provides which is absolutely free. All templates on the Blogger platform itself are free too and this makes it possible to blog with the Blogger platform and not a pay cent for anything.


Benefits of Blogspot Blogger Platform - Blogger versus Wordpress
Blogger is Free and is a Good Choice for the Beginner Blogger


Main Blogger.com (Blogspot) Features

  • Blogger is a free blogging platform

  • Blogger is fast and easy to set up. It takes about 10 minutes to create a blog, configure the settings and add some gadgets.

  • Blogger is easy to use regardless of your level of technical knowledge. The interface is user friendly and intuitive. Tabs and buttons make it easy to navigate.

  • Bandwidth is unlimited with Blogger so there are no bandwidth issues with video and pictures

  • As Blogger.com is owned by Google there is a high degree of integration with other services like Google Analytics and generous photo hosting/storage.

  • It's easy to make money with Google Adsense and other banner advertising scripts which can easily be incorporated into your blog

  • Easy access to Google's powerful Google Analytics to track blog performance

  • It is possible to use your own custom domain rather than the default. For instance yoursite.com instead of yoursite.blogspot.com

  • Blogger supports Mobile blogging access from smartphones

  • Blogger offers the opportunity to try out blogging to see if it is for you at no cost

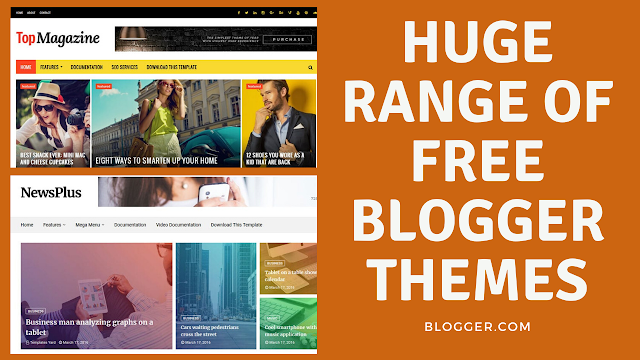
  • There are thousands of free template themes for Blogger blogs
    There are a huge number of free Blogger templates available

  • Blogger gives users the option to tweak templates depending on their experience. Some knowledge of HTML, XML and CSS can be useful to fully customize a Blogger template. Alternatively you can upload your own custom template with built in features like advertising space, widgets, dropdown menus and other useful stuff.

    There are plenty of free templates for Blogger on the web that can be customized to suit individual requirements.  For a small amount of money as low as $10 and far less headache if you are not technically minded. Custom Blogger Themes can be purchased that offer full mobile responsiveness, built-in SEO, are aesthetically pleasing and come with support to add that professional touch to your Blogger blog. 

Wordpress versus Blogger - Advantages and Disadvantages Discussed


Comparison of the Blogger Platform with Wordpress

Blogger vs Wordpress.com

While other online platforms like Wordpress.com have greater functionality for a blogger and are more highly customizable there is also a much heftier learning curve. The Wordpress interface is clunkier to use than the Blogger one in my opinion.

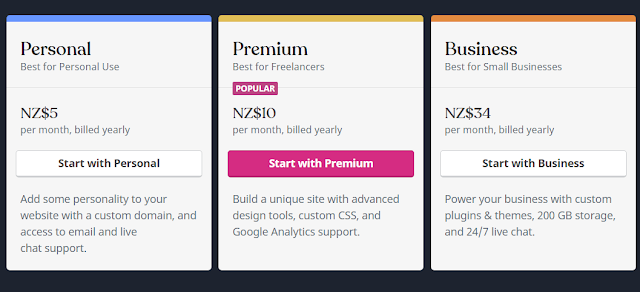
The entirely free option from Wordpress.com has virtually no built-in tools and is capped at 3GBs of storage space. For greater flexibility you can pay $5 and start adding more personal features or $10 a month for premium benefits with greater storage space. Business options are $34 for advanced premium features or $61 to incorporate ecommerce as well. (Prices as June 2020)

Wordpress.org pricing plan as at JUne 2020
Wordpress.com Pricing Plan as at June 2020

Wordpress.com offers a greater range of flexibility to the blogger compared to Blogger.com depending on your plan of course. A number of customizations such as themes and plug-ins come at a premium and need to be purchased separately.

Also the free version of Wordpress places a small amount of advertising on free version blogs. The main drawback of the online version apart from the ads is the cost of hosting which increases as your blog grows so you may find that storage space runs out quickly necessitating the need to turn the free option into a paid one.

Blogger wins hands down as it offers virtually unlimited storage space. Blogger is also an entirely free platform with no cost to the user. Blogger never puts its own ads on your blog.


Blogger vs Wordpress.org

If you choose a self-hosted option like Wordpress.org then the options to customize are significant with a wide range of plugins and themes to choose from. Along with choice however comes higher maintenance and a steeper learning curve.

I have a self hosted Wordpress site which needs a lot more maintenance than any of the other sites I run on Blogger (Blogspot). Plus it is time consuming to find, download and customize plugins to extend Wordpress functionality for self hosted sites. Then there are the obvious disadvantages of uploads rather than making changes online as you do with Blogger.

My experience with hosting is that there can be a lot of server downtime which can affect your return traffic whereas Blogger in contrast is a very reliable service. Plus hosting costs such as provided by Blue Hosting or Hostgator increase the more traffic a Wordpress.org blog attracts. Expect to pay around $100 minimum for hosting and then an annual domain name fee on top to match the features that come with Blogger for free.

Unlike Blogger which is free Wordpress has costs like hosting
Wordpress has costs like hosting attached

Another disadvantage of Wordpress that the user has to take a more active role in updating and backing up the blog whereas Blogger takes care of the main updates meaning more time is available for creating posts.

While Wordpress.org is constantly being updated to improve the interface and eliminate security risks and bugs, Google is no longer developing Blogger. However Blogger is stable, there are plenty of third-party scripts available and it now has the added benefit of mobile responsiveness.

Verdict Blogger versus Wordpress

Blogger.com

Blogger once had a few really annoying glitches in the interface which have largely been ironed out in recent years making it a breeze to use once you become familiar with the interface. I have found Wordpress.org to be equally, if not more bug ridden, so don't let a few minor interface issues put you off. Nothing is ever perfect right?

One of my main frustrations with Blogger is that it is not particularly search engine friendly. Wordpress.org provides a much greater degree of SEO. To achieve the same with Blogger tweaking is needed to provide search engine optimization. If you use a custom Blogger theme then you will be able to take advantage of the built-in SEO that most modern custom Blogger template themes offer.

Wordpress versus Blogger blogging Platform - The choice depends on your needs and your budget
Choose a Blogging Platform Based on Your Needs

If you are using the paid version of Wordpress you will have a choice of widgets and plugins. Blogger, in contrast, has some very handy widgets missing from the default configuration. Widgets such as related posts are useful as is a slider to display images or videos. It would be nice to have these features integrated as part of the Blogger.com interface. On the other hand there are a lot of third-party scripts for Blogger that can be inserted into Blogger using a gadget.

To get the most out of Blogger as a blogging platform, you might want to consider installing a custom template for a more professional and unique look. If you use your own domain name many would be hard pressed to know what blogging platform is being used. However, you would need to dispense with the Nav Bar completely otherwise it would be apparent to visitors that your blogging platform is Blogger. An overall investment of around $30 including a custom domain name would set you up blogging with Blogger.com for a year.

To get the same flexibility and results with Wordpress you would need to outlay around $120 annually which will not break the bank if you only have one blog. Add a couple more blogs into the mix though and it is clear that Blogger offers a lot of features for virutally no cost.

The Bottom Line Wordpress vs Blogger

In summing up then Blogger.com is a great choice for a beginner blogger not wanting to outlay any money. Blogger is also a good choice if you want to make a little bit of extra money through Adsense revenue without needing to be technically minded as ads are easy to install on your blog.
Wordpress versus Blogger which is best

Wordpress.com is a reasonable blogging platform if you don't mind paying for hosting of $10 a month or $34 for a business. If you can stand having Wordpress.com ads on your blog and limited features you can get away with a free version but you get a lot more from Blogger for the same thing.

Wordpress.org is a better choice than Blogger if you want to build an extensive business website with a variety of advanced plugins and ultimately to integrate a shopping cart.
Wordpress is the best choice to monetize and build extensive blogs

This article has covered the main features of a Blogger.com. It has also discussed in detail Blogger in contrast to other blogging platforms: Wordpress.com and Wordpress.org.


Related Articles

7 Tips for Choosing a Great Blog Topic
How to Set Up a Blogspot Blog on Blogger.com
How to Get a Free Blog at Blogger.com
Benefits of Blogging with Blogger.com


Monday, June 1, 2020

How to Add a Sticky Welcome Message Post to Blogger Blog

How to add a sticky welcome message post to the Blogger homepage is a question that is often asked by beginner bloggers keen to make their blog more welcoming and attractive to visitors. By adding a welcome message above your blog posts readers landing on your blog will immediately be greeted by the welcome message. Adding a sticky welcome message is a simple addition to Blogger and it only takes a few minutes to create a nice friendly welcome message that sends clear welcome wishes to your blog visitors.
How to Add a Sticky Welcome Message to a Blogger Blog that offers welcome wishes to visitors

In this Blogger tutorial you will learn how to add a sticky welcome message to the main section in Blogger above the blog posts as seen in the image below. We have chosen to put the message above the post area because it is a placement that is very central for your readers to see your greeting when they land on your homepage. If you are interested in other placements like the sidebar or below the header then check out my detailed instructions on the other placement options for welcome messages on your Blogger blog in my companion article how to add a welcome message to a Blogger homepage.
How to Add a Sticky Welcome Message to Blogger Blog placed above the blog posts in the main section of Blogger - Example of a Welcome Message on blogger with customized colors and borders

Why Add a Sticky Welcome Message to Blogger

A sticky welcome message placed above your posts on the Blogger homepage will immediately grab your readers attention. You will engage your readers and if it hits the right note can promote trustworthiness in your blog and your content.

Blogger makes it easy to insert a text box above the posts and customize it to the look and color scheme of your blog using the Rich Text Editor. You can even add further advanced styling to your sticky welcome message using HTML code.  If you want to add third party scripts or videos just swap the text gadget for a HTML/Javascript gadget.

You can choose to place your welcome message only on the homepage or have your message display on every blog page. I have included instructions on how to show the welcome message on the homepage only.

How to Add a Sticky Welcome Post to Blogger Blog - Craft a Good Message to Engage the Visitor
Craft a Good Sticky Welcome Message Post to a Blogger Blog
to Engage the Visitor


Points to Consider When Adding a Sticky Welcome Message to Blogger 

Before you go ahead and create your sticky welcome message think about what you are going to say to attract a readership.  What value will your blog provide to a potential follower?  Are you informing or entertaining your readership?  Remember you are more likely to impress a visitor if they can easily identify how you can help them and what value to their lives your blog is going to provide them with.

It may be tempting to add your welcome message in the header instead of a blog description but I would advise against this. The blog description has an SEO benefit and needs to contain at least one of your keywords. It is far better to create that personal touch by generating your blog's welcome message using a Blogger text gadget and leave the blog description as a tagline that describes the purpose of your blog. For more on how to add a blog description to Blogger and why it is important to do so please visit my companion post.

Steps to Add a Sticky Welcome Message Above the Posts in a Blogger Blog

The following steps will help you put a sticky welcome message above the posts on all pages of your blog. If you only want it to appear on the homepage and not every post page then see below for instructions on how to display the message only on the homepage.

  1. Login to your Blogger account at Blogger.com

  2. From the Blogger Dashboard click on Layout from the menu on the left-hand side

  3. Click on the Add a Gadget link in the Main Posts section or Post Body section (called different names depending on what theme you are using)

    Note if there is no Add a Gadget link in the Main Posts section you may need to open up the section depending on your Blogger theme. I suggest you try adding the gadget to the sidebar first and then dragging it into the Main Posts area afterwards. If this doesn't work then please refer to my detailed step-by-step guide to Adding a Widget or Gadget Above a Blog Post in Blogger in which I show you how to open main section to add more gadgets.

  4. Select the Text gadget from the pop-up menu. You could also choose to use a html/javascript widget instead if you want to add third party scripts to your message.


  5. Use the Text Gadget to Add a Welcome Message Sticky to the Top   of the Main Post Section on the Blogger Homepage
    Use the Text Gadget to Add a Welcome Message Sticky to the Top
    of the Main Post Section on the Blogger Homepage


  6. Click on the plus+ icon at the right of the Text gadget to create your sticky welcome message.

  7. Give the gadget a name like welcome message to make it easy to identify later.

  8. Use the Rich Text Editor icons to add some simple styling to your sticky welcome message. Use Edit HTML if you need to add advanced styling. Check out my other posts for more on how to add advanced styling to Blogger.

  9. Use the Text Box Gadget to Craft Your   Sticky Welcome Post Message in Blogger
    Use the Text Box Gadget to Craft Your
    Sticky Welcome Post Message in Blogger


  10. Click Save to save your welcome message gadget.

  11. Click on Preview icon at the bottom right-hand corner to view your sticky welcome message.

  12. Once you are satisfied with your sticky welcome message drag it above the blog posts if it is not already there. Or if you created it first in the sidebar then drag the gadget over to the main section and position it above the blog posts gadget.

  13. Drag and Drop the Text Widget Sticky Welcome Message into the  Main Section Above Blog Posts in Blogger Layout
    Drag and Drop the Text Widget into the
    Main Section Above Blog Posts in Blogger Layout


  14. Click Save Arrangement once you are satisfied with the positioning of your Blogger welcome message by clickingon the save icon in the bottom right-hand corner.


  15. Click View Blog in the Dashboard and admire your new welcome message that is greeting your blog visitors.


How to Display a Welcome Message Only on the Homepage of Blogger

If you like the idea of a welcome message but would prefer to have it show only on the homepage rather than all pages it will require a manual edit of your Blogger template. Follow these steps to set the text gadget to only show up on the main page:

  1. Login to your Blogger if not already logged in

  2. Check the name of the welcome message gadget

  3. Return to the Dashboard and Choose Theme

  4. Click the down arrow denoted by the triangle next to the orange Customize button

  5. Choose Back up your theme to download your template in case

  6. Choose Edit HTML

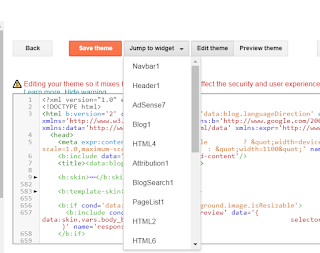
  7. Click on the Jump to Widget icon in the top left corner of the editor

  8. From the drop down menu of widgets click on the gadget you created for your welcome message eg Text1

  9. The code that you jump to will look similar to this:


    <b:section class='main' id='main' name='Main' showaddelement='yes'>
    <b:widget id='Text1' locked='false' title='' type='Text' version='1'>
    <b:widget-settings>
    <b:widget-setting name='content'><![CDATA[<p style="background: #ffffff; border: double;">Welcome! At <span style="font-weight: bold;">Blogspot Blogger Guide</span> we show you the easy way.</p>]]></b:widget-setting>
    </b:widget-settings>
    <b:includable id='main'>
    <!-- only display title if it's non-empty -->
    <b:if cond='data:title != &quot;&quot;'>
    <h2 class='title'><data:title/></h2>
    </b:if>
    <div class='widget-content'>
    <data:content/>
    </div> <b:include name='quickedit'/>
    </b:if>
    </b:includable>
    </b:widget>


  10. Add the following line of code immediately after <b:includable id='main'> which adds an if statement saying homepage only:

    <b:if cond='data:blog.url == data:blog.homepageUrl'>


  11. Add the following line of code immediately before </b:includable>
    to close the if statement

    </b:if>


  12. The following shows the code with the if statement added and is highlighted in blue:
    <b:section class='main' id='main' name='Main' showaddelement='yes'>
    <b:widget id='Text1' locked='false' title='' type='Text' version='1'>
    <b:widget-settings>
    <b:widget-setting name='content'><![CDATA[<p style="background: #ffffff; border: double;">Welcome! At <span style="font-weight: bold;">Blogspot Blogger Guide</span> we show you the easy way.</p>]]></b:widget-setting>
    </b:widget-settings>
    <b:includable id='main'>
    <b:if cond='data:blog.url == data:blog.homepageUrl'>
    <!-- only display title if it's non-empty -->
    <b:if cond='data:title != &quot;&quot;'>
    <h2 class='title'><data:title/></h2>
    </b:if>
    <div class='widget-content'>
    <data:content/>
    </div> <b:include name='quickedit'/>
    </b:if>
    </b:includable>
    </b:widget>

  13. Click the Save icon from the row of buttons in the top right-hand corner

  14. You will be returned to the Dashboard. Click View Blog from the menu and navigate to several post pages to check that your welcome message is now only showing on the homepage rather than every page.


In today's Blogger tutorial I have shown you how to put a welcome message on your Blogger blog that extends welcome wishes to your blog visitors. The welcome message acts in the same way as a sticky note and always appears above your blog posts in the main section of your blog. A welcome message similar to the example can be added with a text gadget and can be customized and styled to suit any Blogger blog.


Related Articles

Basic Blogger Tutorials to Customize a Blogger Blog
Advanced Blogger Tutorials to Customize a Blogger Blog
How to Add a Welcome Message to a Blogger  Homepage
How to Change the Color of the Blogger Nav Bar
How to Put a Twitter Follow Icon on Blogger Next to Post Title
How to Add a Blog Description to the Blogger Page Header


Sunday, May 31, 2020

How to Add a Blog Welcome Message to a Blogger Homepage

A blog welcome message is a great way to greet your visitors when they arrive on your Blogger blog. By adding a blog welcome message you will immediately engage your readers and they will get more information about what your blog is about. In this Blogger tutorial I not only show you how to add a welcome message to the homepage of a Blogger blog, but I also discuss what to say and where to place your welcome message on your blog.

Fortunately adding a blog welcome message to your Blogger homepage is easy to do with the text gadget and you can customize the look of the text, links, video and more.
How to Add a Blog Welcome Message to a Blogger Homepage - Blogger Tutorial for Beginners

What to Say in a Blogger Blog Welcome Message

A welcome message that greets visitors as they arrive on your blog can be placed on a Blogger blog with the intention of letting readers know more about your blog than they can glean from looking at your blog title and blog description. A welcome message typically says something about the purpose of your blog, may include something about you, what you do, what makes your content different and most importantly how you can help them solve a problem.

Your blog welcome message is an opportunity to engage your visitors so it is important to think about the flavor of the message you want to convey. For instance do you want to promote friendliness or trustworthiness, or both? Perhaps you want to include a message that promotes you as an authority on a subject so for example you might say I have 10 years industry experience in blogging or something like that to evidence your knowledge of the niche topic of your blog.

Take a look at this example of a simple Blog Welcome Message below that sets the tone for the visitor experience. The object is to encourage repeat visits and to let the visitor know you are there to help:
Welcome! Thanks for stopping by. This blog provides information on blogging and resources to customize your blog. I look forward to helping you create a successful blog. Please consider following me so you don't miss out on any new posts.

If you are interested in learning more about crafting a welcome message for your Blogger blog watch out for my upcoming blog post in which I give more examples of welcome messages and what to say to engage visitors.


Where to Position a Welcome Message on the Blogger Homepage Guide

Before we discuss how to add a blog welcome message it is a good idea to consider placement of your welcome message. There are three primary spots to place a welcome message: just below the header, above the post area or at the top of the sidebar.

Below the Header
A well crafted blog welcome message just below the header can be a good way to draw the eye to the hotspot below the header. If you have a banner or an Adsense unit there already you will need to be sure that the welcome message adds visual appeal and does not conflict with existing Adsense units or banners.

In the Sidebar
At the top of sidebar can also be a great place for your Blogger welcome message. If eye catching, the blog welcome message will grab a reader's attention in that spot.  Further a welcome message there is less likely to conflict with other widgets like banners or Adsense units.

Above the Post Area
Another option is to put a blog welcome message often called a sticky message above the posts in the main post section of Blogger. The benefits of this position for a blog welcome message is that it will not detract from any other widgets in place and will always display whenever a visitor lands on your Blogger homepage.

For detailed instructions on how to add a welcome message above blog posts in Blogger check out my companion article: How to Add a Sticky Welcome Message to Blogger

3 Options for Best Position of a Welcome Message on the Blogger Homepage


Steps to Add a Welcome Message to the Sidebar of a Blogger Homepage Guide

Follow the steps outlined below to quickly and easily add a welcome message to the sidebar of a Blogspot blog that greets your visitors no matter what page they land on. If you would prefer to place your message above the header or :

Step 1
Login to your Blogger account at Blogger.com

Step 2
From the Blogger Dashboard click on Layout from the menu on the left-hand side

Step 3
Find the Sidebar section. Click on the Add a Gadget link

Step 4
From the pop-up menu scroll down to select the Text gadget.  If you want a sophisticated welcome message that includes video and third-party scripts then choose the html/javascript widget instead from the same menu.

Steps to Add a blog Welcome Message to a Blogger Homepage using the Text Gadget
Add a Blog Welcome Message to a Blogger Homepage
sing the Text Gadget


Step 5
Click on the plus+ icon at the right of the Text gadget to create your welcome message.

Step 6
Enter a title for your message in the pop up window that appears. Name the gadget something meaningful like welcome message so you will be able to easily identify it later.

Step 7
Add the text of your Blogger welcome message into the text box. See an example of a welcome message in the image below for ideas. Using the Rich Text Editor icons you can add some simple styling by changing the text color, adding blockquotes, bold and italics. For more sophisticated styling click on the Edit HTML button which allows you to add specific HTML style code around your text. If you are not sure how to add HTML styling to your welcome message check out my other post on adding styling to a Blogger welcome message.

How to Use the Text Gadget to Create a Blog Welcome Message on the Homepage of a Blogspot Blog - Example Welcome Message
Use the Text Box Gadget to Create a Blog Welcome Message in Blogger


Step 8
Click Save to save your welcome message gadget.

Step 9
Click on Preview (bottom right-hand corner eye icon) to view your welcome message.

Step 10
Once you are happy with the message you can move on to repositioning it the sidebar. Use drag and drop to arrange the welcome message alongside other gadgets in the sidebar.

Step 10
Click Save by clicking on the save button bottom right-hand corner once you are satisfied with the positioning of your Blogger welcome message in the sidebar.


In this Blogger tutorial you have learned how to add a blog welcome message to Blogger. Also discussed were examples of what to say in a welcome message and where to place your message for best effect. Please feel free to comment about adding a blog welcome message if you would like to.


Related Articles

Basic Blogger Tutorials to Customize a Blogger Blog for Beginners
Advanced Blogger Tutorials to Customize a Blogger Blog
How to Add a Sticky Message Above Blogger Posts
How to Schedule Blog Posts in Blogger for a Specific Future Date and Time
How to Add a Copyright Notice to a Blogger Blog
How to Delete a Blogger Blog


Friday, May 29, 2020

How to Delete Locked Blogger Widgets and Fix Blogger Widgets Not Showing

If you are having difficulty with a locked widget in Blogger or you can't add a gadget in a section of Blogger then read on because I will show you how to open up a section so you can add a Blogger gadget, make the widget editable again or delete the Blogger widget depending on your needs.

Sometimes widgets in Blogger become locked.  This means the Blogger widget appears on your live blog but does not show up in the Layout menu and there is no way to edit or delete the widget.  Older blogs typically encounter locked widget problems.  Also Blogger can lock widgets with a change of template.

Want to Know How to Remove Locked Widgets in a Blogger Blog
Want to Know How to
Remove Locked Widgets in a Blogger Blog

How to Fix a Locked Widget So That it Can Be Edited in the Layout Menu

The following steps will unlock a widget that has become locked in a Blogger blog.

Step 1
Log in to your Blogger blog

Step 2
Click View Blog and locate the general area of the widget you want to change. Is it in the sidebar, footer, the header or just under the header?

Step 3.
Select Layout from the  left-hand menu

Step 4.
Look for the widget.  All editable widgets are denoted by four dots on the left-hand side. Check it isn't hiding in another area on the layout menu  eg in the Cross-Column rather than the Header.

If you find it go ahead and click on edit to make changes as usual.

If you don't find it and you are sure it is not displayed then continue with the following steps to manually unlock the missing Blogger widget.

Step 5.

Click on Theme from the left-hand menu

How to Remove Locked Widgets in a Blogger Blog use EDIT HTML


Click on Backup / Restore (right-hand top corner) and then download to back up your blog

Step 6.
From the Theme main page choose EDIT HTML button found below the view of Live on Blog

Step 7.
In the drop down menu labelled Jump to Widget click on the widget you are looking for.

In this example the missing widget is called Adsense1 and is locked in the Cross Column area of the Blogger Theme (not editable from the Layout menu).

To fix the problem jump to the widget Adsense1. In cases where the exact name of the widget isn't known just jump to the nearest area eg Header1 and scroll downwards to find it.

How to Remove Locked Widgets in a Blogger Blog - Go to Jump to Widget in Theme Edit HTML
Use the Jump to Widget to Locate the Locked up Widget
in Blogger Theme Edit HTML


Find the cross column area of the template around line 862 and the following code or very similiar.

<b section class='table' id='crosscol' maxwidgets='1' showaddelement='no'>
<widget id='Adsense1' locked='false' title=' ' type='Adsense'>...</b:widget>


How To Unlock Blogger Widget with Blogger Widget Code so that it can be edited in the Layout Menu

Open up the section so more widgets can be added by changing the maxwidgets to 2 and the showaddelement to yes. Go ahead and save the theme. Now navigate back to the Layout menu and you will find that the add gadget button is now available in the Cross Column section of the Blogger template and the locked Adsense widget is now editable.

How to Remove Locked Widgets in a Blogger Blog Layout Menu with Add a Gadget Fixed
Cross Column Section in Layout Menu Can Now Add a Gadget


How To Disable / Delete / Remove the Blogger Widget HTML Code Completely

While the name of the widget will vary depending on your situation the code between the widget tags will be similiar. You will note that the ...</b:widget> denotes that the widget is expandable and more code is hidden. In this case the quick pencil and all the color scheme for the Adsense unit is hidden.

<widget id='Adsense1' locked='false' title=' ' type='Adsense'>...</b:widget>

If you choose to delete the widget from the template take care to delete only the widget code for the widget. I like to expand the widget by clicking on the dots first before trying to delete it.

Once deleted and the changes to the theme saved go to view blog and you will see that the Blogger widget has been removed from your blog for good.


If you found this article helpful in some way feel free to leave a comment. If you would like to get more tips and tricks to customize Blogger consider following me.


Related Articles

Basic Blogger Tutorials to Customize a Blogger Blog for Beginners
How to Delete a Blogger Blog
How to Change Color of the Navbar or Delete it Altogether
How to Delete or Hide the Date Header in Blog Posts on Blogger
How to Remove or Hide the Labels Counter in Blogger