Welcome! At Blogspot Blogger Guide we show you the easy way to customize your Blogger Blog and offer tips, tricks and fixes to take the technical headache out of blogging.

Showing posts with label Blog Posts. Show all posts

Thursday, March 31, 2022

How to Change the Date of Blog Posts in Blogger

Blogspot gives content creators on the Blogger platform the option to change the date of any blog post. This means that it is possible to both postdate a blog post to sometime in the future or backdate a Blogger post to a date in the near or distant past. In this Blogger tutorial I show you how to change the date of a blog post in Blogger for both old articles and new posts and discuss reasons why changing dates needs to be done with care.
How to Change the Post Date of Blog Posts in Blogger to a date in the future or the past

You will learn about:

Backdating a Blog Post in Blogger
Steps to Backdate an Existing Blog Post in Blogger
Scheduling or Post Dating Blog Posts in Blogger
Steps to Schedule or Post Date Blog Posts in Blogger

Backdate Blog Posts in Blogger

Blogger gives you the option to backdate a blog post to any date as far back as about 1970. Postdating blog posts has to be done with care though and should not be overused. The main reason for this is that SEO can be detrimentally affected as Google's algorithm is weighted to some degree toward fresh content.

However if you need to have your blog posts in chronological order for some reason backdating posts is a great way to achieve this. If you have a bunch of old articles you want to refresh and then publish on a current or recent date Blogger will allow you do this too.

For more information on backdating blog posts in Blogger check out my article How to Backdate Blogger Posts or Publish Articles on a Retrospective Date


How to change the date of a blog post in Blogger and then publish on a retrospective date. Useful to keep blog articles and content in chronological order and to reorder the timeline of articles

Steps to Change the Date of an Existing Blog Post in Blogger

  1. Log in to Blogger

  2. Click on Posts and scroll to find the existing post you want to change the date of

  3. Open the Post by clicking on it. The Blogger Post Editor will open.

  4. On the right-hand side of the Compose Box in the editor you will see a menu - click on Published

  5. Select the Set Date and Time radio button

  6. Use the calendar to set a retropective date

  7. If you need to change the time click on it and select a new time from the drop-down box that opens

  8. Click the orange Update button save the change of date

  9. Click Preview to make sure the date and time are showing correctly

Postdate, Schedule or Future Date Blog Posts in Blogger

If you would like to publish your blog post on a date in the future you can do this by scheduling the blog post date to any date of your choosing. Blogger will publish your blog article on the date and time when it rolls around.

The facility to postdate Blogger posts is useful for those on a busy schedule. Improve your productivity and efficiency by planning ahead of time and publishing posts in advance. This is particularly useful if you are going on vacation and do not want to disrupt your posting schedule.
How to schedule blog posts in Blogger for a future date to improve productivity and efficiency

There are virtually no disadvantages of scheduling posts in advance except perhaps that if you happen to make a mistake on your blog post you may not catch it before it goes live. I suggest you check your article thoroughly before setting it to a future publication date.

For a more in-depth discussion on scheduling blog posts in Blogger please refer to my article on How to Future Date / Schedule Blog Posts to a Specific Date and Time


Steps to Schedule a Future Date for a Blog Post in Blogger

  1. Log in to Blogger

  2. Create a New Post or Open a Draft Post

  3. Select Published from the menu on the right-hand side

  4. Select the Set Date and Time radio button

  5. Use the calendar to set a future date for your blog post

  6. Change the time by clicking on it and selecting the time you would like the post to be published on from the times in the dropdown box

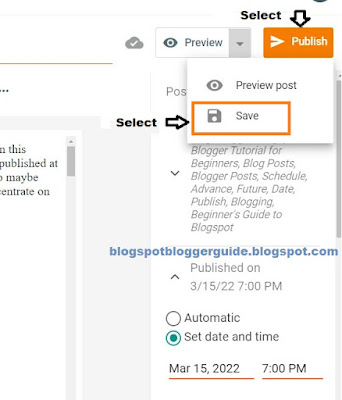
  7. Under Preview click Save and finish making other improvements to your blog post

  8. When ready to publish click on the orange Publish button

  9. From the Dashboard select posts and you will see that your post will be labelled scheduled for the date in the future you selected.


Summary

In this Blogger Tutorial you have learned how to change the date of an existing blog post for a Blogspot blog and how to schedule blog posts to publish on a future date. Also discussed are reasons you might want to change the post date. For SEO reasons backdating posts in Blogger needs to be done with care.


Related Links

How to Schedule a Blog Post to a Future Date in Blogger
How to Backdate Blogger Posts or Publish Articles on a Retrospective Date
Easy Ways to Put Banners on Blogger
How to Put a Twitter Follow Icon Next to Blog Post Title in Blogger
How to Add a Facebook Share Button to Blogger
How to Unlock or Delete Locked Widgets in Blogger
How to Add a Sticky Welcome Message Above Posts in Blogger
How to Add a Welcome Message to the Blogger Homepage


Sunday, March 27, 2022

Add a Widget or Gadget Above a Blog Post in Blogger

If you want to add a gadget or widget to Blogspot that displays above the blog posts then read on as in today's Blogger tutorial I explain how to open up the main posts section of a Blogger blog so that more gadgets can be added. Despite involving a small change to the Blogger theme it is not difficult and will only involve less than 5 minutes to unlock the main section so you can begin adding gadgets and widgets to Blogger in the Main Section.
Add a Widget or Gadget Above a Blog Post in Blogger - Blogspot Tutorial that teaches you how to open main section to add more gadgets if it is locked

By default Blogger themes on installation do not have the main section open to allow additional gadgets or widgets like a message or a banner to be added. Older default blogger templates have the main section locked in most cases. Therefore, in order to add gadgets the main section needs to be opened manually by tweaking the template. Whether you have a default Blogger theme or a third-party template unlocking the main section will not affect any other function.
Older blogger templates often have the main section locked so that no gadgets can be added but it can be unlocked to add gadgets and widgets

Follow this step-by-step tutorial if you want to start adding gadgets in the Blogger posts area like a banner or a welcome message or some other widget. I suggest you also take a look at my other in-related step-by-step Blogger tutorials that show you how to do the following:


How to Add a Gadget to the Main Posts Section in Blogger


In order to add a gadget or widget like a banner above blog posts in Blogger so that it displays on the homepage and all other blog pages it must first be possible to add a gadget to the main post area.

Check if the Add a Gadget Option in the Main Blogger Posts Section is Displayed


Check whether the Add a Gadget option is available by:

  1. From the Dashboard select the Layout menu from the left-hand side menu

  2. Scroll down to the Main Section where you will see the Blog Posts gadget in place

  3. Check whether the Add a Gadget option is available in the main section.


  4. If the Add a Gadget option is available you can skip
    to Step 12

    or

    If the Add a Gadget option is not available it needs to be unlocked by following the steps below that will first show you how to open the main section and then add the a gadget for affiliate banners, messages and more.


    Steps to Open the Main Posts Section in Blogger to Add Extra Gadgets


  5. From the Dashboard select Theme from the menu on the left-hand side

  6. Click on the down arrow on the orange Customize button

  7. Click Backup to back up your template before proceeding then return to the drop down menu under the customize arrow


  8. Choose Edit HTML from the drop down list of options

  9. Click anywhere in the Blogger template

  10. Enter CTRL + F to bring up the search box

  11. Enter the search term class='main'

    You are looking for these lines:

    <div id='main-wrapper'>
    <b:section class='main' id='main' showaddelement='no'>

  12. Replace the no with yes to show add element and save.

    The code should now look like this:
    <div id='main-wrapper'>
    <b:section class='main' id='main' showaddelement='yes'>

  13. Click Save to save the change to your template.

  14. Navigate back to the Layout menu from the Dashboard

  15. You will now be see the Add a Gadget link in the main blog post section. If for some reason this still isn't showing up then go back to the template and check if there is a maxwidgets attribute in the same line of code. Make sure that the maxwidgets="1" is set a number greater than one eg maxwidgets="2" and then save and go back to Layout again.


  16. Steps to Add a Gadget Above a Blog Post in Blogger


  17. To display your message or banner or other widget click on Add a Gadget above Blog Posts

  18. Choose the HTML/Javascript gadget or you could choose Text Gadget if no code is being added

  19. Paste the code in the content box in the pop up window that appears for the HTML / Javascript gadget.

  20. Add a Widget or Gadget Above a Blog Post in Blogger by going to the Main Section and creating a new HTML Javascript widget or Text Gadget and placing it first above blog posts gadget

  21. Click on Save

  22. Arrange your new gadget in the Main Section by dragging and dropping so that it occurs above the blog posts gadget in the Main Section

  23. Click on Preview (eye icon) in the bottom right corner to see your new banner.

  24. Click the Save button to apply your changes to the layout

Depending on the gadget you want to add above the blog posts you may find the following Blogger tutorials helpful:

Today I have shown you how to open up the main posts area in Blogger to accommodate extra gadgets. You have learned how to add an affiliate marketing banner to your Blogger blog (Blogspot blog) that displays just above the posts on every page.


Related Articles

How to Add a Welcome Message to Blogger
How to Add a Sticky Welcome Message to Blogger
Easy Way to Add Banners to Blogger

Thursday, March 24, 2022

How to Backdate a Blogger Post or Publish Article on a Retrospective Date

In today's Blogger tutorial I show you how to backdate a Blogger post to a date in the past. This handy Blogger feature allows content creators on the Blogger platform to customize blog posts by setting a user defined publication date for a blog post that is retrospective. Backdating a post is possible for any blog post you are about to publish or for an existing post where you want to change the publication date to an earlier date.
How to Backdate a Blogger Post or Publish an Article to a Retrospective Date

If you are looking for a Blogger Tutorial on how to set a future date you could check out my companion article on how to schedule Blogger Posts for a Specific Date in the Future.

Reasons to Backdate a Published Article or a New Post

It is not difficult to change the date of a blog post to a past date but this feature does need to be used with care. There are times when it can be useful to be able to backdate Blogger posts for example to fill a gap or to fit into a particular blog post timeline if your blog is date sensitve. You might change the dates of a blog post if you are intending to publish your blog as a book and want to tidy up the post dates for reasons of continuity.
How to Change the date of a Blogger Post to a retrospective date. Useful to keep blog post content in chronological order or to reorder the timeline of the date blog post are published
Change Date of Blog Posts to Past Date if You Need to Reorder the Timeline

Older Posts Can Be Seen as Less Relevant by Search Engines

Do keep in mind that older posts can potentially get penalized by the Google algorithm as they are viewed as less relevant.This is only an issue up to a point though as search engines are still able to recognize the actual date a post was published despite its timestamping. As a rule of thumb it is best not to overdo the backdating of blog articles unless you have a very specifc reason to do so.


Changing the Date of a Blogger Post Has No Affect on the Permalink

Changing the publication date of an blog article does not affect the permalink which is the URL (blog post address) assigned on publishing a blog post. Do not change the permalink without good reason as any backlinks to that article will be lost and search engines like Google will eventually remove the blog post from the search index. A redirect to handle deleted blog posts or changed permalinks can be set up but this is a subject for a more advanced Blogger tutorial that I will be writing about in the future.


Blogger Posts can be changed to a retrospective date without penalty even if they are already published
Blogger Posts Can Be Backdated to a Date and Time of Your Choice


Steps to Back Date an Existing Blog Post or to Publish an Article on an Earlier Date

  1. (a) Navigate to New Post and Create a Blogger post or
    (b) Open a draft post or
    (c) Open an already published post

  2. In the Blogger Post editor click on Published which is in the menu on the right-hand side of the compose box

  3. From the two radio buttons: Automatic and Set Time and Date click Set Time and Date and use the calendar that opens to set a date before the current date for your Blogger post

  4. (a) Click on Save and Update for an already published article or
    (b) Save from the Preview Drop Down Menu and then Publish to publish a new blog post

  5. Click on Posts to then view your post in a list of articles. It will now be timestamped for the date you selected.

  6. If you now click on the View button (the eye icon) to view the article you will see that the publication date of the blog post has changed to the date you selected. The date in the permalink which appears in the browser search window remains the same.


#blogspottutorial #bloggertutorial #changedate #blogposts

Summary

In this Blogger Tutorial I have shown you how to backdate a Blogger post and discussed reasons why you might choose to set a date for a Blogger post that is retrospective. There are advantages in selecting a user defined date especially if you are needing to reorder the timeline of your blog posts in Blogger for some reason. As a general rule it is best to keep blog articles current otherwise their relevancy in terms of the Google search engine algorithm can be affected.


Related Links

Easy Ways to Put Banners on Blogger
How to Put a Twitter Follow Icon Next to Blog Post Title in Blogger
How to Add a Facebook Share Button to Blogger
How to Unlock or Delete Locked Widgets in Blogger
How to Add a Sticky Welcome Message Above Posts in Blogger
How to Add a Welcome Message to the Blogger Homepage
How to Schedule a Blog Post to a Future Date in Blogger
How to Change the Date of Blog Posts in Blogger


Sunday, March 13, 2022

How to Change Image Size in Blogger Posts

In this Blogger Tutorial I show you how to change image size in Blogger posts depending on how you would like the image to look. Resizing images to fit in with the look and feel of your blog will enhance the overall look of your blog and so it is worth changing images to the optimal size. This tutorial is suitable for all Blogspot bloggers wanting to learn more about image size for Blogger posts but is written with beginners in mind.

Level of Difficulty: Easy

Suitable for: Beginners


How to Change Image Size in Blogger Posts - Blogger Tutorial Showing the Easy Way to Modify Images in Blogspot in 2022

How to Change Image Size Blogger

Blogger displays uploaded images using 5 different pre-set image sizes:
  • small - 200 px
  • medium - 320 px
  • large - 400 px
  • extra large - 640 px
  • original size - actual dimensions of the image (should not be wider than the width of your blog post area)

By default images are uploaded as medium size which means they are displayed at a width of 320px. You can make the image larger or smaller depending on the look of your blog and its theme. To set your own custom dimensions instead check out: How to Set Custom Image Dimensions in Blogger

How to Resize Images in Blogger Posts by Changing the Image Size to Default Image Sizes to Make the larger or smaller


I suggest that early on you settle on an image size you like and then consistently use the same image size to keep all images a uniform size across your blog posts. Also try to resize your images before you upload them so that you are not using large files that may slow down loading times of your blog. For more information on resizing images check out 8 Tips for Uploading Images to Blogger.

  • Decide on a default image size for all your post images and use the same size.

  • Resize large images prior to upload to speed up page loading time


Change Image Size in Blogger use the same image size in your Blogger posts for consistency and success rather than using lots of different sizes


Steps to Resize an Image in a Blogger Post

  1. Login in to your Blogger blog

  2. From the Dashboard select Posts from the left-hand menu to modify an image in an existing post
    or
    Select the New Post button to create a new post with images.

  3. Check you are in the Compose View (click the down arrow of the first icon of the tools menu.

  4. Find the image you want to resize.

  5. Click on the image once to highlight the picture.

  6. Steps to Change Image Sizes in Blogger Posts in the Compose View - Select the Wheel icon and select the size by clicking on the radio button

  7. Click on the gear icon (little wheel) that appears in the menu bar below the image

  8. Select the size of the image that best suits the look of your particular blog (Note: do not make your image larger than the width of your posts (an extra large setting displays at 640 width).

  9. How to Increase or Decrease Image Sizes in Blogger Posts using the Compose View

  10. Click Preview to check the look of your image as it will appear in your blog post

  11. Make an changes to the image size if necessary by clicking on the gear icon again

  12. If satisfied with the size of the image go ahead and save by either clicking save under Preview if creating a new post or if you are ready for your blog post to go live click Publish

  13. Click on the eye preview icon in the listing of your blog posts to see your image resized in your live blog post.


In this article you have learned how to change image size in Blogger. Image sizes can be changed to any of the default sizes in the Compose View in Blogger: small, medium, large, extra large and original size. It is helpful for the overall look of your blog to ensure that Blogger Post images sizes are the same size across your blog.

If you want to learn how to override the default image settings in Blogger then check out my other post which teaches you how to set your own custom image dimensions.


Related Articles

How to Add a Welcome Message to a Blogger Homepage
How to Change the Color of the Blogger Navbar
How to Choose a Great Topic for a Blogger Blog in 2020
How to Resize Images in Blogger to User Defined Dimensions
How to Schedule Blog Posts for a Specific Future Date in Blogger

Thursday, March 10, 2022

How to Schedule Blog Posts in Blogger in 2022 to a Specific Future Date

When posting on the Blogspot platform it is possible to set a future date for a blog post. In this Blogger tutorial I show you how to schedule your blog post ahead of time so that posts will be published on an advance date and time of your choosing. The Blogger tutorial is targeted at beginners who are maybe new to Blogspot and want to learn how to schedule blog posts the easy way so they can concentrate on creating great blog content.
How to Schedule Blog Posts in Blogger in 2022 for a specific future date - Blogspot Tutorial for Beginners

Benefits of Scheduling Blogger Posts for a Future Date

Scheduling posts for publication ahead of time provides the flexibility for Blogspot bloggers on a busy schedule to create blog posts at a time that suits them. This is a great feature if you want to write a bunch of posts before you go on vacation but without disrupting the consistency of your blog posting. Blogger allows you to schedule posts so that you can stagger their release daily or every couple of days or weekly whatever. The choice is totally up to you.

How to Schedule Blog Posts in Blogger in 2022 so that posts are published at an advance date you select

The facility to schedule blog posts ahead of time to be published on a specific day makes it possible for bloggers in business to coordinate a whole marketing strategy where social media releases coincide with blog post publication. Not only does it afford streamlining of you blogging operation it will save time and reduce stress to keep ahead with your blog posting. It also offers a welcome cushion if some adverse event or unforseen circumstance disrupts your publication schedule.


Steps to Schedule a Blog Post in Advance in Blogger

  1. Log in to Blogger.com

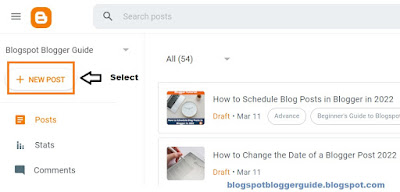
  2. From the Dashboard navigate to New Post as usual to create a new blog post or select draft post to continue working on an unfinished article.

  3. How to Schedule Blog Posts in Blogger - Step-by-Step Blogger Tutorial - Step 1 Select New Post

  4. In the Blogger Post Editor that opens up go ahead and write your blog post as usual. Either Compose View or Edit HTML view is fine.

  5. When ready to publish click on Published on: (formerly Schedule) which is in the menu on the right-hand side of the compose box.

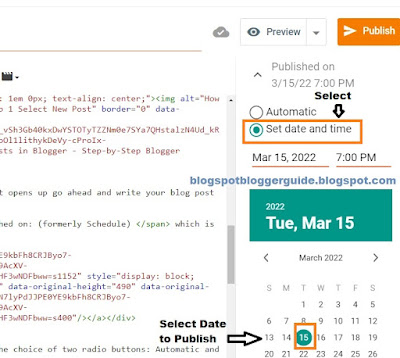
  6. How to Schedule Blog Posts in Blogger - Step-by-Step Blogger Tutorial - Step 2 Select Published On and Choose Date of Publication

  7. Click Set Time and Date from the choice of two radio buttons: Automatic and Set Time and Date.

  8. How to Schedule Blog Posts in Blogger - Step-by-Step Blogger Tutorial - Step 3 Select Date and time you wish to publish by clicking on Published On

  9. Using the calendar click on a date that you want your blog post to appear on.

  10. Now select the time you want to publish by clicking on the date and then selecting a time from the dropdown menu that appears. You could also skip this step if you are happy with the original time set.

  11. How to Schedule Blog Posts in Blogger - Step-by-Step Blogger Tutorial - Step 4 Select Time from the dropdown menu under set date and time

  12. Click on Save.

  13. How to Schedule Blog Posts in Blogger - blogspot tutorial step-by-step select date and time save and publish

  14. Click on Publish but check first that you have included some appropriate labels and that you have set up a suitable permalink


  15. A confirmation popup window will appear. Check you publication date and time before clicking on Confirm

  16. How to Schedule Blog Posts in Blogger - Blogspot tutorial step-by-step select confirm in the publish confirmation screen once you have checked your user selected date and time to publish

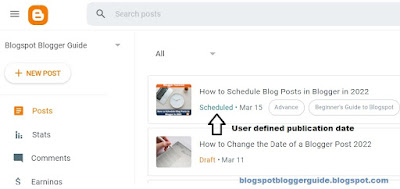
  17. To find your scheduled blog post click on Posts in the Dashboard and then Published to find and view your schedule post.

    Scheduled posts are denoted by the word "Scheduled" which appears in green under the post title. If you change your mind about the date and time to publish simply click on the chevron arrow to revert the article from published back to draft status and then go ahead and make your changes as usual.

  18. How to Schedule Blog Posts in Blogger - Blogspot tutorial step-by-step - Scheduled Blog Posts are denoted in green in blogger in the Dashboard under Published Posts


In today's Blogger Tutorial you learned about how to schedule blog posts for a specific future date. The main advantages of setting a date in the future is if you want to stagger your posts either because you are going on vacation or you are planning your blog publishing schedule in advance of the creation date. If you enjoyed this post and found it helpful consider following me here on Blogger or on other social media such as Pinterest and Instagram.

#bloggertutorial #blogspottutorial #blogposts #postschedule


Related Articles

How to Add a Copyright Notice to a Blogger Blog
How to Add a Sticky Message Above Blogger Posts
How to Add a Welcome Message to a Blogger Homepage
How to Change the Color of the Blogger Nav Bar
Why Blogger is a Better Blogging Platform than Wordpress
How to Choose a Great Topic for a Blogger Blog in 2020
How to Change the Date of Blog Posts in Blogger
How to Backdate Blog Posts or Publish Article on Retrospective Date

Sunday, May 31, 2020

How to Add a Blog Welcome Message to a Blogger Homepage

A blog welcome message is a great way to greet your visitors when they arrive on your Blogger blog. By adding a blog welcome message you will immediately engage your readers and they will get more information about what your blog is about. In this Blogger tutorial I not only show you how to add a welcome message to the homepage of a Blogger blog, but I also discuss what to say and where to place your welcome message on your blog.

Fortunately adding a blog welcome message to your Blogger homepage is easy to do with the text gadget and you can customize the look of the text, links, video and more.
How to Add a Blog Welcome Message to a Blogger Homepage - Blogger Tutorial for Beginners

What to Say in a Blogger Blog Welcome Message

A welcome message that greets visitors as they arrive on your blog can be placed on a Blogger blog with the intention of letting readers know more about your blog than they can glean from looking at your blog title and blog description. A welcome message typically says something about the purpose of your blog, may include something about you, what you do, what makes your content different and most importantly how you can help them solve a problem.

Your blog welcome message is an opportunity to engage your visitors so it is important to think about the flavor of the message you want to convey. For instance do you want to promote friendliness or trustworthiness, or both? Perhaps you want to include a message that promotes you as an authority on a subject so for example you might say I have 10 years industry experience in blogging or something like that to evidence your knowledge of the niche topic of your blog.

Take a look at this example of a simple Blog Welcome Message below that sets the tone for the visitor experience. The object is to encourage repeat visits and to let the visitor know you are there to help:
Welcome! Thanks for stopping by. This blog provides information on blogging and resources to customize your blog. I look forward to helping you create a successful blog. Please consider following me so you don't miss out on any new posts.

If you are interested in learning more about crafting a welcome message for your Blogger blog watch out for my upcoming blog post in which I give more examples of welcome messages and what to say to engage visitors.


Where to Position a Welcome Message on the Blogger Homepage Guide
Before we discuss how to add a blog welcome message it is a good idea to consider placement of your welcome message. There are three primary spots to place a welcome message: just below the header, above the post area or at the top of the sidebar.

Below the Header
A well crafted blog welcome message just below the header can be a good way to draw the eye to the hotspot below the header. If you have a banner or an Adsense unit there already you will need to be sure that the welcome message adds visual appeal and does not conflict with existing Adsense units or banners.

In the Sidebar
At the top of sidebar can also be a great place for your Blogger welcome message. If eye catching, the blog welcome message will grab a reader's attention in that spot.  Further a welcome message there is less likely to conflict with other widgets like banners or Adsense units.

Above the Post Area
Another option is to put a blog welcome message often called a sticky message above the posts in the main post section of Blogger. The benefits of this position for a blog welcome message is that it will not detract from any other widgets in place and will always display whenever a visitor lands on your Blogger homepage.

For detailed instructions on how to add a welcome message above blog posts in Blogger check out my companion article: How to Add a Sticky Welcome Message to Blogger

3 Options for Best Position of a Welcome Message on the Blogger Homepage


Steps to Add a Welcome Message to the Sidebar of a Blogger Homepage Guide

Follow the steps outlined below to quickly and easily add a welcome message to the sidebar of a Blogspot blog that greets your visitors no matter what page they land on. If you would prefer to place your message above the header or :

Step 1
Login to your Blogger account at Blogger.com

Step 2
From the Blogger Dashboard click on Layout from the menu on the left-hand side

Step 3
Find the Sidebar section. Click on the Add a Gadget link

Step 4
From the pop-up menu scroll down to select the Text gadget.  If you want a sophisticated welcome message that includes video and third-party scripts then choose the html/javascript widget instead from the same menu.

Steps to Add a blog Welcome Message to a Blogger Homepage using the Text Gadget
Add a Blog Welcome Message to a Blogger Homepage
sing the Text Gadget


Step 5
Click on the plus+ icon at the right of the Text gadget to create your welcome message.

Step 6
Enter a title for your message in the pop up window that appears. Name the gadget something meaningful like welcome message so you will be able to easily identify it later.

Step 7
Add the text of your Blogger welcome message into the text box. See an example of a welcome message in the image below for ideas. Using the Rich Text Editor icons you can add some simple styling by changing the text color, adding blockquotes, bold and italics. For more sophisticated styling click on the Edit HTML button which allows you to add specific HTML style code around your text. If you are not sure how to add HTML styling to your welcome message check out my other post on adding styling to a Blogger welcome message.

How to Use the Text Gadget to Create a Blog Welcome Message on the Homepage of a Blogspot Blog - Example Welcome Message
Use the Text Box Gadget to Create a Blog Welcome Message in Blogger


Step 8
Click Save to save your welcome message gadget.

Step 9
Click on Preview (bottom right-hand corner eye icon) to view your welcome message.

Step 10
Once you are happy with the message you can move on to repositioning it the sidebar. Use drag and drop to arrange the welcome message alongside other gadgets in the sidebar.

Step 10
Click Save by clicking on the save button bottom right-hand corner once you are satisfied with the positioning of your Blogger welcome message in the sidebar.


In this Blogger tutorial you have learned how to add a blog welcome message to Blogger. Also discussed were examples of what to say in a welcome message and where to place your message for best effect. Please feel free to comment about adding a blog welcome message if you would like to.


Related Articles

Basic Blogger Tutorials to Customize a Blogger Blog for Beginners
Advanced Blogger Tutorials to Customize a Blogger Blog
How to Add a Sticky Message Above Blogger Posts
How to Schedule Blog Posts in Blogger for a Specific Future Date and Time
How to Add a Copyright Notice to a Blogger Blog
How to Delete a Blogger Blog