Welcome! At Blogspot Blogger Guide we show you the easy way to customize your Blogger Blog and offer tips, tricks and fixes to take the technical headache out of blogging.

Showing posts with label Blogger for Beginners. Show all posts

Monday, January 31, 2022

How to Add a Copyright Notice to a Blogger Blogspot Blog in 2022

In this Blogger tutorial you will learn how to add a copyright notice to your Blogspot blog (Blogger blog) to protect your blog content and deter content lifting. With Blogger copyrighting your blog is an easy 2 minute task that requires no change to coding. Follow the simple steps below to have a copyright notice displaying in the footer of your Blogger blog in no time.
How to Add a Copyright Notice to a Blogger Blogspot Blog in 2022

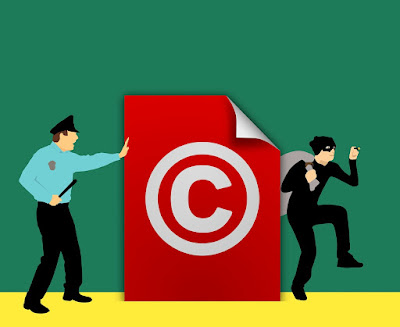
The most obvious advantage of putting a copyright notice on Blogger is it will act as a deterrent to would-be blog scrapers. Duplicating content from others blogs is a common practice all over the internet and it is important to safeguard your content and images.
Add a Copyright Notice to Blogger to Deter Content Theft

It is worth checking periodically if any of your content has been duplicated elsewhere on the net. If it has been scraped there are some steps you can take to claim the content and I will write about these in another article. One way to check the level of duplication of your content is to take a look at Copyscape a site devoted to identifying duplicate content and plagerism on the web.

Steps to Add a Copyright Notice to a Blogger Blog


Step 1
Login to Blogger

Step 2
From the Blogger dashboard click Layout in the menu on the left-hand side
How to Add a Copyright Notice to Blogger Blog Step 1 Navigate to the Layout Menu

Step 3
Scroll to the bottom of the Layout Menu

Step 4
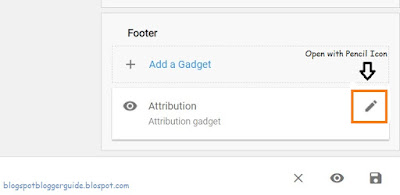
Open the Attribution Gadget by clicking on the Pencil Icon.
How to Add a Copyright Notice to Blogger Blog Step 3 Open the Attribution Gadget

For Default Blogger Themes
By default Blogger adds an attribution widget to the footer of your blog when you first create it. Whether you choose to fill it in is optional. Occasionally the Attribution Gadget can be appear the sidebar if your blog was created some years ago.

For Third Party Themes
If the Attribution Gadget is not already installed you may need to use Add a Gadget and then select the Attribution Gadget from the menu of gadgets. If you can not add a gadget to the footer at all then you will need to navigate to Theme >> Customize >> Edit HTML. Search using CTRL + F to find the footer widget in your blog and then change from showaddelement='no' to showaddelement='yes'
Step 5
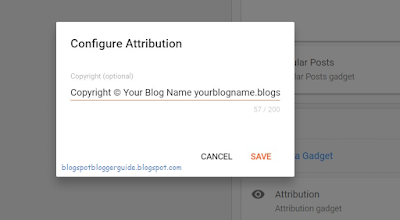
Enter a copyright notice.
eg Copyright © yourblogname.blogspot.com 2022
or Copyright © Your Blog Name yourblogname.blogspot.com 2022

How to Add a Copyright Notice to Blogger Blog Step 5 Enter Your Copyright Notice

Step 6
Click Save

Step 7
Use the Preview Button on the bottom left to view your copyright notice at the bottom of your blog.

How to Add a Copyright Notice to Blogger Blog Step 7 Preview Your Copyright Notice on Your Blog

Step 8
Navigate back to the Layout Menu by clicking on the back arrow in your browser.

Step 9
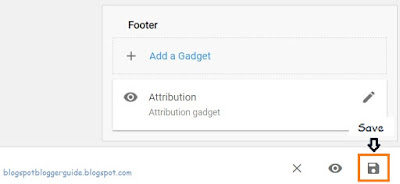
If you are happy with your copyright notice then make sure you click on Save icon in the bottom left to update the Blogger Theme.
How to Add a Copyright Notice to Blogger Blog Step 9 Don't Forget to Save Your Changes in the Layout Menu

Step 10
Remember to periodically update your copyright notice. I suggest you do it every year and that you span the copyright over the years your have been publishing articles.

In this article you have learned how to add a copyright notice to the Blogger footer to deter content lifting. If you found this article helpful please consider following me here or on social media so you can stay up-to-date with any future articles.


Related Articles

How to Add a Welcome Message to a Blogger Homepage
How to Change the Color of the Blogger Nav Bar
Why Blogger is a Better Blogging Platform than Wordpress 2020
How to Choose a Great Topic for a Blogger Blog in 2020


Friday, November 19, 2021

Blogger vs Wordpress - Benefits of Blogging on Blogspot Platform

This article compares Blogger vs Wordpress. It covers the main features of the Blogspot blogging platform at blogger.com and gives a short summary of the advantages and disadvantages of Blogger over Wordpress as a blogging platform.

Blogger vs Wordpress- Which is the Better Blogging Platform?

Creating your Blogspot blog at Blogger.com is a good choice for beginner bloggers because it is a free blogging platform with an easy interface and good features. More advanced bloggers may find the lack of some advanced features annoying but Blogger is definitely worth considering as a blogging platform to try out blogging at no cost.

At Blogger.com you don't need a custom domain so there is no cost involved in purchasing a domain name if you don't want to.  However, should you wish to dispense with the subdomain name Blogger assigns by default, Blogger.com offers the facility to add a custom domain name to your Blogger blog for free.

Blogger.com is a powerful  blogging platform  but still suited to beginner  bloggers
Blogspot (blogger.com) is a powerful blogging platform
but still suited to beginner bloggers

Main Blogger / Blogspot Features

  • Blogger is a completely free blogging platform

  • Blogger is fast to set up. It only takes about 10 minutes to create a blog, configure the settings and add some gadgets.

  • Regardless of your level of  technical expertise Blogger is an easy and intuitive interface to use. Widgets that add functionality to a blog are inserted easily using drag and drop and buttons and links make navigation easy.

  • Bandwidth is unlimited with Blogger so there are no bandwidth issues with video and pictures

  • It is easy to integrate Google Adsense ad units into your blog once you meet the criteria for an Adsense account.  
  • Advertising banners and scripts can easily be incorporated into a Blogspot blog.

  • Google Analytics can be added to track blog performance

  • It is possible to use your own custom domain rather than the default. For instance yoursite.com instead of yoursite.blogspot.com

  • Blogger supports blogging from mobile locations

  • Blogger comes with ready made templates. Default Blogger templates can be tweaked with the addition of HMTL and CSS to achieve a unique look.  It is also possible to add a custom template for a more professional look. There are thousands of Blogger templates (both free and paid) to use with different types of blogs depending on purpose eg portfolio, magazine, video etc.

    The advantage of uploading a custom premium Blogger theme is that most of the hard work is done for you. You may also consider buying a Blogger theme that offers support for any problems that arise.  Most premium Blogger themes are around $20 at websites like Theme Forest.

Blogger vs Wordpress - Benefits of Blogger over Wordpress
Benefits of Blogger over Wordpress


Comparison of the Blogger Platform over Wordpress

There are two different versions of the Wordpress blogging platform.

Wordpress.com  offers a straight forward no nonsense hosted blogging platform which is a rival to Google's Blogger platform. 

Wordpress.org offers a more flexible self-hosted option that requires paid hosting and a custom domain name out of the box.

Interface

The Wordpress.com interface is clunkier than that of Blogger.com.  There is a learning curve to using either of these blogging platforms.  If you don't want a full blog or the headache consider Tumblr a mini blog or even Twitter a micro blog.

Advertising

Wordpress adds its own advertising to your blog and derives revenue from those ads.  Blogger on the other hand puts no advertising on your blog.  With Blogger any revenue a blog derives from advertising is entirely the users.

Storage Space

While Blogger.com allows fairly good storage for photos with Picasa, Wordpress.com caps site storage at 3 GBs.  Running out of storage space is likely to be a problem with Wordpress.com as your blog grows and needs more and more space.

Cost

Blogger is entirely free as is Wordpress.com.  However Wordpress.com only offers limited features.  To access a full range of premium features with Wordpress.com there is a cost depending on what level of account you choose.

Bandwidth

Another issue with Wordpress.com is that once your blog grows and the number of visitors increases you may be required to swap over from the free option to a paid option.


Best Blogging Platforms  - Wordpress.com offers both free and paid options
Wordpress.com offers both free and paid options

Blogger vs Wordpress.org

Don't confuse Wordpress.com with Wordpress.org which is an entirely different option.  The strength of Wordpress.org lies in the flexibility and options for plugins to the basic Wordpress program. In order to access Wordpress.org you will need paid hosting for your blog and a custom domain name.

Learning Curve

With added functionality and features comes a steep learning curve to start blogging with the Wordpress.org blogging platform.  If you are not technically minded this can be a headache and detract from the fun of creating a blog.

Functionality

Wordpress.org definitely has the advantage when it comes to features.  There are many templates and plugins available and in the process of development. There are some great professional looking Wordpress themes that will really make your blog stand out.  If you intend to integrate a shopping cart down the track it will be easier to start with Wordpress which has modules and plugins for ecommerce.

Cost

Wordpress needs to be hosted somewhere like Blue Hosting or Hostgator.  To start blogging with Wordpress you will also need a custom domain name available from domain name sites like GoDaddy.  As your traffic increases expect to need to upgrade to a more comprehensive hosting plan with greater bandwidth which will increase annual running costs.

One of the advantages of Blogger is that as a Google product it is a very stable blogging platform.  In selecting Wordpress your website is subject to the vagaries of the host.  Lots of server down time and slow speeds will negatively impact on your blog traffic.  As someone who has personally had problems with too much server down time I would recommend that if you go with Wordpress.org you choose your web hosting carefully. The cheaper the hosting the more likely this will be a problem.

Problems

Whatever blogging platform you choose expect to have some technical problems.  Wordpress is more bug ridden and problematic than Blogger however this is purely my point of view. Wordpress is a very popular blogging platform with many loyal followers and it rightly deserves its praise having cornered a third of the blogging market.

Wordpress.org is constantly being updated to improve the interface and eliminate security risks and bugs. Blogspot, on the otherhand, is only being updated periodically these days. However, there are lots of third party hacks and scripts for both blogging platforms so it is usually possible to find a work around for most problems.


How to Decide Whether to Blog with Blogger or Wordpress


How to Decide Between Blogger vs Wordpress.org

I am not an advocate of Wordpress.com because of the advertising and the limited features.  Deciding between Blogger and Wordpress.org takes more thought however.  With both platforms there is the facility to build a viable blog that will attract visitors from around the world.

For the less technically minded Blogger is the better choice as much of the hard work is taken out of the process of adding information and gadgets to a blog.  Blogger is entirely free making it a good option to have a bit of a dabble in the blogging arena at no cost.

As a self-hosted option Wordpress.org costs from the outset so it is more of a commitment whereas Blogger is a platform you can grow into. If you want to future proof your blog in case you want to add ecommerce and other advanced features then Wordpress.org wins over Blogger.com.

At the end of the day Blogger is a powerful blogging platform that can be modified to suit individual taste and needs. I prefer it because I find it faster to use than Wordpress and I encounter fewer problems. The lack of SEO is one of Blogger's main drawbacks but with a bit of tweaking this can be overcome too.

If you are starting out as a beginner blogger I recommend that before you lay out your hard earned money you at least have a play with Google Blogger before you even consider Wordpress.org. When Blogger vs Wordpress are compared side-by-side Blogger as a free blogging platform has a lot going for it.


Related Articles

7 Tips for Choosing a Great Blog Topic
How to Set Up a Blogspot Blog on Blogger.com
How to Get a Free Blog at Blogger.com
Why Blogger.com is a Better Blogging Platform than Wordpress for Beginner Bloggers in 2022

Saturday, June 13, 2020

How to Choose a Great Blog Topic for a Blogger Blog - 7 Tips for Beginner Bloggers

Have you chosen a blog topic for your Blogger blog that is right for you? Lots of people start their Blogspot blogs at Blogger.com without giving much thought to their selection of blog topic. Or the angle of the topic they want to explore. If you want your Blogger blog to stand out from the crowd make sure you consider your blog topic carefully.
How to Choose a Great Blog Topic for a Blogger Blog - 7 Tips for Beginner Bloggers to help choose a subject and niche that is right for you

A good blog topic or niche can make or break a blog. Like some partners some blogs and their owners just don't fit no matter which way you look at it. Make sure before you spend 3 to 6 months of initial slog to develop your blog that you haven't placed your ladder against the wrong wall.


How to Choose A Good Blog Topic - 7 tips for Beginner and Newbie bloggers and anyone who wants to build a successful blogger blog
How do I Choose a Good Blog Topic


Tips to Help You Choose a Great Blog Topic

Here are a few tips that will get you thinking about your topic or niche topic for your Blogspot blog at Blogger.com and how important it is to choose the right one for you.

1. Choose a blog topic that you are passionate about
2. Choose a blog topic that interests you not just interests others
3. Choose a blog topic that has potential for readership
4. Know your subject area
5. What's your angle? Identify your angle when choosing a blog topic
6. Choose a blog topic with a medium to long shelf life
7. Clearly define the parameters and scope of your blog topic


1. Choose a blog topic that you are passionate about

You are going to be writing content about this blog topic for 365 days of the year for at least 2-5 years. For that to work successfully you have to have some passion otherwise the tedium will wear you down.

Conversely if you are really passionate about a topic that passion will shine through in your blog and like a big magnet it will attract others.

2. Choose a blog topic that interests you not just interests others

Yes you can make money writing about making money but if you aren't interested in money you have a problem. The topic itself may be viable commercially but readers will soon figure out if you are in it for the money not the fun. Make sure you are genuinely interested in your blog topic and not just choosing it because it seems to be a hot topic. Don't forget readers are going to want new and fresh content and will not stick around if you are not up to providing it.


Who is My Audience and What Interests Them? Know Your Audience - Choose a Blog Topic that will have a global audience and cater for their interests. Make sure you know the interests of your visitors
Who is My Audience and What Interests Them?


3. Choose a blog topic that has potential for readership

If you choose a more unusual blog topic or very narrowly defined niche then you may find you are the only one interested in it. However if you have very little competition you will be able to quickly carve out a niche for your blog.

Research your market. Check out forums. Identify if there actually is a gap waiting to be filled. If there are a lot of others writing about the same topic can the market sustain another blog or will it be a hard slog to get traffic. Know your audience.

Attracting visitors and maintaining readership are important factors in ensuring that your blog will generate a steady income stream. If monetization is important to you check your blog's potential for adding relevant ads and affiliate marketing.

Choose a blog topic that has potential for readership. Carry out research prior to starting your blog to be sure that the market is not too saturated already and if it is find a way to niche down further
Research Your Topic to Ensure a Readership Base Exists

4. Know your subject area

How well do you know the subject matter of your chosen blog topic? Readers will quickly assess your knowledge of your blog topic and will expect you to deliver the goods.

If you are passionate but not very knowledgeable how will you find the information you need to create new material? Creating content is time consuming and it requires good research skills. Have you got access to the kind of information you are going to need?

As a general rule don't choose a topic you know very little about or you may find yourself floundering once you have exhausted your own ideas.


5. What's your angle? Identify your angle when choosing a blog topic

Knowing your subject is one thing but finding a fresh angle is something else. If you want to create a blog in a subject area that is already heavily populated with other blogs you are likely to be more successful if you can find a good angle that has yet to be exploited. Most information isn't new it is just repackaged. How will you pitch your blog? Check out other blogs and identify what aspects might not be so well covered. Make a list of these and ask yourself if any of these areas has enough scope to sustain a blog by itself.

6. Choose a blog topic with a medium to long shelf life

Your blog topic might be great but will readers be interested in it a year or two down the track? This is particularly true for technology based blogs where products come and go and change happens at a rapid rate. Rethink your idea if your topic may not have long term sustainability. Ask yourself if there is a way to reframe it so that it will be more ongoing rather than of short duration.

7. Clearly define the parameters and scope of your blog topic

Do you know what the parameters of your blog topic are? What you will cover and what you won't? If you don't know what the limits of your blog are others won't know either.

Think carefully about your blog topic and define the parameters to narrow the scope.  Niche down. Better to be an authority on a narrow subject than go too wide


It pays to carefully define the scope of your blog or you run the risk of trying to cover everything and losing your audience because they have no idea what your blog is about. Often the most successful blogs are those that focus on a specialist subject and stick within those guidelines. It is better to be an authority on a narrow topic area than go too wide.

Jot down now what your blog actually covers. Include your material and your audience in this. For instance, is your blog for everyone or is it focused on beginners only like this blog? Deciding this early on will make it easy to pitch your articles in a particular way. If you have no clarity you may find you write good material but it is not pitched to the right audience.

Make notes to clarify what your blog covers so that you can pitch articles to the right audience
Jot Down Ideas About What Your Blog Covers
to Make Sure You Pitch it the Right Audience


If you have lots of ideas for a blog topic you will need to crystallize these. Jotting down advantages and disadvantages will help you sort the wheat from the chaff. You may find you have several good ideas but select only one of these to concentrate on. Once things are up and running with your first venture you might decide to get cracking on the second idea but prioritize to start with.

Remember that laying the groundwork now will prevent disappointment further down the track. Your idea has a much greater chance of being successful if you spend some time getting clear about what you want from your blog and what you want to achieve. Even if your idea needs a lot of refining the exercise is a great opportunity to put some planning in place and planning your blog as in most things in life is one of the cornerstones of success.

Doing the Groundwork to Define Your Blog Topic is Key to a Successful Blog
Doing the Groundwork First is Key to a Successful Blog


Summary

This Blogger tutorial has focused on how to choose a great blog topic for a  Blogspot blog. I have discussed 7 tips to help beginner bloggers new to the Google Blogger platform and blogging choose a blog topic that will fit with their knowledge base and interests. Finding a good fit with your blog topic is one of the keys to success and worth taking the time to consider carefully. Any thoughts or ideas about this article please share them.


Related Articles

How to Set Up a Blogspot Blog on Blogger.com
How to Get a Free Blog at Blogger.com
Benefits of Blogging with Blogger.com
Why Blogger.com is a Better Blogging Platform than Wordpress in 2020


Monday, October 5, 2009

How to Put a Twitter Follow Me Button Icon on a Blogger Blog

Would you like your Blogger blog visitors to be able to follow you on Twitter? Or perhaps just provide the option to Tweet something about a post you have written. It's easy when you put a dedicated Twitter follow button on your Blogger blog (Blogspot blog). Let me show you how.
How to Put a Twitter Follow Me Button Icon on a Blogger Blog

Latest Update: Updated on 26 February 2022

Just follow the instructions below to add a Twitter follow me button to Blogger to encourage your readers to follow your Twitter tweets. This is an easy way to attract new traffic to your blog and it only takes a few minutes.
Instructions on how to Put Share and Follow Twitter Buttons and Icons on Blogger

This Blogger tutorial is easy and doesn't involve changing your Blogger template.
How to Add a Free Twitter Follow Button to a Blogger Blog

How to Put a Twitter Icon on Blogger (Blogspot)

There are lots of Twitter icons to choose from. Below are several to get you started. Remember you can change this Twitter icon or button for another if you find a better one simply by changing the URL address of the image.

  1. Log in to Blogger
  2. At the Dashboard go to Layout 
  3. Click Add a Gadget in the sidebar or where ever you want to place your Twitter icon
  4. Choose the HTML/Javascript gadget
  5. Copy and paste the following HTML code for the icon into the content box

    Free Twitter Button 1 - How to Put a Twitter Follow Me Button Icon on a Blogger Blog
    <a href="https://twitter.com/Your-Twitter-Username"><img width="150" src="https://blogger.googleusercontent.com/img/b/R29vZ2xl/AVvXsEgKc2rGote0bsR7VtHMulwHQpU8j_uN7DAPLAd14imYUigB7liNS71vKsbIzcaHPPs4cZkcyclOAkvZ39_456ZdNW0gE9BRm3DspfzCrrrSb7YZPN0bexZcpSG1Xi-JTWHuNuu-85Dc_l1T/s320/twitter-34c.png" height="124" title="Follow Me on Twitter"/></a><br/>


    Free Twitter Button 2 - How to Put a Twitter Button Icon on Blogger
    <a href="https://twitter.com/Your-Twitter-Username"><img width="175" src="https://blogger.googleusercontent.com/img/b/R29vZ2xl/AVvXsEgJJp9fr_mYowcPC2G4bqOscUVrK4RP1vZFZjNJbSoH1wSh6cBhp1uQZ9o5DqHmGLgK1rHqDEyMSNYJtGs8-senOFPp34DDavnpl3ujD6s-IT6CJQDOM941DjIbThyphenhyphenKoTd2zOd0sg3VoLeW/s320/twitter8gif.gif" height="81" title="Follow Me on Twitter"/></a><br/>


    Free Twitter Button 3 - How to Put a Twitter Button Icon on Blogger
    <a href="https://twitter.com/Your-Twitter-Username"><img width="152" src="https://blogger.googleusercontent.com/img/b/R29vZ2xl/AVvXsEisZPXqyqkhq8XmTBBhfrBULTJxvvsLWCOue17LfvcrTlM14XY1gxDOK8-sF_E-ZgL9vcxw65BIONtfVNH7qjs95iXIlgpFVGQRQSSn1rppZaKhSwmU9HpORs4ZPF53kUIwHdAsc9_rOjnF/s320/nt11.png" height="68" title="Follow Me on Twitter"/></a><br/>
  6. Change Your-Twitter-Username for your own Twitter username
  7. Click Save
  8. View your blog to see the Twitter icon in your Blogger sidebar


Twitter Follow Me Buttons

There are heaps of free Twitter Follow Me buttons to download from the internet. My advice is if you find an icon or button you like be sure to check the licensing arrangements before using it on your Blogger blog. Many icons are only free for personal use rather than commercial use and therefore not suitable if your intention is to monetize your blog. In your search look for the phrases like public domain, no attribution required and Creative Commons (CC0) to ensure you have permission to use the icon or button commerically.
How to Search for Free Twitter Follow Me Buttons

You may be tempted to just download a button in a search of Google images but be aware that you will need a PNG file with a transparent background for your button not just a jpeg or jpg. Also your button will need to be hosted somewhere. You can upload it to Blogger or Google Drive for instance and then just use the same code above in your Blogger gadget and simply change the URL of the image.
Twitter Follow Me Button

If you are not looking for anything too fancy you could just use the buttons provided by Twitter. You can get the code from Twitter for a simple follow button with the option to display a count of your Twitter followers.

Twitter Share Buttons

Another option if you want sharing buttons rather than follow buttons beyond what Twitter offers is to use free services like AddThis and ShareThis. These sites provide code that you can quickly add to Blogger to create a bank of buttons including Twitter similar to what you see on this site.
Free Twitter Follow buttons for Blogger

For sharing content and embedding tweets you can also go to Twitter to put the button displayed here on your post somewhere so readers can go directly to Twitter and immediately tweet something about your post if they are signed in.


Summary

Today you have learned how to add a dedicated Twitter follow button to your Blogger blog. If you follow the instructions above you will have your Twitter button or badge up and running in no time. You also learned how to add a tweet button from Twitter. If you want other button designs for the follow button you can still use the method above but you will need to have the image hosted on the internet somewhere or else upload it to Blogger yourself and then just change the url of the image.


Related Links

How to Change the Color of the Blogger Navbar on a Blogspot Blog
How to Remove or Hide the Blogger Navbar on a Blogspot Blog
How to Add a Copyright Notice to a Blogger Blog
How to Turn Off the Labels Counter on a Blogger Blogspot Blog
Easy Ways to Put Banners on Blogger
Making Money From Banners with Blogger
How to Get More Adsense Clicks with Blogger
Blogger Guide to Google Adsense Placement

Thursday, April 16, 2009

Easy Way to Put Banner Ads on a Blogger Blog

Beginner bloggers who want to make money from their blog often ask me how to put affiliate banners on a Blogger blog (Blogspot blog). In this Blogspot tutorial I outline the steps to help you put banners on Blogger the easy way in three different positions: the sidebar, the footer and above blog posts. Follow these instructions and you will have your affiliate banners up and running in no time and start earning money from your blog.

Easy Way to Put Affiliate Banners on a Blogger Blog in 3 Different Positions -sidebar, footer, above posts - Blogspot Tutorial with Step-by-Step Guide

Sign Up for Some Affiliate Marketing Programs


In order to make money online and place affiliate banners on Blogger you first need to sign up as an affiliate with at least one referral program. What affiliate market program you choose will be dictated by your blog topic and your niche within the topic.

If the world of affiliate marketing is all completely new to you I suggest you start with becoming an affiliate to services you might already belong to like Amazon and Ebay.

Another good place to dip your toe in the water of affiliate marketing is Clickbank which boasts a huge range of advertisers. If you make a search you are bound to find a product on there that would integrate well into your blog.

Add Affiliate Marketing Banners to Blogger Blog as an easy way to make money from blogging in addition to Google Adsense - Google Blogger Tutorial giving step-by-step instructions about how to put banners on your a Blogspot blog

Steps to Put Affiliate Banners on Blogger the Easy Way


Once you have signed up with an affiliate program which fits with your blog topic and niche and will pay you referral fees you can start earning money by placing an affiliate banner on your Blogger blog.

Placment of an Affiliate Banner

Before you start the process of putting a banner on Blogger you will need to decide where you want to place your banner on your blog for best effect.

Here are 3 very easy options:

1. Place Banner in Blogger Sidebar


Adding an affiliate banner to the Blogger sidebar is an easy placement option and likely to afford the best benefit. Follow these steps to put a banner in the side bar on your Blogspot blog:

  1. Login to Blogger

  2. From the Dashboard choose Layout from the left-side menu

  3. In Layout scroll until you find the sidebar


  4. Click on Add a Gadget in the Blogger sidebar

  5. Choose the HTML/Javascript gadget from the list

  6. Choose a name for your banner if you wish and type it into the title box (optional)

  7. Paste the affiliate banner code provided by the affiliate service into the content box of the pop up window

  8. Click on the Save button

  9. Move your banner around in sidebar using drag and drop until it is positioned where you want it

  10. Check that your banner is displaying and in the correct position by clicking on the Preview (eye icon) in the lower right corner

  11. Click the Save icon (next to the eye lower right corner) to confirm the new layout of the sidebar.

If you want to center the banner enclose it in a center HTML tag like this:
<center>YOUR AFFILIATE CODE</center>


2. Place Banner in Blogger Footer


Adding an affiliate banner to the Blogger footer can be effective especially if you have other gadgets like random posts and recent posts there. For third-party and some default Blogger themes there may be three columns in the footer so you will need to check the bottom of your template and decide in which column to put your banner.

Follow these steps for easy placement of a banner in the footer of your blog:

  1. Login to Blogger

  2. From the Dashboard choose Layout from the left-side menu

  3. Click on Add a Gadget in the column of a footer where you want to put your banner if your Blogger theme has more than one footer

  4. Choose the HTML/Javascript gadget from the drop down list of options

  5. When the pop up window appears paste the affiliate banner code as supplied by the affiliate marketing service into the content box

  6. Choose a name to give your banner a title. A title is optional

  7. Click on the Save button

  8. Place the banner in the optimal position in the footer by using Blogger's drag and drop feature

  9. When satisfied check that your banner is displaying correctly by clicking on the Preview (eye icon) in the lower right corner

  10. Click the Save icon (next to the eye lower right corner) to confirm the changes to the Blogger footer.

If you want to center the banner enclose it in a center HTML tag like this:
<center>YOUR AFFILIATE CODE</center>


3. Place an Affiliate Banner Above the Blogger Posts

Another excellent place for a banner is to position it so that it appears in the very central position above the blog posts. To add a banner to the main section or page body area of Blogger involves putting the code in an HTML/Javascript gadget and placing it above the blog posts gadget.

Follow these steps to add your banner code above the posts on the home page and every other post page:

  1. Login to your blog on Blogspot

  2. From the menu on the left-hand side of the Dashboard select Layout

  3. Scroll down until you find the Section labelled either Main Section or Page Body Section. Look for the blog Posts gadget to confirm you are in the right section

  4. Click on Add a Gadget (if you find there is no Add a Gadget link you will need to open up the section. Take a look at my step-by-step post about how to add a gadget above blog posts including detailed instructions about how to unlock the Main Section / Page Body Section of Blogger to add more widgets.

  5. Assuming you can the Add a Gadget link in the main blog post section / page body section click on it.

  6. Add a Gadget link in the main blog post section or page body section and choose HTML Javascript gadget to place an affiliate marketing banner above posts in a Blogger blog

  7. Choose the HTML/Javascript gadget from the menu of gadgets that appears

  8. A pop up window will open. Paste your banner code into the content box and add a title if you wish (optional)

  9. Select Save to save the changes

  10. Make sure the new gadget is the first widget in the section and is above blog posts. If not use the drag and drop feature to position the gadget in first position.

  11. Click on the Preview button (eye icon) found in the bottom right corner. Check that the banner is displaying how you would like it displayed.

  12. Click the Save button to apply your changes

If you want to center the banner enclose it in a center HTML tag like this:
<center>YOUR AFFILIATE CODE</center>


Today I have shown you the easy way to add affiliate marketing banners to your Blogger blog (Blogspot blog) in three different positions: in the sidebar, in the footer and above the blog posts. Affiliate marketing banners can generate extra money but do need to be placed strategically. Remember affiliate programs are free to join so it costs you nothing to experiment with positioning your banner to find the best spot.


Related Articles
Make Money from Affiliate Program Banners and Links with Blogger
How to Add a Gadget or Widget to Blogger Above Blog Posts


Subscribe to Blogspot Blogger Guide Full RSS Feed

Subscribe to Blogspot Blogger Guide by Email

Monday, February 2, 2009

How to Start a Blog for Free on Google Blogger at Blogger.com

It's easy to start a free blog at Blogger.com and the cost is zero. That's right at Google Blogger it's absolutely free to create and use a blog for as long as you decide you want it. This Blogger tutorial for beginner bloggers will help you create a Blogspot blog using the Blogger Platform which is a powerful blogging platform owned by Google since 2003.
How to Start a Blog for Free on Google Blogger at Blogger.com including sign up, tips for naming your blog, choosing a Blogger theme


Why Choose Google Blogger over Other Blogging Platforms

If you have been wanting to start a blog but not sure where to start I would suggest Google Blogger as a good option. Lots of bloggers will recommend Wordpress to you which is the gold standard in blogging platforms but is an option that you pay for (the free version has limited functionality). If you haven't tried blogging before and you're not sure if you will even like it then I encourage you to start with Blogger as a no cost way to trial blogging.

If you find that you really like blogging then you can convert your Blogger blog into Wordpress if you choose to further down the track but there is absolutely no reason why you cannot build a successful blog with Google Blogger. Don't spend you valuable hours wading through random articles comparing blogging platforms and website builders when you can get started on your Blogger blog while reading this blog post.

Check out: Blogger vs Wordpress comparison.


Walkthrough of the Steps to Create a Blogger Blog

Blogspot Blogger Guide walks you through the process of creating a blog:

  • Getting a Google account
  • Using a new versus an existing Google account
  • Tips for naming a blog
  • Steps for signing up to Blogger.com for a new blog
  • How to sign in to your new blog on Google Blogger
  • How to select a Blogger theme from the default themes

How to Get a Free Blogspot Blog at Blogger.com today and start blogging

Sign up to Blogger.com and start enjoying the world of blogging confident in the knowledge that this Blogger Tutorial will help you with the initial learning curve and provide ongoing support in the form of Blogger tutorials on how to make the most of the amazing, free blogging platform at Blogger.com. Start a blog today and begin laying the foundations for a profitable and successful blog.
.


Follow this Blogger Step-by-Step Tutorial to Get a Free Blog at Blogger.com Blog and start blogging right away
Follow this Guide to Get a Blogger.com Blog


Main Features of Blogspot Blogging Platform at Blogger.com

  • Completely Free - Zero Cost
  • Simple user-friendly interface
  • Easy to post photos, text and videos
  • Choice of using a blogspot subdomain or your own domain name
  • No restrictions on bandwidth
  • Unlimited video storage using YouTube
  • Photo storage virtually unlimited
  • Support for Mobile blogging
  • Facility to add third-party templates and widgets


Getting a Blogspot Blog at Blogger.com is a 3 step process:

  1. Create a free Google Account if you don't already have one at Blogger.com or use an existing Google Account
  2. Name Your Blog
  3. Choose a Template


Tips Before Creating a Google Account for Your Free Blogger Blog at Blogger.com

Anyone can sign up for a free account at Blogger.com. You can use an existing Google account eg (gmail account) or you can create a new account.

Setting up a New Account versus Using an Existing Account

Personal Blog
If you are using Google Blogger for a personal blog that you want your family and friends to read then it makes sense to probably use your existing gmail account. This will allow you direct access to photos you have saved on Google Photos and Google Drive. It will also make it easy to use other Google Services like Google Docs and Google Maps and import files into your blog.

Business Blog
If on the other hand you are setting up a business blog then it is probably better to set up a new account as it will enable you to separate your business from your personal. It will mean you will need to log out of your personal account to switch to your business account but on the plus side it will help you to keep all social media accounts and so on that you might set up in the future to promote your blog content separate from your personal social media and email account.
If your new Blogger blog is for business rather than personal it is a good idea to create a seperate Google account to keep personal and business separated. Switching between Google accounts is easy and will promote a successful blog practice from the start of creating a new blog

Once you have created an account at Blogger.com you will be free to create as many blogs as you wish up to 100 blogs on the same account.

Tips for Naming Your Blog on Blogger

If you are setting up a business it is best to choose a name that clearly explains the general topic of your blog. If you are starting a personal blog then you have a lot of flexibility about the blog name. The only limitation is whether it is available on Blogger and social media platforms.

Check Name is Available on Social Media
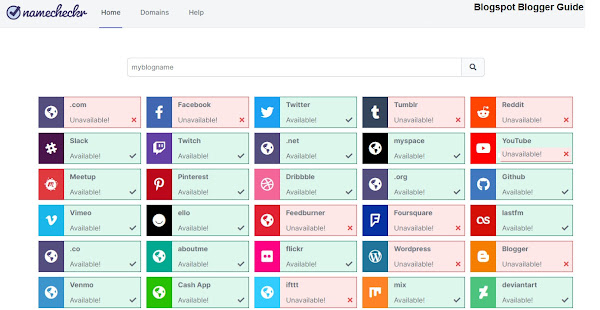
There are millions of Blogspot blogs on the Blogger platform so you may need to get creative to find a blog name that works in your particular niche. You can use a free blog name generator to help you get ideas. One thing I have found helpful before setting up a new blog is to check the availability of the name I want to use on other platforms as well. Tools like namecheckr.com can be useful to check whether your chosen name is available on Facebook, YouTube, Pinterest, Reddit, Instagram and other major social media services.
It is a good idea to check the availability of your chosen Blogger blog name on social media with Namechecker in case it is not available before you create a blog on Blogger

Check Domain Name is Available if Creating a Business Blog
Also important if you are creating a business blog is to check whether the domain name for your proposed blog name is available. If you are intending to use a custom domain name rather than the Blogspot subdomain (Blogger gives by default) then you will need to make sure it is available. To check whether the domain name can be used simply do a search in your browser using a search term like domain name search. There are lots of sites that offer free domain name search in the hope of selling you a domain name in the process.

  • Naming your blog requires some thought as this is the URL address visitors will use to access your site.
  • Long names are difficult to remember and are therefore best avoided.
  • Choose a name that is short, memorable and is associated with your blog topic or blog niche.
  • Try to choose a name (title) that has at least one of your keywords in it. For instance I chose Blogspot Blogger Guide because it described the purpose of my site and also covered two critical keywords: Blogspot and Blogger.
How to Get a Free Blogspot Blog at Blogger.com - Blogger.com Main Page
Create a Blogger Blog with a Google Account or Create One


If you already have a Google Account Sign In and Navigate to Blogger

You can use your existing Google gmail account to create a blog in Blogger provided you are signed in. Simply navigate to Blogger.com. As mentioned previously you will be able to directly access lots of other Google services from within Blogger that you may already be using like Google Photos, Google Drive, Gmail, YouTube and so on.

If you don't already have a Google Account Create One at Blogger.com

If you don't have a Google Account or you want another one for Blogger you will need to create an account. Simply direct your browser to Blogger.com and click on Create Your Blog from the main page and then click Create Account in the window that opens up. Follow the prompts to add a name for a new gmail account and a password. When set up you will be returned to the main Blogger screen and prompted to enter your blog name.

Follow the Create a Google Account Link to Create a Blogger Blog


Create a Google Account


Steps to Create a Free Blog at Blogger.com

Once you have a Google account follow the steps below to start your free Blogger blog and get blogging.

  1. Create a New Blog
    Click on the orange Create Your Blog button on the Blogger.com home page.

  2. Create a Blogger Blog by Visiting the Homepage of Blogger and clicking on the orange create a blog button


  3. Name Your Blog
    In the next window enter the chosen name of your blog as you want it to display to your readers. This is the name that will appear in the header of your blog. Include spacing and title case for clarity for example Blogspot Blogger Guide. Click Next.

  4. When signing up for a new Blogger blog chose a name to appear in the header and be sure to include spacing and title case

  5. Subdomain vs Custom Domain
    In the next popup window enter your desired blog name into the box provided. Assuming you are using the default Blogspot subdomain (yourblogname.blogspot.com) rather than your own domain name (yourblogname.com). Click Next.

    Blogger checks the availability of the URL and will inform you that the subdomain is available. Go ahead and click continue to complete sign up but first make sure that you have entered the correct name and without any spelling mistakes.
    blogger gives an error message that the blog address you have chosen is unavailable

    If your chosen blog name is not available you will have to come up with an alternative. With so many blogs on the Blogger platform now some of your desired names may be already allocated but if you persevere you will find something that closely matches the title you are after.

    Note: If you have to enter multiple names then it is worth clicking the back button to change the blog name that will appear in the your blog's header before completing signup.

  6. Naming Your Blog - Choosing a Title
  7. Confirm Display Name
    On this screen you will be asked to confirm the display name you want to show to your readers. Enter the name you want displayed and then click Finish.

  8. Complete Sign Up and Go to Dashboard
    When Blogger.com has confirmed your blog address or URL eg yourblogname.blogspot.com and you have completed the sign up process you will be taken to the area of Blogger known as the Dashboard. You will see a menu on the left-hand side from which you access everything you need to customize your blog to you own specifications.
    blogger Dashboard showing default Contempo themes

  9. Default Blogger Theme
    The next step involves choosing a Blogger Theme. By default your blog will have the Contempo Light Theme. To view your blog and its theme click on View Blog link which appears at the bottom of the left-side menu.

    If you want to change this template to another Blogger theme go back to the dashboard by scrolling to the bottom of the page and clicking on the Powered by Blogger link. Or you can get there by clicking on your profile and then the big Blogger icon.

  10. How to Choose a Different Blogger Theme
    To choose a different Blogger Theme go to Theme in the left-hand menu. Scroll down and you will see all the default themes Blogger has available. Bear in mind that only the newer Blogger themes are responsive so it is probably better to select one of these such as Contempo (other color options), Soho, Emporio, Notable.

  11. View New Blogger Theme
    When you see a theme you like click on it once. You can now see how it will look by clicking on the Preview. If you like the Theme click on the back arrow and then Apply to change themes.


  12. Choose a Blogger.com default template


    Blogspot Blog Created at Blogger.com


  13. Create Your First Post
    To create your first post click on the new Post button on the left-hand menu in the Dashboard. The blog post editor will pop open and you can draft your first blog post. It is advisable to set a few settings on your blog before beginning your posts. These are discussed in my next article: How to Set Up a Blogspot Blog at Blogger.com.


In this Blogger tutorial for beginners I discussed how to start a Blogspot blog at Blogger.com including tips on creating a Google Account for Blogger, naming your Blogspot blog, walking you through the sign up and sign process and choosing a Blogger theme.


Related Articles

Why Blogger.com is a Better Blogging Platform than Wordpress for Beginners in 2020
7 Tips for Choosing a Great Blog Topic
Blogger vs Wordpress
How to Set Up a Blogger Blog and Configure Settings for a New Blogspot Blog on Blogger.com
Benefits of Blogging with Blogger.com