Welcome! At Blogspot Blogger Guide we show you the easy way to customize your Blogger Blog and offer tips, tricks and fixes to take the technical headache out of blogging.

Showing posts with label Blogger Basic Tutorials. Show all posts

Monday, January 31, 2022

How to Add a Copyright Notice to a Blogger Blogspot Blog in 2022

In this Blogger tutorial you will learn how to add a copyright notice to your Blogspot blog (Blogger blog) to protect your blog content and deter content lifting. With Blogger copyrighting your blog is an easy 2 minute task that requires no change to coding. Follow the simple steps below to have a copyright notice displaying in the footer of your Blogger blog in no time.
How to Add a Copyright Notice to a Blogger Blogspot Blog in 2022

The most obvious advantage of putting a copyright notice on Blogger is it will act as a deterrent to would-be blog scrapers. Duplicating content from others blogs is a common practice all over the internet and it is important to safeguard your content and images.
Add a Copyright Notice to Blogger to Deter Content Theft

It is worth checking periodically if any of your content has been duplicated elsewhere on the net. If it has been scraped there are some steps you can take to claim the content and I will write about these in another article. One way to check the level of duplication of your content is to take a look at Copyscape a site devoted to identifying duplicate content and plagerism on the web.

Steps to Add a Copyright Notice to a Blogger Blog


Step 1
Login to Blogger

Step 2
From the Blogger dashboard click Layout in the menu on the left-hand side
How to Add a Copyright Notice to Blogger Blog Step 1 Navigate to the Layout Menu

Step 3
Scroll to the bottom of the Layout Menu

Step 4
Open the Attribution Gadget by clicking on the Pencil Icon.
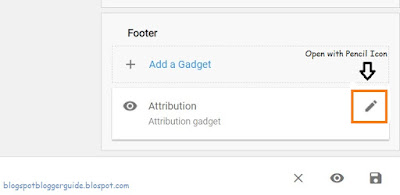
How to Add a Copyright Notice to Blogger Blog Step 3 Open the Attribution Gadget

For Default Blogger Themes
By default Blogger adds an attribution widget to the footer of your blog when you first create it. Whether you choose to fill it in is optional. Occasionally the Attribution Gadget can be appear the sidebar if your blog was created some years ago.

For Third Party Themes
If the Attribution Gadget is not already installed you may need to use Add a Gadget and then select the Attribution Gadget from the menu of gadgets. If you can not add a gadget to the footer at all then you will need to navigate to Theme >> Customize >> Edit HTML. Search using CTRL + F to find the footer widget in your blog and then change from showaddelement='no' to showaddelement='yes'
Step 5
Enter a copyright notice.
eg Copyright © yourblogname.blogspot.com 2022
or Copyright © Your Blog Name yourblogname.blogspot.com 2022
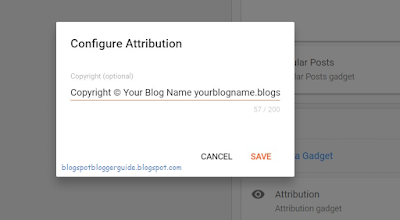
How to Add a Copyright Notice to Blogger Blog Step 5 Enter Your Copyright Notice

Step 6
Click Save

Step 7
Use the Preview Button on the bottom left to view your copyright notice at the bottom of your blog.

How to Add a Copyright Notice to Blogger Blog Step 7 Preview Your Copyright Notice on Your Blog

Step 8
Navigate back to the Layout Menu by clicking on the back arrow in your browser.

Step 9
If you are happy with your copyright notice then make sure you click on Save icon in the bottom left to update the Blogger Theme.
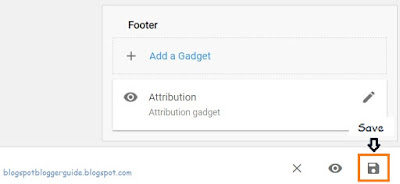
How to Add a Copyright Notice to Blogger Blog Step 9 Don't Forget to Save Your Changes in the Layout Menu

Step 10
Remember to periodically update your copyright notice. I suggest you do it every year and that you span the copyright over the years your have been publishing articles.

In this article you have learned how to add a copyright notice to the Blogger footer to deter content lifting. If you found this article helpful please consider following me here or on social media so you can stay up-to-date with any future articles.


Related Articles

How to Add a Welcome Message to a Blogger Homepage
How to Change the Color of the Blogger Nav Bar
Why Blogger is a Better Blogging Platform than Wordpress 2020
How to Choose a Great Topic for a Blogger Blog in 2020


Tuesday, May 4, 2010

Add a Print Friendly Button to Blogger to Print Out Blog Posts

Attention Blogspot bloggers I have found a really easy way to allow visitors to my Blogger blogs to print out my articles. Today I am going to share with you this very easy trick which is absolutely free. It only takes a few minutes to install a printer friendly button at the foot of your Blogger posts or in the Sidebar and you will be adding a lot of functionality to your blog. (Updated as at 18 February 2022).

How to Add a Print Friendly Button to Blogger so Visitors Can Print Out Blog Posts

Advantages of Adding a Print Friendly Button to Blogger


  • The Print Friendly button is absolutely free
  • It creates an attractive print friendly version of your blog article that is print optimized.
  • There is an option to print in PDF format or save in PDF format
  • Removes unwanted content such as Google ads
  • Provides flexibility to remove unwanted text and only print out what is important to the reader
  • All images can be removed leaving only the text thus saving paper and ink
  • Minimizes the risk of readers copying and pasting your material because they don't know how to print out

How to Add a Print Friendly Button to Blogger with PrintFriendly

The PrintFriendly button is a very handy gadget. When a visitor clicks on the button it will take them to an article preview screen and offers some printing and sharing options. There is the option to print out the article directly with or without images. Alternatively the article can be downloaded as a PDF file or a link to the article emailed. PrintFriendly even lets you share the article via a Twitter Tweet button.


How To Add a Print Friendly Button to your Blogger blog


There are two ways to add a Print Friendly Button to Blogger.
  1. The first and by far the easiest way is to add a Print Friendly button to the sidebar or below your Blogger posts using an HTML / Javascript widget.
  2. The second is to hard code the Print Friendly button directly into your blog which will give you much greater flexibility in terms of placement.

Method 1 - To Add a Print Friendly Button to Allow Readers to Print Your Blog Posts

  1. Sign in to Blogger and select the blog you want to add the printer friendly button to.
  2. From the Blogger dashboard go to the Layout menu
  3. Decide where you want your gadget. The sidebar is an easy choice. Scroll down until your find the Sidebar section of your template
  4. Click on the Add a Gadget link in the sidebar
  5. Choose the HTML/JavaScript gadget

  6. How to Add a Free Print Button from Print Friendly to Blogger Using an HTML/Javascript gadget

  7. Open a new window in your browser and navigate to the PrintFriendly website.
  8. Scroll down to the bottom of the page and click on the Blogger icon
  9. Select the HTML radio button at the top left of the page
    How to Add a Free Print Button to Blogger Using an HTML/Javascript gadget - Make Sure HTML is selected and choose from a range of buttons on the PrintFriendly website

  10. Choose a PrintFriendly button by selecting the radio button beside it. Print Friendly offer at least 12 different buttons.
  11. Select the features you want from the Features Menu or go with the default settings displayed. You may decide to turn off email as a way to have more control of how your article is shared on the internet.
  12. Once you are happy with all the features settings copy the code that is displayed below the features.
  13. Now return to the HTML gadget and paste the code into the gadget
  14. Select Save
  15. Scroll to the bottom of the Layout Menu and click on the Preview Button
  16. You will now see your PrintFriendly Button as it will appear on your live blog.
  17. Click the back button of your browser to return to the Layout Menu
  18. If you are satisfied with the location of the button click Save at the bottom right-hand corner. If not you may need to play around with the positioning to get the optimal place in the sidebar.

Method 2 - To Add a Print Friendly Button to Allow Readeers to Print Your Articles


(Note: Before you attempt this make sure you have backed up your Blogger Template)

  1. Log in to Blogger and select the blog you want to add the printer friendly button to.
  2. From the Blogger dashboard click Theme from the side menu
  3. Select EDIT HTML from the drop down menu

  4. How to Add a Free Print Button from PrintFriendly to Blogger By Hard coding it into the Blogger template - Select Edit HTML to get started on this step by step walkthrough

  5. Click in the code box and then use CTRL + F to find the following code:
    <div class='post-footer'>
  6. Open a new browser window go to the PrintFriendly website
  7. Scroll down the home page until you see the Blogger icon, then click on it.
  8. Make sure the HTML radio button is selected at the top of the Button page
  9. Select the radio button for the PrintFriendly Button that you think will integrate best with your Blogger blog. (There are at least 12 to choose from).

  10. Choose from a range of Print Friendly button options
  11. In the Features menu select the features that you want your PrintFriendly button to have or go with the default. I suggest you think about whether you want readers to be able to email your posts.
  12. Copy the code snippet for your chosen button
  13. Then go back to your open Blogger window and find the code you identified in Step 4 of these instructions.
  14. Paste the code directly after the <div class='post-footer'> tag
  15. Save your changes to the Blogger template
  16. From the Dashboard click View Blog to see your PrintFriendly button beneath each post.

Summary

Today I introduced you to the PrintFriendly button - a completely free button that print optimizes your Blogger posts and allows readers to print directly from the post. I discussed some of the main advantages of adding the printer friendly button to Blogger and I provided you with comprehensive instructions to add the button to your Blogger template by either using an HTML/ Javascript gadget or by hard coding it into your Blogger HTML code.

If you found this article helpful please let me know by commenting below. I would be interested in your experience.

Related Links

How to Add a Welcome Message to a Blogger Homepage
How to Change the Color of the Blogger Navbar or Remove It in Layout
How to Unlock or Delete Locked Blogger Widgets
How to Put a Twitter Icon on Blogger Next to Blog Post Title
How to Delete a Google Blogger Blogspot Blog in 2022
How to Add a Copyright Notice to a Blogger Blog