For bloggers hoping to attract visitors and perhaps make money from advertising and affiliate links it is a good idea to ensure that you have configured your blog correctly particularly the way blog posts are displayed and comments are handled.
If you have not yet got a blog at Blogger.com please see my Blogger tutorial about how to start a Blogspot Blog: Get a Free Blogspot Blog at Blogger.com. If you are still considering your blog topic and niche you will find plenty of tips on how to choose a good topic for your blog.
How to Configure Basic Settings in Blogger
Prior to writing your first post configure Blogger by clicking on Settings in the menu on the left-hand side of the Dashboard.Set or Change the Blog Language of Your Blogger Blog
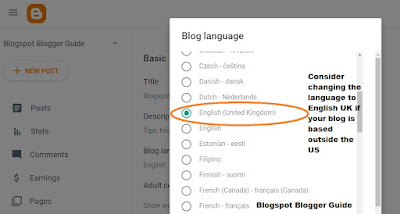
In English speaking countries the language of your blog will automatically be set to US English. For bloggers from other English speaking countries outside the US you may prefer to change the language settings to UK English.If you would like to change the language you can do so under the Settings > Blog Language option. From there it is just a question of checking the radio button according to the language you want to choose and then clicking save.
Add a Blog Description
Enter a short tagline, phrase or short sentence as your Blog Description in the page header of your blog. As you are limited to 500 characters your blog description needs to be concise. Make sure it describes the purpose of your site and gives some indication of what kind of content a visitor might expect. The blog description will appear on your blog just under the blog name in the header section. It can be changed at a later date if needed.For tips on adding a blog description to a Blogspot Blog check out my earlier Blogger tutorial.
Make Your Blog Visible to Search Engines
If you are wishing to keep your blog completely private of for just friends and family rather than the whole world ensure that the visible to search engines setting slider under Privacy in the Settings menu is set to the off position.If you want search engines like Google to index your blog for the purposes of attracting visitors the visibility to search engines setting will need to be on otherwise your blog will not get much in the way of traffic. To check the visible to search engines setting ensure the slider is green (the on position) in Settings under the Privacy heading.
You will need some patience initially as it does take search engines like Google time to crawl your site and index your blog posts. To improve your chances of your blog being indexed thorough I suggest you consider adding a sitemap at some point. To learn more take a look at my Blogger tutorial on how to add a simple atom sitemap to the Google Search Console.
Check HTTPS Redirect is Turned On to Secure your Blog.
By default this setting should be turned on but it is worth checking the slider is in the green on position. Older blogs and those using third party templates may find the HTTPS setting is turned off. The advantage of having this setting turned on is that all blog posts and pages are delivered encrypted regardless of whether the blog address is http or https.Set Permissions for Reader Access of Your Blogger Blog
Under Reader Access in the Permissions Setting set the privacy setting to your preferred setting.
- Custom Readers if you want to keep your blog private with only selected readers.
- Private to Authors: If you want to invite other blog authors and have them read posts then set the permission to private with other blog authors.
- Public: If you want your blog to have the widest readership then set the permission to public which means anyone and everyone can read it.
How to Configure Blog Posts in Blogger
Maximum Number of Blog Posts Setting
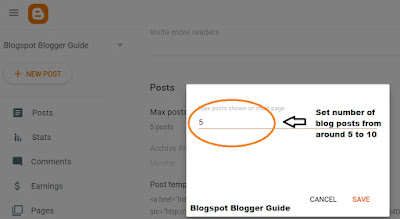
Under the Posts heading set the number of posts to show on the main page. By default the number of blog posts is set to 7 but you can have more or less than this number. To change the maximum number of posts click on the number of posts and then using the up and down arrows select the number of posts to display.I would advise against showing too many posts on the home page as it may lengthen loading times which is a big factor in visitor retention. One way to get around this issue so you can display more posts is by using jump breaks so visitors are only shown a shortened version of the post on the main page and the full post when they click on read more. You may need to experiment with this feature before you find the best balance for your blog.
Archiving
In the past it was possible to set the frequency of the archiving of your blog to other than monthly. This feature is turned off currently.

Configuring Commenting on Your Blogger Blog
Who Can Comment
In the Comments section under Settings you can control who is allowed to comment on your blog.You can set three different options to handle comments:- Anyone (including anonymous)
- Users with Google Accounts
- Only members of this blog
Comment Moderation
In the Comments Moderation section it is possible to control comments before they go live. In the past spam has been quite a problem with Blogger blogs and remains so today depending on the niche topic and the popularity of your blog. I would suggest you apply some comment moderation and your best bet is to set it to always to comletely filter out spam.There are three different levels of Comment Moderation that can be applied to a Blogger blog:
- Always
- Sometimes
- Never
Email Notification of Comments It may worth setting up email notification of new comments if you set comment moderation to always otherwise you may forget to check the comments section periodically. You can add your email address under the Settings >> Comments >> Email moderation requests to: section.
Reader Comment Captcha
It is possible to control spam from spam bots to some degree with captcha. I suggest you make sure that the green slider is set to on prevent unwelcome messages especially from spambots.

How to Set Up Time Zone Format and Date Header in Blogger
Set Up Time Zone
The Time Zone is set to (GMT-07:00) Pacific Time – Los Angeles by default so you will need to set up the Time Zone depending on your geographical location. To select the Time Zone click on the Time Zone heading and then select the correct Time Zone by clicking on the radio button next to the appropriate Time Zone and then selecting save.Set Up Date Format
Blogger offers multiple options for displaying the date. To make changes click on the Date Header Format heading and then choosing your desired format by selecting the radio button from the dropdown menu. You will need to save changes for the different date format to take effect. To see the change in effect, preview a blog post or click on View Blog.Set Up Timestamp Format
There are 11 different Timestamp options provided by Blogger which allow you to customize how the time will appear on a post. You can change the Timestamp to suit your preferences by navigating to Settings >> Timestamp Format. Select the option from the the options that appear in the popup window and click save to apply the changes.Set Up Comment Timestamp Format
You can also customize the appearance of the timestamp on comments. Set up is the same as for setting up the timestamp.Configure Other Settings in Blogger
Declare Adult Content
Make sure that adult content is set to no unless your blog does have adult content of course.Google Analytics ID
If you have a Google Analytics ID already enter it in the space provided to track blog performance. If you have just started your blog make a point of coming later once you have your Google Analytics ID and entering it here.Congfigure Site Feed
Post FeedThere are 5 options for the Post Feed: full, until jump break, short, custom and none.
For a new blog not using a feed service your feed in most cases should be set to short or to jump break. If you are not sure you can leave it at full for now and come back to it later.
Often a full feed is used where blogs posts are being desseminated by a RSS service eg Feedburner. These days social media platforms do much of that job so there is a debate about whether RSS feeds are still worth it especially as there is a higher risk of content theft and readers are not visiting your blog to read your content. Conversely blog feeds are needed for some functionality to work eg the recent posts gadget works off the feed.
Post Feed Footer
In the Post Feed Footer enter a copyright notice about your material which will appear in the bottom of your feed after every post. This will act as a deterrent to content lifting and blog scraping.
Configure Your Blogger User Profile
If you want your readers to know a bit about you consider configuring your user profile with information about yourself. Do you want your readers to be able to email you for example? You can enter as much or as little information as you like.To make changes to your user profile scroll right to the bottom of Settings and click on the user profile link. Check the options if you want to share your profile and email address. You can also select what name gets displayed on your blog posts on your user profile page. You can add a photo, your geographical location and any other information you might wish to.
Congratulations! With these settings in place it's time to go ahead and make your first post.
While any of the settings discussed in this Blogger tutorial are able to be altered at any time it is a good idea to put them in place prior to writing a first post so that you don't forget to set something important once the business of writing blog posts takes over. This Blogger tutorial provides instructions on how to configure and set some of the basic settings and features for Blogspot blogs at Blogger.com.
Related Articles
How to Get a Free Blog on Google BloggerHow to Choose a Great Blog Topic for a Blogger Blog - 7 Tips for Beginner Bloggers


No comments:
Post a Comment