Welcome! At Blogspot Blogger Guide we show you the easy way to customize your Blogger Blog and offer tips, tricks and fixes to take the technical headache out of blogging.

Showing posts with label SEO. Show all posts

Tuesday, March 22, 2022

How to Add a Blog Description to the Blogger Header For a Blogspot Blog

In this Blogger Tutorial for beginners new to Blogspot blogging I show you how to quickly add a blog description to your Blogger blog. A blog description is the one line tagline that is displayed in the header under the blog name in Blogger. Adding a blog description to Blogger is easy to achieve and will help both search engines and your audience know about your blog topic.
How to Add a Blog Description to a Blogger Blog and Why it is Important for Search Engines and Blog Visitors

Why is a Good Blog Description Important?

A Blogger blog description needs to clearly and succinctly say what the blog is about. It needs to be well-crafted if you are going to use it as a tagline in your header to hook potential readers to your blog. With just a few well chosen words the role of your blog description is to spark a reader's interest enough to decide to visit your blog.

If you would like to know more about how to write a good blog description for showcasing your Blogspot blog / Blogger blog take a look at my companion article where I discuss tips for writing a well-crafted blog description and the SEO benefits for search engines and visitors. I will also show you some examples of well written blog descriptions to help you write the best blog description for your blog.

How to Add a Blog Description to a Blogger Blog - Step-by-step walkthrough to put description onto blog through the settings menu plus discussion why it is important to write a good blog description

Also bear in mind it is possible to hide the blog description if you want to write a longer description for your blog that doesn't display to readers but is visible to search engines. If you are interested in hiding the blog description on your Blogger blog I will be discussing how to do this in an upcoming post.

Steps to Add a Blog Description to Blogger


Step 1
Login to Blogger

Step 2
Go to the Settings Menu on the lefthand side

Step 3
In Basic Settings below Blog Name you will find the space to enter a blog description
to add a blog description to Blogger blog go to settings and then under Basic you will find description box under the blog name

Step 4
Click on the word description to bring up the dialog box
to add a blog description to Blogger blog click on description box under the blog name and enter a descriptive tagline for your blog

Step 5
Enter your chosen description
For example I have used "Tips, Tricks and Strategies to Customize a Blogger Blog"
How to Add a Blog Description to Blogger - once saved the description will appear under the blog name in the header of your blog on blogspot

Step 6
Click Save

Step 7
Click the Preview Button located at the bottom of the Layout Menu on the righthand side

Step 8
View how your description will look on your live blog. Check for any errors.

Step 9
Click the back arrow in your browser to go back to the Settings menu.

Step 10
Go ahead and click the Save button located at the bottom of the Layout Menu on the righthand side to commit your changes. Or if you need to make any further changes click on the Description again and repeat Steps 5 to 9.


#blogspottutorial #bloggertutorial #blogdescription

Summary

In today's Blogger tutorial I have discussed the steps to add a blog description to a Blogger Blog. I also covered the importance of writing a good blog description that is well-crafted and will attract visitors to your blog.


Related Articles

How to Choose a Great Topic for a Blogger Blog in 2020
How to Add a Blog Welcome Message to a Blogger Homepage
How to Change the Color of the Blogger Navbar
How to Change Image Sizes in Blogger Posts
How to Resize Images in Blogger to User Defined Dimensions
How to Schedule Blog Posts in Blogger for a Specific Future Date


Sunday, March 6, 2022

How to Add an Atom Blogger Sitemap to Google Search Console 2022

In this Blogger tutorial you will learn how to create an atom Blogger sitemap and add it to Google Search Console to improve search engine indexing of your Blogger blog (Blogspot blog). There are different kinds of sitemaps but for today we will be submitting an atom sitemap to Google. This is a quick five minute task which regardless of your technical skills can easily be achieved and will help discovery of your blog posts.

How to Add an Atom Sitemap to Google Search Console for a Blogger Blog in 2022


Benefits of Adding a Blogger Sitemap to Google Search Console?

Google Search Console is a free tool from Google formerly known as Google Webmasters that will help you track indexing of your Blogspot blog on the Google Search Engine. The benefits of creating and adding a sitemap of your Blogger blog to the Google Search Console is to aid crawling both of new posts and pages and those your have updated.
Get Blogger Blog indexed by Google by adding a sitemap to Google Search Console

The atom sitemap we will be adding today tells Google to index the first 500 posts on your blog as a batch. Once your blog is nearing 500 posts you will need to add another sitemap for 1000 posts to the Google Search Console.

The atom sitemap will help the Google crawler find posts and pages up to 500 in total and encourage it to check back often for changes. The end result is that Google is more likely to discover posts and index these which in turn will mean better SEO and increased traffic to your blog.
Benefits of Adding a Sitemap of a Blogger Blog to Google Search Console to Improve Indexing and Discovery of Blog Posts

Follow the easy steps below to learn how to create a sitemap for your Blogger blog and how to submit a sitemap to the Google Search Console.

How to Create and Add a Sitemap to Google Search Console for a Blogger Blog


Step 1
Login to Blogger

Step 2
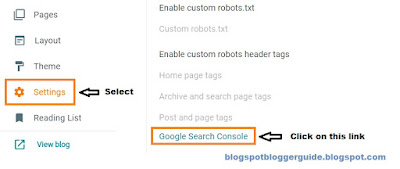
Select Settings from the left-hand menu

Step 3
Scroll down about two thirds of the way until you find Search Preferences in the menu that opens up

Step 4
Then click the Google Search Console link to open Google Search Console in a new page.


How to Access Google Search Console from a Blogger Blog via Blogger Settings Menu


If for any reason you are unable to bring up the Google Search Console then go to:
https://search.google.com/search-console


Step 5
Once in the dashboard of Google Search Console find your blog by selecting it in the property selector. If you only have one blog then click on your blog's name in the selector window. If you have more than one blog you will need to select it using the down arrow found at the top left-hand corner under the Google Search Console logo.

Click on the domain name of your Blogger blog next to the Blogger icon that appears in the property selector.


How to Find your Blogger blog in the Google Search Console Property Selector


If your Blogger blog is not listed in the property selector list then you can add it by clicking on the +  add property icon found at the bottom of the dropdown list.  You may need to start typing the name of your blog to bring up the + Add Property icon.

Step 6
Having selected your blog from the Property Selector now click on Sitemaps from the left-hand menu


Choose Sitemaps in Google Search Console Menu to Add a New Sitemap for a Blogger Blog


Step 7
In the Sitemaps main page you will see any sitemaps already added.

Under Add a New Sitemap enter the following to add a sitemap of your Blogger blog

https://yourblog.blogspot.com/atom.xml?redirect=false&start-index=1&max-results=500

Note: Change yourblog in blue to the name of your Blogger blog


How to Enter a New Atom Sitemap in Google Search console for Blogger Blog


Step 8
Click Submit

Step 9
You will then get a popup message advising that the submission has been successful. You will see the atom sitemap has been added to the list of sitemaps for your Blogger blog.


Sitemap Successful Submission Notice in Google Search Console


Other information that you will be able to see:

  • type of sitemap
  • date submitted
  • date last read
  • status - this should read success
  • number of discovered URLs  - the number of URLs found automatically by the sitemap


Note: If you have a lot of URLs not found by the sitemap it might be because your Blogger blog is older and Google is not able to easily discover these posts in which case adding an HTML sitemap is a good idea.


Summary

In this Blogger tutorial you have learnt how to create and add an atom Blogger sitemap to Google Search Console to encourage Google to index your posts and pages. The advantage of adding an atom sitemap is help the search engine crawlers discover pages on your Blogger blog and index these. As the number of blog posts increases on your Blog you will need to eventually add another sitemap and this needs to be done prior to the total number of posts exceeding 500.


Related Articles

How to Add a Copyright Notice to a Blogger Blog
How to Add a Sticky Message Above Blogger Posts
How to Add a Welcome Message to a Blogger Homepage
How to Change the Color of the Blogger Nav Bar
Why Blogger is a Better Blogging Platform than Wordpress
How to Choose a Great Topic for a Blogger Blog in 2020