Welcome! At Blogspot Blogger Guide we show you the easy way to customize your Blogger Blog and offer tips, tricks and fixes to take the technical headache out of blogging.

Showing posts with label Edit HTML. Show all posts

Tuesday, April 5, 2022

Change Blog Post and Sidebar Width of a Blogger Theme

In today's Blogger tutorial I discuss how to change column width of both the sidebar and the blog post area of a Blogger Theme to either increase or decrease the size of the template displayed on the screen. I show you two methods of adjusting the width of the template: firstly through the Blogger Template Designer and secondly by making a small change to the template itself. These modifications are easy to achieve, only take a few minutes and will help you achieve the look you are after on your Blogspot Blog.
How to Change the Column Width of a Blogger Theme and Sidebar - Two Methods - Adjust width in Blogger Theme Designer or Edit Template and manually change the code

Older Default Blogger Themes

By default older Blogger templates eg Simple Blogger Theme were not full width but there was always the facility to increase or decrease the width of the columns of template according to user requirements. In the past it was recommended to keep the width of a Blogger blog under 1000px to ensure that visitors viewing on smaller screens did not have to keep scrolling to see the whole blog. Those days are gone now with responsive templates and the use of small devices like tablets and smartphones so it is fine to increase the entire width of your blog to 100% if you wish to.
The Column Width of older style Blogspot themes like Simple Template can be adjusted in the Blogger Theme Designer

Third Party Blogger Themes

If you are using a third party theme you may not be able to use the Blogger theme designer to adjust widths depending on how it was coded. You will still be able to use Method 2 as discussed below to make adjustments to the column width of the entire blog and / or the sidebar.

Newer Responsive Blogger Themes (Contempo, Soho, Emporio)

Newer responsive Blogger templates eg Notable Blogger template are already set at 100% width minus the sidebar so there is generally no need for tweaking the width.


How to Adjust the Column Width of Blogger Blogs


There are two basic ways to adjust the width of a Blogger template / Blogger Theme:

  1. Adjusting the width in Theme Designer of Blogger (or if this is not available)

  2. Changing the code within the Blogger template to the desired width


Method 1: Steps to Change the Width of a Blogger Template in the Theme Designer

  1. Login to Blogger

  2. At the Dashboard choose Theme

  3. Click on the orange Customize button which will take you to the Blogger Theme Designer

  4. On the left-hand menu click Adjust Widths

  5. How to Change the Column Width of a Blogger Theme and Sidebar in the Blogger Theme Designer Using the Slider to Set Desired Width in px

  6. Adjust the width using the slider to increase or decrease the width of the entire blog. Any changes you make can be viewed in the large window on the right-hand side.
    For example: To make your blog full width push the slider all the way across to 1500px.

  7. You can also change the width of the sidebar. By sliding the bar to the right you can increase the column size of the sidebar dimensions to a maximum width of 500px.

  8. Click on the Save button in the bottom right-hand corner of your screen.


Method 2: Steps to Change the Width of a Blogger Template in Blogger Edit HTML


If you are not able to edit the width of your Blogger template in Theme Designer then you will need to adjust the widths manually in the template itself.
  1. Login to Blogger

  2. At the Dashboard choose Theme

  3. Click on the down facing arrow next to the orange Customize button

  4. Choose Backup to make copy of your existing template in case you need to reinstae it

  5. Now choose Edit HTML

  6. Click anywhere inside the template and then CTRL + F (Command + F on a Mac) to bring up the search function

  7. Enter the following search term into the search window and press enter:

    b:template-skin

  8. Look for the following code:

    <b:template-skin>
    <b:variable default='960px' name='content.width' type='length' value='960px'/>
    <b:variable default='0' name='main.column.left.width' type='length'/>
    <b:variable default='310px' name='main.column.right.width' type='length'/>


  9. Change the value of the content width of the template to whatever width you would like eg for an entire blog width of 1200px the code would look as follows:

    <b:template-skin>
    <b:variable default='960px' name='content.width' type='length' value='1200px'/>
    <b:variable default='0' name='main.column.left.width' type='length'/>
    <b:variable default='310px' name='main.column.right.width' type='length'/>


  10. To change the sidebar width (assuming you have a right sidebar) change the main.column.right.width to a new width by changing its value or adding a value if not already there as in this example. eg For a sidebar of 500px the code would look like this:

    <b:template-skin>
    <b:variable default='960px' name='content.width' type='length' value='960px'/>
    <b:variable default='0' name='main.column.left.width' type='length'/>
    <b:variable default='310px' name='main.column.right.width' type='length' value='500px'/>


  11. Click on the Save icon in the top right-hand corner to save your changes.

  12. From the Dashboard click on View Blog to see your Blogger template with the widths you have input.

In this Blogger tutorial you have learned how to change the column width size of your Blogger template to increase or decrease the width of the entire blog and the sidebar. Changes to the width of the columns is best achieved by using the Blogger Template Designer but if this not available for some reason I have also shown you how to adjust the width manually by making small changes to the HTML of your Blogger template.


Related Articles

Easy Way to Put Banners on a Blogger Blog
Add a Widget or Gadget Above a Blog Post in Blogger
How to Delete a Blogspot Blog from Blogger - Step-by-Step Guide to Remove a Blog
How to Add a Welcome Message to the Blogger Homepage
How to Add a Blog Description to the Blogger Header of a Blogspot Blog


Tuesday, March 8, 2022

How to Enable or Remove the Blogger Navbar Using 2 Methods

Want to learn how to get rid of or delete the Blogger Navbar? The Blogger Navbar is the navigation bar menu at the top of a Blogger blog above the header that appears on older Blogger themes. It is easy to get rid of the Blogger Navbar and in today's Blogger Tutorial I am going to show you two different methods to disable, hide or delete it or to reinstate it if that is your goal. You would use the second method only if for some reason you cannot enable the Blogger Navbar by the easy method which is by turning it on and off in the Navbar gadget in Layout Designer. (Updated April 2022)

How to Remove the Blogger Navbar or Hide it using HTML hardcode method

Advantages vs Disadvantages of the Blogger Navbar

Most people dislike the Blogger Navbar and want to delete it because it looks unprofessional and in the past it encouraged readers to leave a blog by clicking on the Next Blog link. If you are using a custom template the Blogger Navbar is likely to already be hidden but if you are using one of the older default Blogger templates eg Simple, there will be times when you will need to remove it manually to stop it showing up.

Before you get rid of the Blogger Navbar completely though remember that it has some pretty useful features such as:

  • Follow Me link to encourage your readers to follow you (Blogger has removed this unfortunately)
  • Share via email, Facebook, Twitter
  • Blog search
  • Quick links to Blogger New Post, Design and Blogger Dashboard


I would suggest that if you do decide to hide or delete the Blogger Navbar that you add the custom search box gadget and some social sharing icons to your blog to partially compensate for the features you will be losing.


Blogger Navbar

If you simply want to change the color of the Blogger Navbar please refer to my Blogger tutorial How to Change the Color of the Blogger Navbar.


2 Ways to Disable the Blogger Navbar - Navigation Search Bar

There are two methods to disable the Blogger Navbar: Method 1 involves turning it off in the Navbar Gadget while Method 2 is mostly geared at bloggers who are using an older Blogger theme and need to hide the Navbar by adding HTML code to the template itself.


Method 1: Steps to Remove or Hide the Blogger Navbar

The following method is a step-by-step guide to turn off or disable the Blogger Navbar using the Navbar Gadget.
  1. Sign in to Blogger
  2. From the Blogger Dashboard go to Layout
  3. Find the Navbar Section which should be the first Gadget at the top of your blog in layout
  4. Click the edit link or pencil icon to edit the Navbar Gadget
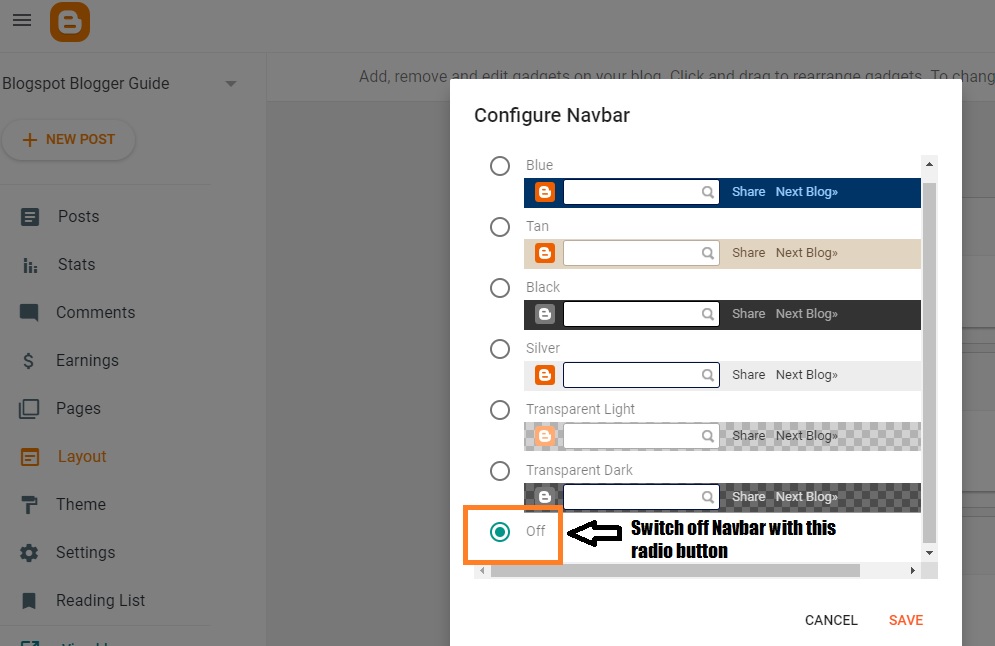
  5. In the Configure Navbar window that opens up scroll down to the bottom

  6. Turn off or delete Blogger Navbar Search bar above header in Blogspot by switching it off in the Navbar Gadget

  7. Click the on radio button to turn the Navbar Gadget off. Green light for off and clear for on. (If you are trying to reinstate the Navbar make sure the radio button on the Navbar Gadget is clear.)
  8. Click Save
  9. Click Preview (eye icon at the bottom right-hand corner) to Preview your blog without the Navbar displaying above the header
  10. Click the Save icon (located next to the Preview icon)


Method 2: Steps to Remove or Hide the Blogger Navbar

This second method of deleting or removing the Blogger Navbar is done through a change to the Blogger template. Essentially it hides the Navbar with code but does not actually delete the code.
  1. Sign in to Blogger and select the blog you wish to change
  2. From the Blogger Dashboard go to Theme
  3. Click the orange down arrow next to the Customize button
  4. Click Backup to back up your blog before proceeding
  5. Once backed up click on Edit HTML from the drop down menu by clicking on the down arrow once again
  6. Click anywhere inside the template and then search the following code using CTRL + F (PC) or CMD + F (Mac) to bring up the search box: ]]></b:skin>
  7. Insert the code below just before the ]]></b:skin> tag


    #navbar-iframe {
    height: 0px;
    visibility: hidden;
    display: none;
    }

  8. When you are satisfied click on the Save button to save your changes
  9. Click on View Blog to admire your Blogger blog with the Navbar removed

Blogger Tip:
If you decide that you want to reinstate the Blogger Navbar you can do one of two things:
  1. Simply remove the code you inserted:

    #navbar-iframe {
    height: 0px;
    visibility: hidden;
    display: none;
    }

  2. Or comment out the code like this

    /*
    #navbar-iframe {
    height: 0px;
    visibility: hidden;
    display: none;
    }*/

Summary

Today I have explained how to turn the Blogger Navbar off and on in the Navbar Gadget. I have also shown you an easy trick to remove or alternatively hide the Blogger Navbar using the hardcode method. By adding a short piece of code to your Blogger template the Blogger Navbar can be hidden from view. I have also shown you what to do if you need to reinstate a missing Blogger Navbar.


Related Links

How to Change the Color of the Blogger Navbar
How to Add a Copyright Notice to a Blogger Blog
How to Add a Print Friendly Button to Blogger
How to Backdate Blogger Posts to Publish Articles on a Retrospective Date
How to Remove Blogger Labels Counter
Add a Follow Me Twitter Icon Button to Blogger
Make Money From Affiliate Banners with Blogger
How to Get More Adsense Clicks with Blogger
Easy Ways to Put Banners on Blogger