Welcome! At Blogspot Blogger Guide we show you the easy way to customize your Blogger Blog and offer tips, tricks and fixes to take the technical headache out of blogging.

Sunday, March 13, 2022

How to Change Image Size in Blogger Posts

In this Blogger Tutorial I show you how to change image size in Blogger posts depending on how you would like the image to look. Resizing images to fit in with the look and feel of your blog will enhance the overall look of your blog and so it is worth changing images to the optimal size. This tutorial is suitable for all Blogspot bloggers wanting to learn more about image size for Blogger posts but is written with beginners in mind.

Level of Difficulty: Easy

Suitable for: Beginners


How to Change Image Size in Blogger Posts - Blogger Tutorial Showing the Easy Way to Modify Images in Blogspot in 2022

How to Change Image Size Blogger

Blogger displays uploaded images using 5 different pre-set image sizes:
  • small - 200 px
  • medium - 320 px
  • large - 400 px
  • extra large - 640 px
  • original size - actual dimensions of the image (should not be wider than the width of your blog post area)

By default images are uploaded as medium size which means they are displayed at a width of 320px. You can make the image larger or smaller depending on the look of your blog and its theme. To set your own custom dimensions instead check out: How to Set Custom Image Dimensions in Blogger

How to Resize Images in Blogger Posts by Changing the Image Size to Default Image Sizes to Make the larger or smaller


I suggest that early on you settle on an image size you like and then consistently use the same image size to keep all images a uniform size across your blog posts. Also try to resize your images before you upload them so that you are not using large files that may slow down loading times of your blog. For more information on resizing images check out 8 Tips for Uploading Images to Blogger.

  • Decide on a default image size for all your post images and use the same size.

  • Resize large images prior to upload to speed up page loading time


Change Image Size in Blogger use the same image size in your Blogger posts for consistency and success rather than using lots of different sizes


Steps to Resize an Image in a Blogger Post

  1. Login in to your Blogger blog

  2. From the Dashboard select Posts from the left-hand menu to modify an image in an existing post
    or
    Select the New Post button to create a new post with images.

  3. Check you are in the Compose View (click the down arrow of the first icon of the tools menu.

  4. Find the image you want to resize.

  5. Click on the image once to highlight the picture.

  6. Steps to Change Image Sizes in Blogger Posts in the Compose View - Select the Wheel icon and select the size by clicking on the radio button

  7. Click on the gear icon (little wheel) that appears in the menu bar below the image

  8. Select the size of the image that best suits the look of your particular blog (Note: do not make your image larger than the width of your posts (an extra large setting displays at 640 width).

  9. How to Increase or Decrease Image Sizes in Blogger Posts using the Compose View

  10. Click Preview to check the look of your image as it will appear in your blog post

  11. Make an changes to the image size if necessary by clicking on the gear icon again

  12. If satisfied with the size of the image go ahead and save by either clicking save under Preview if creating a new post or if you are ready for your blog post to go live click Publish

  13. Click on the eye preview icon in the listing of your blog posts to see your image resized in your live blog post.


In this article you have learned how to change image size in Blogger. Image sizes can be changed to any of the default sizes in the Compose View in Blogger: small, medium, large, extra large and original size. It is helpful for the overall look of your blog to ensure that Blogger Post images sizes are the same size across your blog.

If you want to learn how to override the default image settings in Blogger then check out my other post which teaches you how to set your own custom image dimensions.


Related Articles

How to Add a Welcome Message to a Blogger Homepage
How to Change the Color of the Blogger Navbar
How to Choose a Great Topic for a Blogger Blog in 2020
How to Resize Images in Blogger to User Defined Dimensions
How to Schedule Blog Posts for a Specific Future Date in Blogger

Thursday, March 10, 2022

How to Schedule Blog Posts in Blogger in 2022 to a Specific Future Date

When posting on the Blogspot platform it is possible to set a future date for a blog post. In this Blogger tutorial I show you how to schedule your blog post ahead of time so that posts will be published on an advance date and time of your choosing. The Blogger tutorial is targeted at beginners who are maybe new to Blogspot and want to learn how to schedule blog posts the easy way so they can concentrate on creating great blog content.
How to Schedule Blog Posts in Blogger in 2022 for a specific future date - Blogspot Tutorial for Beginners

Benefits of Scheduling Blogger Posts for a Future Date

Scheduling posts for publication ahead of time provides the flexibility for Blogspot bloggers on a busy schedule to create blog posts at a time that suits them. This is a great feature if you want to write a bunch of posts before you go on vacation but without disrupting the consistency of your blog posting. Blogger allows you to schedule posts so that you can stagger their release daily or every couple of days or weekly whatever. The choice is totally up to you.

How to Schedule Blog Posts in Blogger in 2022 so that posts are published at an advance date you select

The facility to schedule blog posts ahead of time to be published on a specific day makes it possible for bloggers in business to coordinate a whole marketing strategy where social media releases coincide with blog post publication. Not only does it afford streamlining of you blogging operation it will save time and reduce stress to keep ahead with your blog posting. It also offers a welcome cushion if some adverse event or unforseen circumstance disrupts your publication schedule.


Steps to Schedule a Blog Post in Advance in Blogger

  1. Log in to Blogger.com

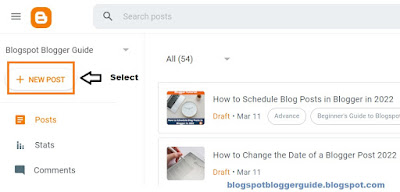
  2. From the Dashboard navigate to New Post as usual to create a new blog post or select draft post to continue working on an unfinished article.

  3. How to Schedule Blog Posts in Blogger - Step-by-Step Blogger Tutorial - Step 1 Select New Post

  4. In the Blogger Post Editor that opens up go ahead and write your blog post as usual. Either Compose View or Edit HTML view is fine.

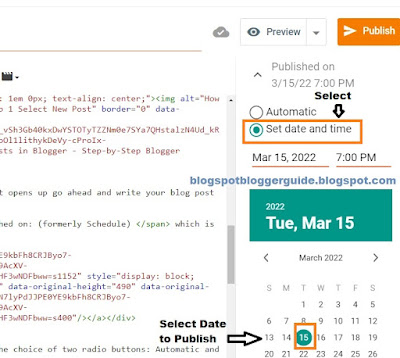
  5. When ready to publish click on Published on: (formerly Schedule) which is in the menu on the right-hand side of the compose box.

  6. How to Schedule Blog Posts in Blogger - Step-by-Step Blogger Tutorial - Step 2 Select Published On and Choose Date of Publication

  7. Click Set Time and Date from the choice of two radio buttons: Automatic and Set Time and Date.

  8. How to Schedule Blog Posts in Blogger - Step-by-Step Blogger Tutorial - Step 3 Select Date and time you wish to publish by clicking on Published On

  9. Using the calendar click on a date that you want your blog post to appear on.

  10. Now select the time you want to publish by clicking on the date and then selecting a time from the dropdown menu that appears. You could also skip this step if you are happy with the original time set.

  11. How to Schedule Blog Posts in Blogger - Step-by-Step Blogger Tutorial - Step 4 Select Time from the dropdown menu under set date and time

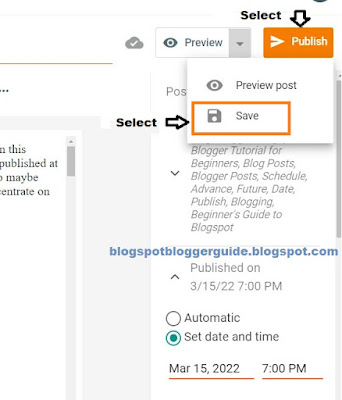
  12. Click on Save.

  13. How to Schedule Blog Posts in Blogger - blogspot tutorial step-by-step select date and time save and publish

  14. Click on Publish but check first that you have included some appropriate labels and that you have set up a suitable permalink


  15. A confirmation popup window will appear. Check you publication date and time before clicking on Confirm

  16. How to Schedule Blog Posts in Blogger - Blogspot tutorial step-by-step select confirm in the publish confirmation screen once you have checked your user selected date and time to publish

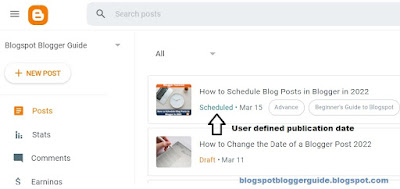
  17. To find your scheduled blog post click on Posts in the Dashboard and then Published to find and view your schedule post.

    Scheduled posts are denoted by the word "Scheduled" which appears in green under the post title. If you change your mind about the date and time to publish simply click on the chevron arrow to revert the article from published back to draft status and then go ahead and make your changes as usual.

  18. How to Schedule Blog Posts in Blogger - Blogspot tutorial step-by-step - Scheduled Blog Posts are denoted in green in blogger in the Dashboard under Published Posts


In today's Blogger Tutorial you learned about how to schedule blog posts for a specific future date. The main advantages of setting a date in the future is if you want to stagger your posts either because you are going on vacation or you are planning your blog publishing schedule in advance of the creation date. If you enjoyed this post and found it helpful consider following me here on Blogger or on other social media such as Pinterest and Instagram.

#bloggertutorial #blogspottutorial #blogposts #postschedule


Related Articles

How to Add a Copyright Notice to a Blogger Blog
How to Add a Sticky Message Above Blogger Posts
How to Add a Welcome Message to a Blogger Homepage
How to Change the Color of the Blogger Nav Bar
Why Blogger is a Better Blogging Platform than Wordpress
How to Choose a Great Topic for a Blogger Blog in 2020
How to Change the Date of Blog Posts in Blogger
How to Backdate Blog Posts or Publish Article on Retrospective Date

Tuesday, March 8, 2022

How to Enable or Remove the Blogger Navbar Using 2 Methods

Want to learn how to get rid of or delete the Blogger Navbar? The Blogger Navbar is the navigation bar menu at the top of a Blogger blog above the header that appears on older Blogger themes. It is easy to get rid of the Blogger Navbar and in today's Blogger Tutorial I am going to show you two different methods to disable, hide or delete it or to reinstate it if that is your goal. You would use the second method only if for some reason you cannot enable the Blogger Navbar by the easy method which is by turning it on and off in the Navbar gadget in Layout Designer. (Updated April 2022)

How to Remove the Blogger Navbar or Hide it using HTML hardcode method

Advantages vs Disadvantages of the Blogger Navbar

Most people dislike the Blogger Navbar and want to delete it because it looks unprofessional and in the past it encouraged readers to leave a blog by clicking on the Next Blog link. If you are using a custom template the Blogger Navbar is likely to already be hidden but if you are using one of the older default Blogger templates eg Simple, there will be times when you will need to remove it manually to stop it showing up.

Before you get rid of the Blogger Navbar completely though remember that it has some pretty useful features such as:

  • Follow Me link to encourage your readers to follow you (Blogger has removed this unfortunately)
  • Share via email, Facebook, Twitter
  • Blog search
  • Quick links to Blogger New Post, Design and Blogger Dashboard


I would suggest that if you do decide to hide or delete the Blogger Navbar that you add the custom search box gadget and some social sharing icons to your blog to partially compensate for the features you will be losing.


Blogger Navbar

If you simply want to change the color of the Blogger Navbar please refer to my Blogger tutorial How to Change the Color of the Blogger Navbar.


2 Ways to Disable the Blogger Navbar - Navigation Search Bar

There are two methods to disable the Blogger Navbar: Method 1 involves turning it off in the Navbar Gadget while Method 2 is mostly geared at bloggers who are using an older Blogger theme and need to hide the Navbar by adding HTML code to the template itself.


Method 1: Steps to Remove or Hide the Blogger Navbar

The following method is a step-by-step guide to turn off or disable the Blogger Navbar using the Navbar Gadget.
  1. Sign in to Blogger
  2. From the Blogger Dashboard go to Layout
  3. Find the Navbar Section which should be the first Gadget at the top of your blog in layout
  4. Click the edit link or pencil icon to edit the Navbar Gadget
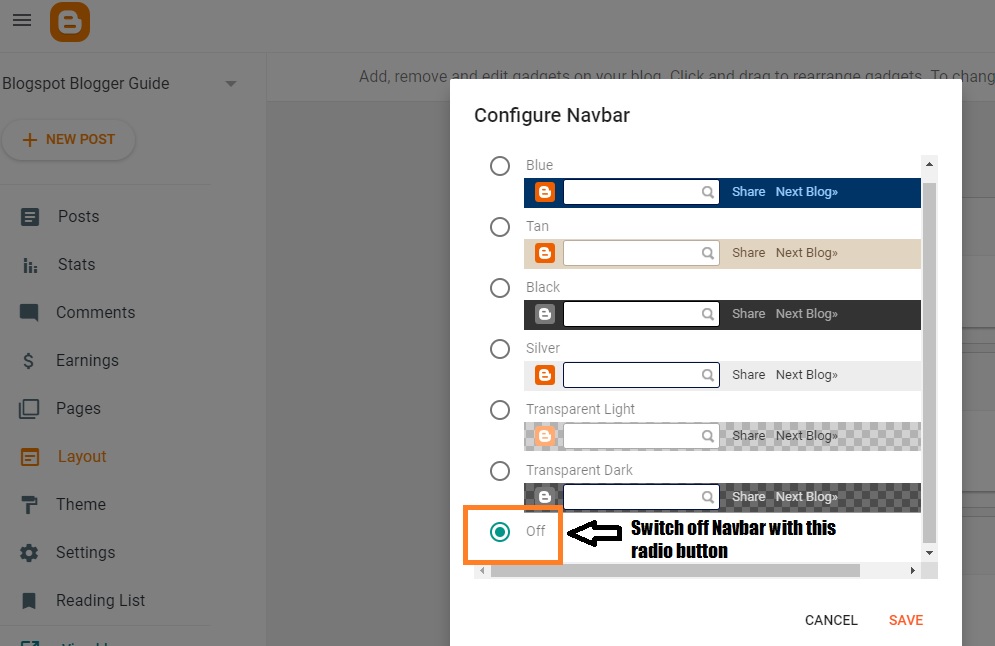
  5. In the Configure Navbar window that opens up scroll down to the bottom

  6. Turn off or delete Blogger Navbar Search bar above header in Blogspot by switching it off in the Navbar Gadget

  7. Click the on radio button to turn the Navbar Gadget off. Green light for off and clear for on. (If you are trying to reinstate the Navbar make sure the radio button on the Navbar Gadget is clear.)
  8. Click Save
  9. Click Preview (eye icon at the bottom right-hand corner) to Preview your blog without the Navbar displaying above the header
  10. Click the Save icon (located next to the Preview icon)


Method 2: Steps to Remove or Hide the Blogger Navbar

This second method of deleting or removing the Blogger Navbar is done through a change to the Blogger template. Essentially it hides the Navbar with code but does not actually delete the code.
  1. Sign in to Blogger and select the blog you wish to change
  2. From the Blogger Dashboard go to Theme
  3. Click the orange down arrow next to the Customize button
  4. Click Backup to back up your blog before proceeding
  5. Once backed up click on Edit HTML from the drop down menu by clicking on the down arrow once again
  6. Click anywhere inside the template and then search the following code using CTRL + F (PC) or CMD + F (Mac) to bring up the search box: ]]></b:skin>
  7. Insert the code below just before the ]]></b:skin> tag


    #navbar-iframe {
    height: 0px;
    visibility: hidden;
    display: none;
    }

  8. When you are satisfied click on the Save button to save your changes
  9. Click on View Blog to admire your Blogger blog with the Navbar removed

Blogger Tip:
If you decide that you want to reinstate the Blogger Navbar you can do one of two things:
  1. Simply remove the code you inserted:

    #navbar-iframe {
    height: 0px;
    visibility: hidden;
    display: none;
    }

  2. Or comment out the code like this

    /*
    #navbar-iframe {
    height: 0px;
    visibility: hidden;
    display: none;
    }*/

Summary

Today I have explained how to turn the Blogger Navbar off and on in the Navbar Gadget. I have also shown you an easy trick to remove or alternatively hide the Blogger Navbar using the hardcode method. By adding a short piece of code to your Blogger template the Blogger Navbar can be hidden from view. I have also shown you what to do if you need to reinstate a missing Blogger Navbar.


Related Links

How to Change the Color of the Blogger Navbar
How to Add a Copyright Notice to a Blogger Blog
How to Add a Print Friendly Button to Blogger
How to Backdate Blogger Posts to Publish Articles on a Retrospective Date
How to Remove Blogger Labels Counter
Add a Follow Me Twitter Icon Button to Blogger
Make Money From Affiliate Banners with Blogger
How to Get More Adsense Clicks with Blogger
Easy Ways to Put Banners on Blogger


Monday, March 7, 2022

How to Change the Color of the Blogger Navbar Menu

This Blogspot tutorial shows you how to change the color of the Blogger Navbar which appears above the header in older Blogger themes when enabled. Changing the color of the Blogger Navbar so that it matches the color scheme of your Blogger blog takes less than a minute and is an easy trick that requires no change to the Blogger code as all changes are done in the Navbar Gadget. Updated April 2022

To go straight to the step-by-step tutorial on how to change the color of the Navbar or read on for details about the Navbar and its purpose.
How to Change the Color of the Blogger Navbar or Delete It 2022

What is the Blogger Navbar?

The Blogger Navbar is the colored or sometimes transparent search bar menu that appears by default at the top of older Blogger themes above the header. The Navbar provides quick navigation links that make it easy to jump to the Blogger Dashboard, start a new post, access Theme Designer or share a page directly from your live blog.

Example of an Active Blogger Navbar Read On to Learn how to Change the Color
Blogger Navbar Example

Currently Blogger offers the choice of 6 different Blogger Navbar colors: blue, tan, black, silver, transparent light and transparent dark. Transparent light and transparent dark are the most recent additions. It is uncertain how likely it is that Blogger will continue to offer more color options for the Navbar in the future as Google has announced that it will not be developing the Blogger platform anymore.

How to Change the Color of Blogger Navbar - The Blogger Navbar offers a choice of 6 Colors that can be selected in the Navbar Gadget
The Blogger Navbar Gadget Can be Customized to 6 Different Colors
along with the option to turn it off


Which Blogger Themes Have a Navbar Enabled?

Historically Blogger had the Navbar enabled by default on all blogs however these days the Navbar only displays at the top of a blog on some of the older themes like Simple, Picture Window and Awesome Inc. If you are using a newer theme or have a third party theme it will not show up automatically and would need to be enabled. If you want to know more about how to turn on the Navbar keep reading as this Blogger tutorial covers this too.

If you would like to learn how to remove the Blogger Navbar to stop it showing up I touch on this in this tutorial but for more in-depth coverage of the topic I discuss several methods in my Blogger Tutorial on How to Remove or Disable the Blogger Navbar


How To Change the Color of the Navbar / Search Bar / Menu Bar on Blogger

Below is a step-by-step walkthrough of how to change the color of the menu bar above the header in Blogger.
  1. Sign in to Blogger and select the blog you wish to change

  2. From the Blogger Dashboard go to Layout Menu

  3. Find the Navbar section in Layout typically found at the top in the Blogger Layout Designer.

  4. Click the Edit link which appears on the right side of the Navbar Gadget.


  5. Click on the Edit Link to Open the Navbar Gadget in the Layout Page of Blogger to Change the Color of the Navbar
    Click on the Edit Link to Open the Navbar Gadget
    in the Layout Page of Blogger


    Edit Blogger Navbar - Former Blogger Navbar Layout Circa 2009  Showing Position of the Edit Button
    Former Blogger Navbar Layout Circa 2009
    Showing Position of the Edit Button


  6. Select the color of your choice by clicking on the radio button on the left side of each color in the pop up Navbar Configuration window that appears.

    If you want to turn off the Navbar altogether click on the off radio button found at the bottom of the menu of choices in the Navbar configuration window.

    Turn Blogger Navbar Off By Clicking on the Radio Button at the Bottom of the Navbar Configuration Pop-up Window
    Turn Blogger Navbar Off By Clicking on the Radio Button
    at the Bottom of the Navbar Configuration Pop-up Window


  7. Once you have made your selection click on the Save Button to save your changes

  8. Click View Blog to see the effect of changing the color of the Blogger Navbar to more closely match the design and style of your blog.

    Or if you have turned the Blogger Navbar off you will see that the Navbar has disappeared from the top of your blog.

Summary

In today's Blogger Tutorial I have discussed what the Blogger Navbar is, its uses and what Blogger themes have it by default. I have shown you how to change the color of the Blogger Navbar on your blog via the Navbar Gadget to one of six custom choices so that it matches the color and design of your blog.


Related Links

How to Remove or Hide the Blogger Navbar with HTML
How to Change Image Sizes in a Blogger Blogspot Blog
How to Change Image Sizes in Own custom Dimensions in a Blogger Post
How to Add a Print Friendly Button to Blogger
How to Change the Date of Blog Posts in Blogger
How to Remove Blogger Labels Counter
Add a Follow Me Twitter Icon Button to Blogger
Easy Ways to Put Banners on Blogger
How to Add a Welcome Message to Blogger Homepage
How to Unlock or Delete Locked Widgets in Blogger


Sunday, March 6, 2022

How to Add an Atom Blogger Sitemap to Google Search Console 2022

In this Blogger tutorial you will learn how to create an atom Blogger sitemap and add it to Google Search Console to improve search engine indexing of your Blogger blog (Blogspot blog). There are different kinds of sitemaps but for today we will be submitting an atom sitemap to Google. This is a quick five minute task which regardless of your technical skills can easily be achieved and will help discovery of your blog posts.

How to Add an Atom Sitemap to Google Search Console for a Blogger Blog in 2022


Benefits of Adding a Blogger Sitemap to Google Search Console?

Google Search Console is a free tool from Google formerly known as Google Webmasters that will help you track indexing of your Blogspot blog on the Google Search Engine. The benefits of creating and adding a sitemap of your Blogger blog to the Google Search Console is to aid crawling both of new posts and pages and those your have updated.
Get Blogger Blog indexed by Google by adding a sitemap to Google Search Console

The atom sitemap we will be adding today tells Google to index the first 500 posts on your blog as a batch. Once your blog is nearing 500 posts you will need to add another sitemap for 1000 posts to the Google Search Console.

The atom sitemap will help the Google crawler find posts and pages up to 500 in total and encourage it to check back often for changes. The end result is that Google is more likely to discover posts and index these which in turn will mean better SEO and increased traffic to your blog.
Benefits of Adding a Sitemap of a Blogger Blog to Google Search Console to Improve Indexing and Discovery of Blog Posts

Follow the easy steps below to learn how to create a sitemap for your Blogger blog and how to submit a sitemap to the Google Search Console.

How to Create and Add a Sitemap to Google Search Console for a Blogger Blog


Step 1
Login to Blogger

Step 2
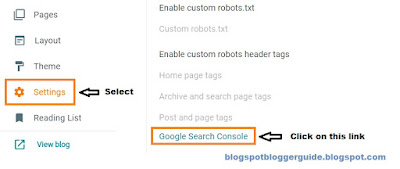
Select Settings from the left-hand menu

Step 3
Scroll down about two thirds of the way until you find Search Preferences in the menu that opens up

Step 4
Then click the Google Search Console link to open Google Search Console in a new page.


How to Access Google Search Console from a Blogger Blog via Blogger Settings Menu


If for any reason you are unable to bring up the Google Search Console then go to:
https://search.google.com/search-console


Step 5
Once in the dashboard of Google Search Console find your blog by selecting it in the property selector. If you only have one blog then click on your blog's name in the selector window. If you have more than one blog you will need to select it using the down arrow found at the top left-hand corner under the Google Search Console logo.

Click on the domain name of your Blogger blog next to the Blogger icon that appears in the property selector.


How to Find your Blogger blog in the Google Search Console Property Selector


If your Blogger blog is not listed in the property selector list then you can add it by clicking on the +  add property icon found at the bottom of the dropdown list.  You may need to start typing the name of your blog to bring up the + Add Property icon.

Step 6
Having selected your blog from the Property Selector now click on Sitemaps from the left-hand menu


Choose Sitemaps in Google Search Console Menu to Add a New Sitemap for a Blogger Blog


Step 7
In the Sitemaps main page you will see any sitemaps already added.

Under Add a New Sitemap enter the following to add a sitemap of your Blogger blog

https://yourblog.blogspot.com/atom.xml?redirect=false&start-index=1&max-results=500

Note: Change yourblog in blue to the name of your Blogger blog


How to Enter a New Atom Sitemap in Google Search console for Blogger Blog


Step 8
Click Submit

Step 9
You will then get a popup message advising that the submission has been successful. You will see the atom sitemap has been added to the list of sitemaps for your Blogger blog.


Sitemap Successful Submission Notice in Google Search Console


Other information that you will be able to see:

  • type of sitemap
  • date submitted
  • date last read
  • status - this should read success
  • number of discovered URLs  - the number of URLs found automatically by the sitemap


Note: If you have a lot of URLs not found by the sitemap it might be because your Blogger blog is older and Google is not able to easily discover these posts in which case adding an HTML sitemap is a good idea.


Summary

In this Blogger tutorial you have learnt how to create and add an atom Blogger sitemap to Google Search Console to encourage Google to index your posts and pages. The advantage of adding an atom sitemap is help the search engine crawlers discover pages on your Blogger blog and index these. As the number of blog posts increases on your Blog you will need to eventually add another sitemap and this needs to be done prior to the total number of posts exceeding 500.


Related Articles

How to Add a Copyright Notice to a Blogger Blog
How to Add a Sticky Message Above Blogger Posts
How to Add a Welcome Message to a Blogger Homepage
How to Change the Color of the Blogger Nav Bar
Why Blogger is a Better Blogging Platform than Wordpress
How to Choose a Great Topic for a Blogger Blog in 2020